Tuesday, 7 June 2011

Tiddly Inks - Going goth


Goedemorgen, het is weer tijd voor een nieuwe challenge van Tiddly Inks en deze week willen we graag gothic kaartjes zien. Christy van Tiddly Inks heeft een hele verzameling met cute gothic afbeeldingen, dus het is dan ook niet moeilijk om de perfecte afbeelding voor deze challenge te vinden! :) Gothic en donkere kaartjes zijn niet helemaal mijn stijl, maar toch vond ik het erg leuk om te doen! Ik heb mijn kaart gemaakt met de afbeelding Spooky birthday uit het Gothic cute gedeelte van de Tiddly Inks shop.
Ik heb zoals altijd de afbeelding gekleurd met potloden en een zwarte glaze pen gebruikt om de ogen te kleuren. De afbeelding heb ik daarna uitgeknipt. Op een zwarte kaart heb ik een laag paars co'ordinations papier geplakt. De randen van het papier heb ik eerst gedistresst. Rondom het paarse papier heb ik een grote strik gemaakt van zwart tule. De strik wordt bij elkaar gehouden met een knoop en een strikje zwart bakers twine. Het spinneweb was ooit eens een freebie van Christy en over het web heb ik ook nog een stuk zwarte tule gebonden.

Goodmorning, it is time for a new challenge from Tiddly Inks and this week we would love to see gothic cards. Christy has a large collection with cute gothic images, so it wasn't really hard to find the perfect image for this challenge! :) Gothic and dark  cards aren't my style, but I had real fun when I was making my card this week! I have used the image Spooky birthday for my card and you can fidn her here in the cute gothic part from the Tiddly Inks shop. As always I have used pencils to colour my image and I used a black glaze pen for the eyes. Then I cut the image out. I added a layer of purple co'ordinations paper on a black card. I distressed the edges of the purple paper. I added a large bow from black tulle. I have used a black button and bakers twine to hold the bow together. The spider web has been a freebie a while ago and I wrapped the black tulle around it.


Ik heb voor de binnenkant van de kaart hetzelfde web nog eens in grijstinten geprint. De tekst heb ik geprint en daarna op een stukje van het paarse papier geplakt.

For the inside I printed the spider web again in grey. The sentiment is also printed and then I layered it on purple paper.

**************************************************************************
IMAGE: Spooky birthday and spider web 4 from Tiddly Inks
PAPER: Black, white and purple cs.
ACCESSORIES: Pencils, black glaze pen, black tulle, black button, black bakers twine.

Saturday, 4 June 2011

Stamp something - Use a digi


Goedemorgen! Even gauw mijn kaartje posten, want ik ga vanmiddag lekker op stap met 3 vriendinnen. We hebben al een tijdje geleden kaartjes gekocht voor Mary Poppins en daar gaan we vandaag naar toe. Het is heerlijk weer dus we gaan lekker al vanmiddag zodat we lekker op een terrasje kunnen zitten in aan het strand in Scheveningen. Heerlijk genieten dus! :)
Met mijn kaartje van vandaag wil ik meedoen aan de challenge van Stamp something. Deze week is het hun maandelijkse digi challenge, dus je moet ervoor zorgen dat er een digitale stempel op je kaart zit. Lekker makkelijk dus! De digitale stempel die ik heb gebruikt is van de Wax fruit company en het is Study of tulips. Ik heb de tulpen geprint en daarna ingekleurd met mijn potloden. De afbeelding heb ik daarna uitgeknipt met een klein wit randje langs de afbeelding. Op de kaart heb ik een stuk rood-wit gestipt papier geplakt, nadat ik daar eerst een wit lintje omheen heb gebonden. Op het lintje heb ik nog een strikje gemaakt. De tekst heb ik geprint en daarna geonst met de scalloped tag pons van Martha Stewart. Ik heb twee gaatjes in de afbeelding gemaakt en de tag daarna met een wit lintje aan de afbeelding gebonden.

Hello everyone! This is a quick post, because I have a fun day and evening planned with 3 friends. We bought tickets for Mary Poppins a while back and today we are going to see the show. The weather is lovely so I am looking forward to a drink on a terrace at the beach of Scheveningen! :)
I want to enter my card in the challenge from the Stamp something challenge blog. This week is their monthly digi challenge and the only thing you have to do, is use a digital stamp on your card. Very easy! The digital stamp I used is fropm the Wax fruit company and it is Study of tulips. I have printed the tulips and coloured them with my pencils. I have cut the image out and left a little white border on the image. On my card I adhered a layer of red and white dotted paper after I wrapped a white ribbon around it. I added a little bow on the ribbon. The sentiment (happy birthday) is printed and I punched it with the scalloped tag punch from Martha Stewart. I made two little holes in my image next to a tulip and attached the tag with a white ribbon with a very tiny bow.


**************************************************************************
IMAGE: Study of tulips from The wax fruit companyPAPER: White cs
ACCESSORIES: Pencils, white ribbon.

Friday, 3 June 2011

Stampfairy - Lenny fruits


Goedemorgen, ook vandaag is er weer een nieuwe release van Stampfairy en deze week heeft Gerda een hele leuke collectie getekend met het beertje Lenny. Het design team heeft gewerkt met de afbeelding van Lenny met de perzik. Is het geen schatje? Toen ik deze afbeelding zag moest ik meteen aan het perziken design papier van Magnolia denken, want dat past natuurlijk perfect bij deze afbeelding! Ik heb Lenny ingekleurd met mijn potloden en het was best even zoeken om de perfecte kleur te vinden voor de perzik, Uiteindelijk heb ik moeten mengen met 4 verschillende potloden en nu past het precies bij het design papier. Ik heb de ogen en neus van Lenny gekleurd met een zwarte glaze pen en daarna heb ik Lenny uitgeknipt. Uit het perziken papier heb ik een ovaal gesneden met de nestabilities en die heb ik op een laag groen papier geplakt. Op een witte kaart heb ik een laag kraft papier geplakt en in het midden heb ik nog een strip kraft papier geplakt. Langs de randen van het kraft papier en ook langs de randen van de strip heb ik stiklijntjes getekend met een witte gelpen. De tekst is de freebie die bij deze collectie hoort en die heb ik uitgeknipt na het printen. Als laatste heb ik nog 3 witte hotfix steentjes op de kaart geplakt.

Good morning, Today we have a nother fun new release from Stampfairy for you and this week Gerda has drawn a very cute collection with Lenny the bear. The design team has worked with the image of Lenny holding a peach. Isn't he adorable? When I saw this image I immediately thought about the peach design paper I have from Magnolia, becuase that matches the image so perfect! I have coloured Lenny with my pencils and it was kind of difficult to find the right colour of rthe peach. I ended up with using 4 different colours and now it looks perfect! I have coloured Lenny's eyes and nose with a black glaze pen and after that I cut him out. I have cut an oval from the peach paper with my oval nestabilities and I adhered it on a layer of green paper. I adhered a layer of kraft paper on a white card and in the middle of th card I added a strip of kraft paper. I added faux stitching on the edges of the kraft paper and strip with a white gelpen. The sentiment is a freebie you can find together with the Lenny fruits collection and I have cut him out after I printed it out. And finally I added 3 white hotfix gems. 


En dit is de gehele collectie: Lenny fruits.
And this is the whole collection: Lenny fruits.
**********************************************************************
IMAGE: Lenny fruits collection from Stampfairy
PAPER: White cs, kraft paper, ivy cs from Bazzil,  Design paper from Magnolia
ACCESSORIES:  Pencils, black glaze pen, white gelpen, oval nestabilities, white hotfix.

Thursday, 2 June 2011

MIjn kaarten uit Hobbyjournaal 75

Hallo! Ook deze maand mocht ik weer 2 kaarte maken voor de Hobbyjournaal en ik heb deze keer een gewone kaart en een kerstkaart gemaakt. Ik heb voor beide hetzelfde design papier gebruikt. Hoe de kaarten gemaakt worden kan je lezen in de Hobbyjournaal.

Hello! This month I was asked again to make a couple of cards for the Dutch magazine Hobbyjournaal and this time I have made a normal card and a christmas card. I have used the same desing paper for both the cards.


PAPER: White cs, Delight from Pebbles inc.
INK: Versafine onyx black
ACCESSORIES: Pencils, black glaze pen, circle nestablities.glitter, snowflake punch, circle punch, white ribbon, black hotfix.


PAPER: White and black cs, Delight from Pebbles inc.
INK: Versafine onyc black
ACCESSORIES: Pencils, black glaze pen, black hotfixm black fineliner

Tuesday, 31 May 2011

Tiddly Inks - Darling Diva


Goedemorgen! Vandaag hebben we weer een hele leuke nieuwe challenge van Tiddly Inks. We willen namelijk een diva zien op je kaart. Christy heeft een aantal geweldige afbeeldingen die perfect zijn voor deze challenge, je kunt ze allemaal vinden in de Tiddly Inks shop. Ik heb gekozen voor Supahstar. Ik heb de afbeelding ingekleurd met mijn potloden. De brilglazen, het tshirtje en haar laarzen heb ik gekleurd met een zwarte spica glitter pen, want een diva kaart kan natuurlijk niet gemaakt worden zonder glitter! Ik heb de afbeelding uitgesneden met de ovalen nestabilities en met de zwarte spica pen heb ik een stiklijntje langs de rand van de ovaal getekend. Ik wist dat ik ergens nog zwart glitter papier had liggen dat ik al jaren heb en dat was perfect voor deze kaart. Ik heb er een strip van gesneden en met een figuurschaar heb ik er een schulprand aan geknipt. Ik heb er zwart baker´s twine rondom gewonden en daar een klein strikje in gemaakt. Van het paarse en zwarte glitter papier heb ik met 3 ponsen allemaal sterretjes gemaakt en die heb ik op de achtergrond van de kaart geplakt.

Good morning! Today we have a fun new challenge from Tiddly Inks. We want to see a diva on your card. Christy has lots of images perfect for this challenge, you can find them all in the Tiddly Inks shop. I wanted to make a card with Supahstar. I have coloured the image with my pencils. I have coloured her glasses, shirt and boots with a black spica glitter pen, because you can´t make a diva card without glitter! I have cut the image with my oval nestabilities and added faux stitching with the black spica glitter pen. I had some black glitter paper somewhere in my stash and it is perfect for this card. I cut a strip and added the scalloped border with shaped scissors. I wrapped black baker´s twine around it and made a little bow. I have punched the stars with 3 different punches for the background.

********************************************************************
PAPER: White cs, papicolor, black glitter paper
ACCESSORIES: Pencils, black spica glitter pen, oval nestabilities, star punches, shaped scissors, black bakers twine.

Monday, 30 May 2011

Stampfairy challenge - Sketch


Goedemiddag! Ik heb een kaartje gemaakt voor de stampfairy challenge van deze week. Deze week hebben we namelijk een hele leuke sketch en daar wilde ik heel graag aan meedoen.

Hello everyone! I made a card for the Stampfairy challenge from today. This week we have a really lovely sketch and I really wanted to use it for a card.


De Stampfairy afbeelding die ik heb gebruikt is Betsy. Ik heb Betsy ingekleurd met potloden en haar ogen heb ik gekleurd met een zwarte glaze pen. Langs de randen van de rechthoek waarop ik haar heb geprint heb ik met een zwarte fineliner stiklijntjes aangebracht. Als basis heb ik een rode kaart genomen en daarop heb ik een laag wit papier geplakt. Op deze laag wit papier heb ik de koeievlekken gestempeld met een stempelset van Elzybells. De tekst komt ook uit deze zelfde stempelset. De rondjes zijn gemaakt met de nestabilities en ook hier heb ik stiklijntjes op getekend. De bloemetjes heb ik gemaakt met een stansje van My favorite things. In het midden van de bloemen en naast de afbeelding heb ik een paar zwarte hotfix steentjes geplakt.

The stampfairy image I used is Betsy. I have coloured Betsy with my pencils and her eyes are coloured with a black glaze pen. I added faux stitching on the edges of the rectangle. I used a red card for my base and added a layer of white paper. I stamped the cow spots on it with a stamp set from Elzybells. The sentiment is also from the same stampset. I made the circles with the nestabilities and again I added faux stitching. The flowers are made with a die from My favorite things. In the centers of the flowers and next to the image I added a couple of black hotfix gems.

 
************************************************************************
IMAGE: Betsy from Stampfairy, What's moo from Elzybells
PAPER: Red and white cs
INK: Memento tuxedo black
ACCESSORIES: Pencils, black glaze pen, black fineliner, gingham ribbon, circle nestabilities, Flower trio and leaf trio dienamic die from My favorite things, black hotfix.


En ook vandaag is er weer een nieuwe release bij Stampfairy:
And today we have a new release from Stampfairy:

Sunday, 29 May 2011

Tiddly Inks - Weddingbugg

Goedemorgen, vandaag laat ik twee kaartjes zien die ik heb gemaakt met de schattige afbeelding Wedding huggabugg van Tiddly Inks. Ik heb voor beide kaartjes de afbeeldingen ingekleurd met mijn potloden en op de uiteindes van de voelsprieten heb ik zwarte hotfix steentjes geplakt. Ik heb de afbeelding uitgeknipt en met foamtape op de kaart geplakt.

Goodmorning, today I am showing 2 cards that I made with the cute image Wedding huggabugg from Tiddly Inks. I have coloured the image with my pencils for both cards and I added black hotfis gems on the end of the antenna's. I have cut the images out and used foamtape to adhere the images on my cards.

Het eerste kaartje is een rond kaartje geworden. Ik heb de kaart gesneden met de ronde nestabilities. Op de rode kaart heb ik een laag zwart stipjes papier geplakt, maar daar heb ik eerst een wit lint omheen gebonden. Ik heb het lint bij elkaar gebonden met een stukje rode bakers twine en daarna heb ik de afbeelding op de kaart geplakt.

The first card is a circle card. I have cut the card with the circle nestabilities. On the red card I adhered a layer of black dotted paper, but I first wrapped a white ribbon around it. I used a piece of red bakers twine and made a little bow with it. Then I adhered the image on the card.


En dit is het tweede kaartje. Ik heb op de witte kaart een laag rood papier geplakt en daar weer bovenop een laag wit papier. Het witte papier heb ik geëmbost met de swiss dots embossingfolder van provocraft. Ik heb uit rood en wit papier twee circles uitgesneden met mijn nestabilities en daar heb ik de afbeelding op geplakt. De tekst heb ik op de computer gemaakt en die heb ik op een rood papier geplakt. Het geschulpte randje heb ik met een figuurschaar uitgesneden. De rode roosjes heb ik gemaakt van vilt met een stansje van Marianne design. De blaadjes zitten bij dezelfde stans en die heb ik uit groen papier gestanst.

Met dit kaartje wil ik graag meedoen aan de volgende challenges:
And this is the second card. I have adhered a layer od red and white paper on a white card. The white paper is embossed with the swiss dots embossingfolder from Provocraft. I have cut two circles out of red and white paper and adhered the image on it. I made the sentiment strip on my computer and adhered it on red paper. I made the scalloped border with shaped scissors. The red roses are made from red felt with a die from Marianne design. The leaves are from the same die and I made them from green paper.


I want to enter my card in the following challenges:
*******************************************************************************
PAPER: Red and white cs, ivy cs from bazzil.
ACCESSORIES: Pencils, black hotfix, glitter, circle nestabilities, swiss dots embossingfolder from Provocraft, white ribbon, red bakers twine, red felt, Creatables LR0162 from Marianne design, shaped scissor.

Saturday, 28 May 2011

A hanglar double pocket card


Goedemorgen! Ik heb dit kaartje afgelopen week gemaakt voor een lieve vriendin. Ik moest haar nog steeds een pakketje toesturen, maar dat duurde even, maar nu eindelijk heb ik mijn pakketje op de bus gedaan samen met nog een verrassing voor haar. Ze heeft het pakketje nog niet binnen, dus het is al een kleine sneak peek voor haar! :) Ik heb een stempel uit de sailor kids set van Hanglar gebruikt. Ik heb de afbeelding ingekleurd met mijn potloden en de ogen van het meisje zijn gekleurd met een zwarte glaze pen. Ik heb de afbeelding uitgeknipt en met foamtape op de kaart geplakt. Ik wil graag meedoen aan de challenge van Double Dutch en daar moet je deze keer een dubbele pocket kaart maken. Ik had dit nog nooit gedaan, maar het was heel erg leuk om te doen! Op het Double Dutch blog staat een link naar een tutorial hoe je zo'n kaart moet maken. Ik heb voor de kaart rood streepjes papier gebruikt en donkerblauw papicolor papier. Op het blauwe papier heb ik met versamark inkt stippen gestempeld met de Polka dots basics set van Papertrey Ink. Daarna heb ik witte embossingpoeder gebruikt. Het label heb ik van een strip papier gesneden en ik heb er een rode eyelet aan bevestigd. De tekst is een stempel van My favorte things en die heb ik met donkerblauwe inkt gestempeld. Langs de rand van het label heb ik een stiklijntje getekend met een blauwe fineliner.

Ik wil met mijn kaartje ook graag meedoen aan de challenge van Lovely Hanglar only waar ze deze week om stippen vragen op je kaart en bij de Just magnolia en Hanglar challenge blog willen ze graag dat je iets maakt voor een vriend.


Good morning! I made this card last week for a seet friend. I had to send her a package, but that took me some while to do it, but now I have finally posted the package together with a surprise for her. She hasn't received my package yet, so I guess this is a little sneak peek for her. I have used a stamp from the sailor kids stamp set from hanglar for my card. I have coloured the image with my pencils and I coloured her eyes with a black glaze pen. I have cut the image out and adhered it with foamtape on my card. I want to enter my card my card in the Double dutch challenge blog. This week they have the challenge to make a double pocket card. I had never done this, but it was really fun to do! You can find a link to a tutorial on the Double Dutch challenge blog. I have used red striped paper and dark blue papicolor paper for my card. I stamped dots on the blue paper with versamark ink with the Polka dots basics set from Papertrey Ink. Then I added white embossing powder. I have cut the label from a strip of white paper and used a red eyelet. The sentiment is a stamp from My favorite things and I stamped with blue ink. I added faux stitching with a blue fineliner.

I also want to enter my card in the following challenges. The lovely Hanglar only challenge blog is asking for dots this week and at the Just magnolia and Hanglar challenge blog they want to see a special project for a friend.


******************************************************************

IMAGE: Sailor kids from Hanglar, Polka dots basics from Papertrey Ink, Pure innocence- Something special just for you from My favorite things.
PAPER: White cs, darkblue cs.
INK: Versafine onyx black, versamark, darkblue ink
ACCESSORIES: Pencils, black glaze pen, red eyelet, white ribbon, blue fineliner, white embossing powder

Friday, 27 May 2011

Stampfairy - Herb patriot


Hallo! Vandaag hebben we weer een nieuwe release van Stampfairy en deze week heeft Gerda een collectie getekend van Herb de beer die de Amerikaanse onafhankelijkheidsdag aan het vieren is. Het was dan ook meteen makkelijk om te kiezen in welke kleuren ik mijn kaart ging maken, namelijk de kleuren van de Amerikaanse vlag. Ik heb een rode kaart genomen en daarop een laag blauw gestreept papier geplakt. De bovenkant van het gestreepte papier heb ik rond afgesneden. Om de ronde vorm te krijgen heb ik een schotel op het papier gelegd en de rand met een potlood afgetekend. Daarna even netjes afknippen en voila ik had een ronde bovenkant. De sterretjes zijn stickers. Ik heb Herb ingekleurd met potloden en zijn ogen zijn gekleurd met een zwarte glaze pen. De afbeelding heb ik uitgesneden met de vierkante nestabilities. De tekst is een freebie die bij deze Herb patriot collectie hoort. Ik heb het randje en de hartjes gekleurd met een rood potlood en daarna heb ik de cirkel uitgeknipt.
Ik wil met mijn kaart meedoen aan de challenge van Stamptacular sunday waar ze tenminste één beer op je kaartje willen zien.

Hello! Today we have a new release from Stampfairy and this week Gerda has drawn a collection stamps from Herb the bear who is celebrating independence day. It was really easy to choose the colours for my card, because I used the colours from the american flag. I used a red card and added a layer of blue striped paper. I used a plate to cut a round shape on top of the blue striped paper. The stars are peel offs. I have coloured Herb with my pencils and I coloured his eyes with a black glaze pen. The image is cut out with the square nestabilities. The sentiment circle is the freebie from the Herb-patriot collection. I have coloured the edge and the little hearts with a red pencil and then I cut it out.
I want to enter my card in the Stamptacular sunday challenge where they want to see at least one bear on your card.


En dit is de gehele Herb-patriot collection.

This is the whole Herb-patriot collection.

******************************************************************
IMAGE: Herb-patriot from Stampfairy
PAPER: Red cs and blue striped paper
ACCESSORIES: Pencils, black glaze pen, star peel offs, white gelpen, square nestabilities.

Wednesday, 25 May 2011

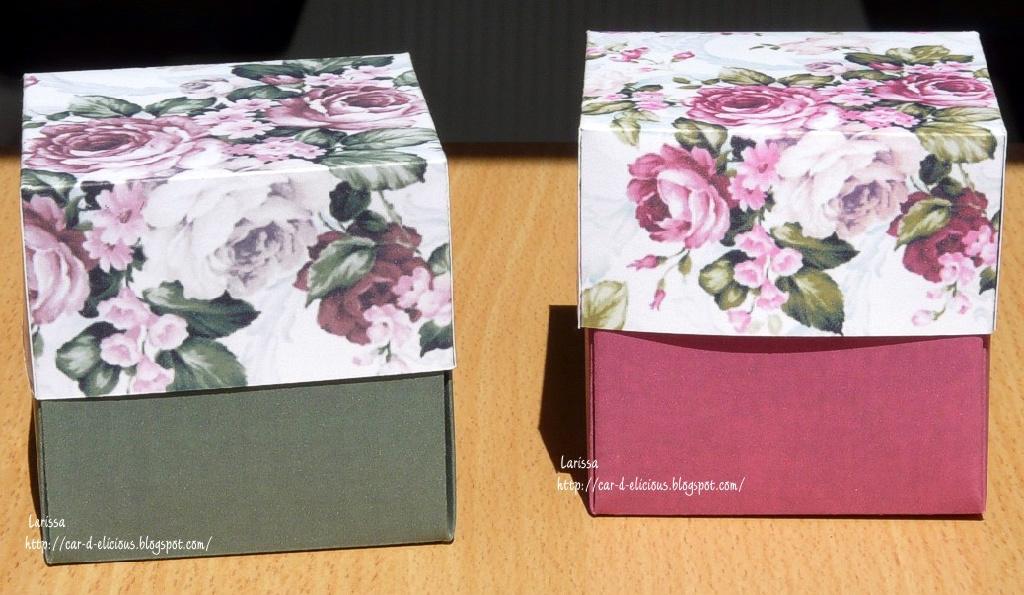
Theedoosjes


Hallo! Afgelopen weekend heb ik deze theedoosjes gemaakt. Het bloemenpapier dat ik ervoor heb gebruikt heb ik ooit eens ergens gedownlod en ik zou nu echt niet meer weten waar het vandaan komt.


Hello! I made these little tea boxes last weekens. I have downloaded the flower paper that I used for them a long time ago and I don't know where I got it.


Als je het doosje opent zitten er 4 theezakjes in en in het midden van het doosje heb ik een heerlijke ferrero rocher geplaatst.

If you open the box, you will find 4 bags of tea and a delicious ferrero rocher.


De theezakjes zijn met een lintje vastbegonden aan het doosje. Achter de theezakjes heb ik nog een klein stukje van het bloemenpapier geplakt. De ferreo rocher heb ik vastgeplakt met een gluedot zodat hij niet gaat schuiven in het doosje.

The tea bags are attached to the box with a white ribbon. Behind the tea bags I adhered another piece of the flower paper. I used a gluedot to adhere the chcoclate to the box.


De theezakjes heb ik uit hun oorspronkelijke verpakking gehaald en daarna heb ik van het bloemenpapier er zelf een verpakking voor gemaakt. De randjes heb ik geëmbost met een mal van de cuttlebug.

I have made a new package for the teabags from the same flower paper. I emobbsed the edges of the package with an embossing folder from cuttlebug.


En dit is nog eens de de binnenkant van het doosje met de groene onderkant.

And this is the inside of the green box.

Voor iedereen die graag wil weten hoe je dit doosje maakt, ik heb er ooit eens voor Tiddly Inks een tutorial over gemaakt en die kan je hier vinden: klik. :)

For everyone who wants to know how you can make a box like this, I have written a tutorial for Tiddly Inks about it a while ago and you can find it here: click :).

LinkWithin

Related Posts with Thumbnails