Showing posts with label Boekenlegger. Show all posts

Saturday, 4 May 2019

Di's digi design challenge - Anything but a card


Goedemorgen! Vandaag post ik een project voor de nieuwe challenge op het Di's digi designs challenge blog. Deze week willen we graag iets anders dan een kaartje zien. Ik heb ervoor gekozen om een boekenlegger te maken. Ik heb een e-reader, maar ook gewoon nog heel veel papieren boeken en de laatste tijd heb ik weer even veel papieren boeken gelezen. Ik vond het altijd al leuk om zelf boekenleggers te maken en ik heb in het verleden dan ook al een aantal boekenleggers gemaakt. Ik gebruik al een tijdje een "oude" boekenlegger en was wel weer toe aan een nieuwe.

Op de boekenlegger heb ik de digitale stempel What's up van Di's digi stamps gebruikt. Ik heb de giraf ingekleurd met mijn Polychromos potloden en de zwarte glaze pen. Ik heb de vleugels van de giraf gekleurd met de Clear Spectrum noir sparkle glitter pen. Daarna heb ik de afbeelding uitgeknipt. Mijn boekenlegger is gemaakt van kraft karton. Ik heb met een zwarte fineliner een kader getekend op de voorkant. Ik heb de giraf daarna op de boekenlegger geplakt. Uit rood karton heb ik een aantal kleine bloemetjes gestanst en die heb ik rondom de giraf op de boekenlegger geplakt. Met de zwarte glaze pen heb ik een stipje op alle bloemen getekend.


Goodmorning! Today I am posting a project for the new challenge on the Di's digi designs challenge blog. This week we want to see something else than a card. I decided to make a bookmark for this challenge. I do have an e-reader, but also lots of paper books. Lately I have been reading many paper books. I have always loved to make my own bookmarks and have already made many bookmarks. At the moment I have been using my "old" bookmark for a while now and I think is is the right time for a new one! 

On the bookmark I have used the digital stamp What's up from Di's digi stamps. I coloured the giraffe with my Polychromos pencils and the black glaze pen. I coloured the wings with the Clear Spectrum noir sparkle glitter pen. Then I have fussy cut the image. My bookmark is made from kraft cardstock. I have drawn a stitched frame on the front with a black fineliner. Then I glued the giraffe on the bookmark. I have die-cut a couple of tiny flowers from red cardstock and glued those around the giraffe on the bookmark. I added a dot with the black glaze pen in all the centers of the flowers. 


Ik heb binnen in de boekenlegger een magneetvel van de Action geplakt, zodat de boekenlegger niet zomaar uit mijn boek kan vallen.

I have glued a magnet sheet from the Action inside the bookmark, so it doesn't fall out of my book very easily.


STAMP: What's up from Di's digi stamps
COLORING MEDIUM: Polychromos pencils
PAPER: Kraft paper and red cs
DIES: Flower die
ACCESSORIES: Black glaze pen, Clear Spectrum noir glitter sparkle pen, black fineliner, magnet sheet from the Action

Saturday, 2 February 2019

Mama elephant - Little bunny agenda paperclips


Voor dag 2 post ik vandaag een klein projectje. Ik vond een tijdje geleden bij het opruimen een aantal zakjes met plastic paperclips van de V&D en deze zijn echt perfect om te versieren. Er kan maar een heel klein stempeltje op. De schattige konijnen van de stempelset Little bunny agenda van Mama elephant zijn echt het perfecte maatje. Ik heb een aantal afbeeldingen gestempeld en deze daarna ingekleurd met mijn Polychromos potloden en de zwarte glaze pen. Ik heb de afbeeldingen daarna uitgeknipt. Met de Crea-nest-lies XXl 41 van Crealies heb ik daarna kleine cirkels uit ruitjes papier van het Tiny check paperpad en Tiny check brights paperpad van My favorite things gestanst. Ik heb de cirkels op mijn paperclips geplakt en daarna heb ik de afbeeldingen op de paperclips geplakt. 


On day 2 I am posting a little project. A while ago I found a couple of bags of plastic paperclips from a dutch store that no longer exists. These paperclips are perfect to decorate. You have to use a tiny stamp on them, so the cute bunnies from the stampset Little bunny agenda from Mama elephant are perfect for them. I stamped a couple of bunnies and coloured those with my Polychromos pencils and the black glaze pen. I have fussy cut all the images. With the Crea-nest-lies XXl 41 from Crealies I have die-cut a couple of tiny circles from the Tiny check paperpad and Tiny check brights paperpad from My favorite things. I glued the design paper on the paperclips and then I glued the image on top of it.


I want to enter this card in the following challenges:
STAMP: Little bunny agenda from Mama elephant
COLORING MEDIUM: Polychromos pencils
PAPER: White cs, Tiny check and Tiny check brights paperpad from My favorite things
INK: Versafine onyx black
DIES: Crea-nest-lies XXL 41 from Crealies
ACCESSORIES: Black glaze pen, Paperclips from V&D


Tuesday, 17 July 2018

A little something for my nephews


Goedemorgen! Vandaag post ik 2 kaarten die ik voor mijn neefjes Menno en Niek heb gemaakt. Ze hebben beide hun schoolrapport gehad en als tante moet je dan natuurlijk wel een kleine beloning geven voor hun rapport. Ik heb een kaartje gemaakt voor de jongens met daarop een beer die geld vast houdt. Binnen in de kaart heb ik nog een losse boekenlegger voor de jongens gedaan.


Goodmorning! Today I am posting 2 cards that I have made for my nephews Menno and Niek. It is the end of the school year and they both got their report cards. So I had to give them a little something for their report cards. I made a card with a bear on it that holds some money in its paws. Inside the card I added a bookmark for both the boys.


Voor de kaart heb ik twee panda's gemaakt met de Cute cat bookmark die van Your next stamp en de Cute animals add-on van Your next stamp. Eén van de panda's heb ik op de voorkant van de kaart geplakt. Ik heb de panda en alle losse onderdelen uit wit karton gestanst en daarna heb ik de oren gekleurd met Worn lipstick distress inkt. Het lijf en de vlekken van de panda heb ik gekleurd met Black soot en Hickory smoke distress inkt. Ik heb op de voorkant van de kaart een rechthoek geplakt die ik heb gestanst van groen design papier van het Kraft in color - color paperpad van Doodlebug. Ik heb de rechthoek uitgestanst met de Crea-nest-lies XXL 52 van Crealies. Ik heb daarna de panda met foamtape op de kaart geplakt. Vervolgens heb ik een briefje van 10 euro in zijn pootjes geschoven. Ik heb een tekst uit wit karton gestanst met de Little lowercase letters van My favorite things en die heb ik boven en onder de panda geplakt.


For this card I made two panda's with the Cute cat bookmark die from Your next stamp and the Cute animals add-on from Your next stamp. I glued one of the panda's on the front of the card. I have die-cut the body and all the other parts from white cardstock. I have coloured the inner part of ears with Worn lipstick distress ink. I have coloured the body and other parts with Black soot and Hickory smoke distress ink. On the front of a white card I adhered green design paper from the Kraft in color - color paperpad from Doodlebug. I have die-cut the green design paper with the Crea-nest-lies XXL 52 from Crealies. I adhered the panda with foamtape on the front of the card. I have die-cut a sentiment (well done) from white cardstock with the Little lowercase letters from My favorite things and glued it above and below the panda.


Ik heb de binnenkant van de kaart versierd met een pocket die ik heb gemaakt van hetzelfde design papier dat ik op de voorkant van de kaart heb gebruikt. Ik heb de pocket uitgestanst met de Gift bag die van Waffleflower. In de pocket heb ik de tweede panda geplaatst. De panda is eigenlijk bedoeld als boekenlegger, dus ik heb ik hem niet vastgeplakt. Op de pocket heb ik met de Little lowercase letters van My favorite things de naam van mijn neefje Niek gemaakt.


I have decorated the card with a pocket that I have made from the same design paper that I used on the front of the card. I have die-cut the pocket with the Gift bag die from Waffleflower. I have placed the second panda inside the pocket. It is actually a bookmakr , so I didn't use glue. On the pocket I have made the name from my nephew Niek with the Little lowercase letters from My favorite things.


Ik heb ook nog een boek gekocht voor mijn neefjes. Niek is gek op dieren en daarom is dit boek over een dierenwinkel het perfecte boek voor hem!


I also bought a book for my nephews. Niek is crazy about animals and I think this book about an pet shop is the perfect book for him!


Voor het kaartje van Menno heb ik 2 beren uitgestanst met de Cute cat bookmark die van Your next stamp en de Cute animals add-on van Your next stamp. Ik heb de binnenkant van de oren gekleurd met Worn lipstick distress inkt. Voor het lijfje en de oren heb ik Brushed corduroy en Gathered twigs distress inkt gebruikt. Op de voorkant van de kaart heb ik geel ruitjespapier van het Gingham-linen rainbow petite prints paperpad van Doodlebug gebruikt. Ik heb dit uitgestanst met de Crea-nest-lies XXL 52 van Crealies. De tekst is uit zwart karton gestanst met de Little lowercase letters van My favorite things.


For the second card for Menno I have die-cut 2 bears from white cardstock with the Cute cat bookmark die from Your next stamp and the Cute animals add-on from Your next stamp. I coloured the inner part of the ears with Worn lipstick distress ink. For the body and ears I used Brushed corduroy and Gathered twigs distress ink to colour the bear. On the front of the card I used yellow gingham design paper from the Gingham-linen rainbow petite prints paperpad from Doodlebug. I have die-cut the design paper with the Crea-nest-lies XXL 52 from Crealies. The sentiment (well done) is die-cut from black cardstock with the Little lowercase letters from My favorite things.


Ook voor Menno heb ik de binnenkant van zijn kaart versierd. Ik heb weer een pocket uit het gele design papier gestanst met de Gift bag die van Waffleflower en hier heb ik de beren boekenlegger in gestopt. Ik heb de naam van Menno gemaakt met de Little lowercase letters van My favorite things.


For Menno I also decorated the inside of the card with a pocket that I have die-cut from yellow gingham design paper with the Gift bag die from Waffleflower and I put the bear bookmark inside it. I have die-cut the name from black cardstock with the Little lowercase letters from My favorite things.


Ik heb ook voor Menno een boek gekocht. Hij kan zelf al lezen en hopelijk vindt hij dit een leuk boek!


I have also bought a book for Menno. He can read himself and I hope he likes the book!


PAPER: White and black cs, Kraft in color - color and Gingham-linen rainbow petite prints paperpad from Doodlebug
INK: Black soot, Worn lipstick, Hickory smoke, Brushed corduroy and Gathered twigs distress ink
DIES: Crea-nest-lies XXL 52 from Crealies, Cute cat bookmark die and Cute animals add-on from Your next stamp, Gift bag die from Waffleflower, Little lowercase letters from My favorite things 

Tuesday, 19 June 2018

A gorjuss bookmark


Ik had een tijdje geleden in een webwinkel een stempel van Gorjuss besteld, maar toen ik deze echt in mijn handen had, bleek hij echt super groot te zijn. Veel te groot (wat mij betreft) voor een kaartje. Ik moest dus iets anders gaan bedenken wat ik met deze stempel kon gaan doen. Terwijl ik door mijn hobbyspullen aan het zoeken was kwam ik mijn Extreme labels van Crealies tegen en de grootste label heeft echt de perfecte maat voor zo'n afbeelding. Ik heb een grote label gemaakt die ik als boekenlegger ga gebruiken.
Op de boekenlegger heb ik stempels van de set Gorjuss - Time to fly van Santoro gebruikt. Ik heb de afbeeldingen ingekleurd met mijn Polychromos potloden en de zwarte glaze pen. Daarna heb ik de afbeeldingen uitgeknipt. Ik heb met de Extreme labels & tags 05 van Crealies (retired) een grote label uit wit karton gestanst. Op het label heb ik met het Mini cloud edges stencil van My favorite things en Tumbled glass distress inkt een achtergrond gemaakt. Ik heb de onderkant van de tag nog eens gestanst en daarna heb ik een grasrandje aan de onderkant gestanst met de Grassy fields van My favorite things. Ik heb het gras gekleurd met Peeled paint en Forest moss distress inkt en daarna heb ik het samen met de afbeeldingen op de label geplakt. Ik heb witte bakers twine door het gaatje boven in het label gebonden.


A while ago I ordered a Gorjuss stamp from an online store, but when it arrived I was shocked to see how big it is in real. In my opinion it is too big for a card, so I had to think of something else that I can do with this image. When I was looking through al my craft supplies I found the extreme labels from Crealies and the biggest one is the perfect size for the image. So I decided to make a large label that I am going to use as a bookmark. 
On the bookmark I used stamps from the set Gorjuss - Time to fly from Santoro. I have coloured the images with my Polychromos pencils and the black glaze pen and then I fussy cut them all. I have die-cut a lartge label from white cardstock with the Extreme labels & tags 05 from Crealies (retired). With the Mini cloud edges stencil from My favorite things and Tumbled glass distress ink I made a background on the label. I have die-cut the bottom part of the label again and then I made a grassy border on it with the Grassy fields die-namics from My favorite things. I coloured the grass with Peeled paint and Forest moss distress ink and then I glued the grass and all the images on the label. I tied white bakers twine on to the label.


STAMP: Gorjuss - Time to fly from Santoro
COLORING MEDIUM: Polychromos pencils, Distress inks
PAPER: White cs
INK: Versafine onyx black, Tumbled glass, Peeled paint and Forest moss distress ink
DIES: Extreme labels & tags 05 from Crealies (retired), Grassy fields from My favorite things
ACCESSORIES: Black glaze pen, Mini cloud edges stencil from My favorite things, White bakers twine

Saturday, 24 February 2018

Di's digi designs challenge - Die-cuts


Goedemorgen, vandaag begint er weer een nieuwe challenge op het Di's digi designs challenge blog. Deze keer is onze challenge om die-cuts te gebruiken. Ik heb een boekenlegger gemaakt met daarop een schattige beer. Wat mij betreft kun je nooit genoeg boekenleggers hebben, dus ik maak ze heel graag. :)
Ik heb voor op mijn boekenlegger de afbeelding Bookworm bear van Di's digi stamps gebruikt. Ik heb de afbeelding ingekleurd met mijn Polychromos potloden, de zwarte glaze pen en een witte gelpen. Ik heb de afbeelding vervolgens uitgeknipt. Ik heb de boekenlegger gemaakt met een stans van een label. Met de Lea'bilities die - Labels large van Leane creatief heb ik de label uit wit karton gestanst. Ik heb de kleinere vorm van de mal uit zwart-wit stippenpapier van het Do what you love - Pretty paper bloc van Marianne design gestanst. Ik heb deze mal op rood karton gelegd en ik ben met een potlood langs de buitenrand gegaan en daarna heb ik deze vorm uitgeknipt en deze heb ik op het label geplakt. Ik heb met de Stitched borders 3 van Pretty pink posh een rand uit rood karton gestanst en deze heb ik op het label geplakt en daarna heb ik de afbeelding op de boekenlegger geplakt. Binnenin de boekenlegger heb ik 2 magneetjes geplakt, zodat de boekenlegger niet zomaar uit mijn boek kan vallen.


Goodmorning, today a new challenge starts on the Di's digi designs challenge blog. This time we want you to use die-cuts on your creation. I have made a bookmark with a cute bear on it. You can never have enough bookmarks, so I really enjoy making them. 
For my bookmark I have used the image Bookworm bear from Di's digi stamps. I have coloured the image with my Polychromos pencils, the black glaze pen and a white gelpen. Then I have fussy cut the image. I made the book mark with a label die. With the Lea'bilities die - Labels large from Leane creatief I have cut the largest label from white cardstock. I used the smaller shape to cut the label from black and white dotted design paper from the Do what you love - Pretty paper bloc from Marianne design. I put the die on red cardstock and went with my pencil around it and cut the shape out and adhered it on my label. With the Stitched borders 3 from Pretty pink posh I have die-cut a stitched border and I adhered it on the label. Then I adhered the image on the label. On the inside of the bookmark I have attached 2 little magnets, so the bookmark doesn't fall out of your book very easy.


STAMP: Bookworm bear from Di's digi stamps
COLORING MEDIUM: Polychromos pencils
PAPER: White and red cs, Do what you love - Pretty paper bloc from Marianne design
DIES: Lea'bilities die - Labels large from Leane creatief, Stitched borders 3 from Pretty pink posh
ACCESSORIES: Black glaze pen, white gelpen. 

Friday, 19 January 2018

Birdie bookmarks with distress inks


Voor dag 5 heb ik voor een redelijk simpel projectje gekozen. Ik heb namelijk met de silhouette een aantal boekenleggers uit aquarelpapier gesneden en die heb ik gekleurd met verschillende combinaties distress inkt. Ze zijn lekker vrolijk geworden en ze waren zo klaar. Voor de boekenleggers heb ik het bestand Bookmark - Birdie from Alaa' K (31554) gebruikt. Ik heb één grote vogel uitgesneden en 3 kleinere. Ik heb een zwarte hotfix steentje voor het oogje gebruikt.


For day 5 I decided to make a pretty easy project. I used the silhouette to cut a couple of bookmarks from watercolor paper and then I coloured them with distress ink. They are really bright and theye were really fast and easy to make. For the bookmarks I used the file Bookmark - Birdie from Alaa' K (31554). I have cut one large bird and 3 smaller birds. I used a black hotfix gem for the eye of the bird.


Voor de grote vogel heb ik de kleure: Barn door - Spiced marmelade - Mustard seed - Twisted citron - Salty ocean gebruikt.


For the big bird I used the following colours: Barn door - Spiced marmelade - Mustard seed - Twisted citron - Salty ocean.


Voor dit kleine vogeltje heb ik de kleuren gebruikt: Mustard seed - Picked raspeberry - Peacock feathers.


For this little bird I used the following colours: Mustard seed - Picked raspberry - Peacock feathers.


Voor dit kleine vogeltje heb ik de kleuren gebruikt: Spun sugar - Picked raspberry - Seedless preserves.


For this little bird I used the following colours: Spun sugar - Picked raspberry - Seedless preserves.


Het laatste vogeltje is gekleurd met de volgende kleuren: Wilted violet - Picked raspberry - Carved pumpkin.


The last bird is coloured with the following colours: Wilted violet - Picked raspberry - Carved pumpkin.

I want to enter this card in the following challenges:
*********************************************************************************
SILHOUETTE CUTTING FILE: Bookmark - Birdie from Alaa' K (31554)
COLORING MEDIUM: Distress inks
PAPER: Watercolour paper
INK: Barn door, Spiced marmelade, Mustard seed, Twisted citron, Salty ocean, Spun sugar, Picked raspberry, Seedless preserves, Wilted violet, Carved pumpkin and Peacock fethers distress ink
ACCESSORIES: Black hotfix gem

Tuesday, 27 September 2016

Fairytale challenge 152 - Bookmarks


Goedemorgen, het is dinsdag en deze dinsdag betekent dat de nieuwe challenge weer op het Fairytale challenge blog staat. Deze keer is de challenge: Maak een boekenlegger. Heel leuk! Dit jaar ben ik weer een beetje meer beginnen te lezen, na een paar jaar niet zoveel te hebben gelezen en dat bevalt goed! En dan heb je natuurlijk een boekenleger nodig voor alle echte boeken die ik lees, naast de boeken op mijn e-reader.
Mijn favoriete afbeelding voor een boekenlegger is School girl van Tiddly Inks. Ik heb al twee keer eerder deze afbeelding op een boekenlegger gebruikt. ;) Ik heb de afbeelding deze keer redelijk groot geprint en daarna heb ik het meisje ingekleurd met mijn Polychromos potloden en de zwarte glaze pen en daarna heb ik de afbeelding uitgeknipt. De boekenlegger is gemaakt van kraft karton en deze is 10 x 29.6 cm en daarna heb ik hem dubbelgevouwen. Bijna het formaat van een kaart dus. Langs de rechterrand heb ik een strip streepjespapier uit een paperpad van de Action geplakt. Daarnaast heb ik een smalle strip zwart karton geplakt. Met een witte gelpen heb ik stiklijntjes getekend. Uit rood karton heb ik met de hartjesdie van de Pocket tag van Create a smile stamps een aantal hartjes gestanst en deze heb ik naast het meisje geplaatst. Binnenin de boekenlegger heb ik 2 magneetjes geplakt waardoor hij heel mooi in je boek blijft zitten.


Goodmorning, it is Tuesday and this Tuesday it means that a new challenge is posted on the Fairytale challenge blog. This time our challenge is: Make a bookmark. Really fun! This year I started reading a bit more again, after a few years of hardly reading at all and I am really enjoying it! And then you need a good bookmark for all the real books you are reading next to the books on my e-reader. 
My favorite bookmark image is School girl from Tiddly Inks. I have made 2 more bookmarks with this image. ;) I printed the image pretty large this time and then I coloured it with my Polychromos pencils and the black glaze pen and then I fuss cut it. From kraft cardstock I made a bookmark with almost the size of an card. I added a strip of striped paper from a paperpad from a Dutch store on the right and then I added another strip of black cardstock. I added faux stitching with a white gelpen. From red cardstock I cut a couple of hearts with the hearts die from the Pocket tag from Create a smile stamps and I adhered those next tot the girl. In side the bookmark I attachted 2 tiny magnets, so the bookmark stays closed.


I want to enter this card in the following challenges:
*********************************************************************************
STAMP: School girl from Tiddly Inks
COLORING MEDIUM: Polychromos pencils
PAPER: Kraft cs, black and red cs, Action paperpad
DIES: Pocket tag from Create a smile stamps
ACCESSORIES: Black glaze pen, white gelpen

Tuesday, 23 August 2016

Tiddly Inks challenge 189 - Back to school


Goedemorgen, vandaag begint er weer een nieuwe challenge op het Tiddly Inks challenge blog. Deze keer is de challenge Back to school. Ik heb een leuke boekenlegger gemaakt, omdat je er daar nooit genoeg van kunt hebben. ;) Ik heb de afbeelding School girl van Tiddly Inks ingekleurd met mijn polychromos potloden en de zwarte glaze pen en daarna heb ik de afbeelding uitgeknipt. Uit roze papier heb ik een grote tag/boekenlegger gesneden met de Crea-nest-lies extreme labels & tags 5 van Crealies. Ik heb dezelfde tag uit zwart-stipjespapier van het Dots & stripes valentines paperpad van Echo Park gesneden. Ik heb hier met de Crea-nest-lies XXL 4 van Crealies een ronde bovenkant aan gemaakt. Ik heb er een wit lintje omheen gebonden en dit daarna op de tag geplakt. Bovenin heb ik een wit lintje samen met een zwart lintje aan de boekenlegger gehangen.

Goodmorning, today a new challenge starts on the Tiddly Inks challenge blog. Our challenge is back to school. I made a bookmark, because you never can have enough of those. ;) I coloured the image School girl from Tiddly Inks with my polychromos pencils and the black glaze pen and then I fussy cut it. From pink cardstock I cut a large tag/bookmark with the Crea-nest-lies extreme labels & tags 5 from Crealies. I have cut the same tag from black dotted design paper from the Dots & stripes valentines paperpad from Echo Park. I then cut it with the Crea-nest-lies XXL 4 from Crealies to give it a round shape. I wrapped a white ribbon around it and then I adhered it on the pink tag. 


STAMP: School girl from Tiddly Inks
COLORING MEDIUM: Polychromos pencils
PAPER: Pink cardstock, Dots & stripes valentines paperpad from Echo Park
DIES: Crea-nest-lies extreme labels & tags 5 and Crea-nest-lies XXL 4 from Crealies
ACCESSORIES: Black glaze pen, white and black ribbon.

Friday, 8 July 2016

Gorjuss boekenlegger - New heights

Goedemorgen, vandaag is het dag 4 van de 30-day colouring challenge van Kathy Racoosin.

Goodmorning, today it is day 4 from the 30-day colouring challenge from Kathy Racoosin.


Vandaag laat ik een projectje zien dat ik weer eens heb gekleurd met de Zig clean color real brush markers. Ik vermaak me de laatste tijd erg goed met mijn potloden en dus heb ik deze niet zoveel gebruikt. Maar vandaag heb ik ze dus weer eens gebruikt. 
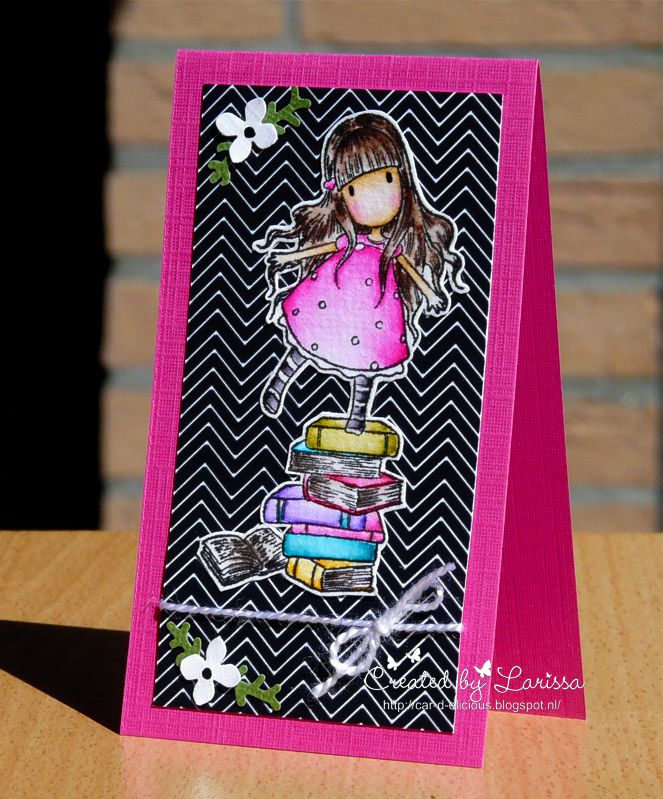
Ik heb een boekenleggertje gemaakt met de mini gorjuss stempels. Dit is Santoro gorjuss - No2 New heights van Do crafts. Ik heb de afbeelding op aquarel papier gestempeld en daarna heb ik deze dus ingekleurd met de Zig clean colors. Het ging best goed, alleen over de kleur van het gezichtje ben ik nog niet tevreden. Ik heb de afbeelding uitgeknipt. De boekenlegger is gemaakt van roze karton en hierop heb ik Small chevron paper van Pink petticoat geplakt nadat ik hier eerst een wit koordje omheen heb gebonden. Met de hydrangea pons van Martha Stewart heb ik 2 kleine witte bloemetjes gemaakt. Het zwarte hartje heb ik gekleurd met de zwarte glaze pen. De boekenlegger sluit met een magneet. 


Today I am showing you a project that I coloured with the Zig clean color real brush markers. Lately I have been having so much fun with my pencils, that I didn't use these markers that much. But today I finally used them again.
I made a little bookmark with one of the mini gorjuss stamps. This is Santoro gorjuss - No2 New heights from Do crafts. I stamped the image on watercolour paper and then I coloured it with the zig clean colors. I am pretty satisfied with the result, but I don;t like the colour of the face. I have fussy cut the image. The bookmark is made from pink cardstock and I added a layer of Small chevron paper from Pink petticoat after I wrapped white cord around it. I made 2 little white flowers with the Hydrangea punch from Martha Stewart. I coloured the centres with the black glaze pen. The bookmark closes with a little magnet.


I want to enter this card in the following challenges:
*********************************************************************************
STAMP: Santoro gorjuss - No2 New heights from Do crafts 
COLORING MEDIUM: Zig clean color real brush markers
PAPER: Watercolor paper, Small chevron paper from Pink petticoat, pink, white and green cs
INK: Versafine onyx black
ACCESSORIES: Black glaze pen, white cord, Hydrangea punch, leaf punch, little magnet

LinkWithin

Related Posts with Thumbnails