Thursday 31 January 2019

As you like it challenge blog 149 - Favourite card shape or fold


Goedemorgen, vandaag begint er weer een nieuwe challenge op het As you like it challenge blog en deze keer willen we graag je favoriete kaart model of manier om je kaart te vouwen zien.  Ik vind het erg leuk om cirkelkaarten te maken, dus dat heb ik dan ook gedaan voor deze challenge. De ronde vorm heeft gewoon iets liefs en speciaals en ik ben erg blij met mijn Crealies mallen waardoor ik ook cirkelkaarten kan maken die dezelfde maat hebben als mijn vierkante kaarten. Het scallop randje maakt het kaartje nog extra lief. Deze keer worden we gesponsord door Fantastic ribbons.

Ik heb op mijn kaartje de afbeelding Kittys post van Di's digi stamps gebruikt. Ik heb de afbeelding ingekleurd met mijn Polychromos potloden en de zwarte glaze pen en daarna heb ik de afbeelding uitgeknipt. Ik heb de onderkant van de afbeelding uitgestanst met de Crea-nest-lies XXL 49 van Crealies. Ik heb dezelfde dies gebruikt om een cirkel uit wit karton te stansen. Deze cirkel heb ik gekleurd met Tumbled glass en Broken china distress inkt. Uit wit karton heb ik een aantal wolken gestanst met de Simple puffy cloud frames van Lawn fawn en deze heb ik op mijn cirkel geplakt. Ik heb de afbeelding daarna met foamtape op de cirkel geplakt. Op de brievenbus heb ik een tekst van de set Bulletjournal - Tekst diversen van Craft emotions gestempeld met zwarte inkt en daarna heb ik deze geëmbost met clear embossingpoeder. Ik heb de kaart gemaakt door met de Crea-nest-lies XXL 53 van Crealies 2 cirkels uit wit karton te stansen en deze boven aan elkaar te plakken. Daarna heb ik de cirkel met de afbeelding op de kaart geplakt.


Goodmorning, today a new challenge starts on the As you like it challenge blog and this time we want to see your favourite card shape or fold. I really love making circle cards, so that is what I made for this challenge. I think the circle shape looks really cute and is looking special. I really enjoy using my Crealies dies to make a circle card, because the Crea-nest-lies have the same size as my square cards have. I really love adding a scallop border, to make it even more cute! This time we are being sponsored by Fantastic ribbons

I have used the cute image Kittys post from Di's digi stamps on my card. I have coloured the image with my Polychromos pencils and the black glaze pen and then I have fussy cut the image. I have die-cut the bottom part of the image with the Crea-nest-lies XXL 49 from Crealies. I used the same dies to die-cut another circle from white cardstock. I have coloured the circle with Tumbled glass and Broken china distress ink. From white cardstock I have die-cut a couple of clouds with the Simple puffy cloud frames from Lawn fawn. I have glued those on the circle. Then I glued the image with foamtape on the circle. I have stamped a sentiment (much love) from the stampset Bulletjournal - Tekst diversen from Craft emotions with black ink on the mailbox and then I embossed it with clear embossingpowder. I have made a card with 2 circles that I have die-cut with the Crea-nest-lies XXL 53 from Crealies and I glued those at the top of circles together. 


STAMP: Kittys post from Di's digi stamps
COLORING MEDIUM: Polychromos pencils, Distress inks 
PAPER: White cs
INK: Versafine onyx black, Tumbled glass and Broken china distress ink
DIES: Crea-nest-lies XXL 49 & 53 from Crealies, Simple puffy cloud frames from Lawn fawn
ACCESSORIES: Black glaze pen, Clear embossingpowder

Wednesday 30 January 2019

Gerda Steiner designs - Under the weather?


Goedemorgen, vandaag post ik weer een kaartje met een stempel van Gerda Steiner designs. Deze keer heb ik een kaartje gemaakt met de digitale stempel Umbrella mouse van Gerda Steiner designs. Ik heb de afbeelding ingekleurd met mijn Polychromos potloden en de zwarte glaze pen. Ik heb de afbeelding vervolgens uitgeknipt. Op een witte kaart heb ik een strip oranje design papier van het Country fair plaid paperpack van My favorite things (retired) geplakt. Op een stukje wit karton heb ik met het Rainy day stencil van Clearly besotted stamps en Tumbled glass en Broken china Distress oxide inkt een achtergrond gemaakt voor mijn afbeelding. Uit wit karton heb ik een klein heuveltje gestanst met de Stitched basic edges van My favorite things. Ik heb het heuveltje gekleurd met Mowed lawn en Lucky clover Distress oxide inkt en daarna heb ik deze op het witte karton geplakt. Ik heb 2 teksten van de stempelset Hootie patootie van Lil inkers op het karton gestempeld. Met een zwarte fineliner heb ik een lijntje gedoodled langs de randen van de kaart. Ik heb het witte karton met foamtape op de kaart geplakt en daarna heb ik de afbeelding met foamtape op de kaart geplakt. Als laatste heb ik met de Corner chomper de onderste hoeken van de kaart afgerond.


Goodmorning, today I am posting a card with a stamp from Gerda Steiner designs. This time I made a card with the digital stamp Umbrella mouse from Gerda Steiner designs. I have coloured the image with my Polychromos pencils and the black glaze pen. I have fussy cut the image. 
On a white card I glued a strip of orange design paper from the Country fair plaid paperpack from My favorite things (retired). On another piece of white cardstock I made a background with the help of the Rainy day stencil from Clearly besotted stamps and Tumbled glass and Broken china Distress oxide ink. I have die-cut a little hill from white cardstock with the Stitched basic edges from My favorite things. I have coloured the hill with Mowed lawn and Lucky clover Distress oxide ink. On the background I have stamped 2 sentiments from the stampset Hootie patootie from Lil inkers. With a black fineliner I doodled some lines on the background. I have glued the background with foamtape on the card and then I glued the image with foamtape on the card. Then I rounded the bottom corners of the card with the corner chomper.


STAMP: Umbrella mouse from Gerda Steiner designs, Hootie patootie from Lil inkers
COLORING MEDIUM: Polychromos pencils, Distress oxide inks
PAPER: White cs, Country fair plaid paperpack from My favorite things (Retired)
INK: Versafine onyx black, Tumbled glass, Broken china, Mowed lawn and Lucky clover Distress oxide ink
DIES: Stitched basic edges from My favorite things
ACCESSORIES: Black glaze pen, Corner chomper, Rainy day stencil from Clearly besotted stamps, black pen

I am a participant in the Gerda Steiner designs Affiliate Programme. This means that if you click on one of my links and subsequently make a purchase, I will receive a small commission of store credit, at no extra cost to you.

Monday 28 January 2019

Memory dex - Live life in full bloom


Goedemorgen, vandaag post ik weer een nieuw kaartje dat ik heb gemaakt voor mijn Memory dex. Op het kaartje heb ik de digitale stempel Poppies van Sheepski designs verwerkt. Ik heb de afbeelding uitgestanst met de Rolodex cards Rounded rectangle 3624-701 van Vaessen creative en daarna heb ik deze ingekleurd met mijn Polychromos potloden. Op een stukje wit karton heb ik de Basic diagonals van Clearly besotted stamps gestempeld en deze heb ik ook met dezelfde die uitgestanst en daarna heb ik een randje onder de afbeelding geplakt. Ik heb zwart borduurgaren rondom het kaartje gebonden. Op zwart karton heb ik met versamark inkt een tekst van de set Little things van Alpaca pals gestempeld en deze heb ik vervolgens geëmbost met witte embossing poeder. Ik heb met zwarte inkt de kleine spatjes die ook uit deze set komen gestempeld en daarna heb ik de tekst stripjes met foamtape op het kaart geplakt. Ik heb uit rood karton het basis kaartje gestanst met de Rolodex cards Rounded rectangle 3624-701 van Vaessen creative en daar heb ik mijn witte kaartje op geplakt.


Goodmorning, today I am posting a new card that I made for my Memory dex. On the card I used the  digital stamp Poppies from Sheepski designs. I have die-cut the image with the Rolodex cards Rounded rectangle 3624-701 from Vaessen creative and then I coloured the image with my Polychromos pencils. On a piece of white cardstock I stamped the Basic diagonals from Clearly besotted stamps and then I die-cut it with the same die. I glued a little strip of it below the image. I tied black embroidery thread around the card. I stamped a sentiment from the set  Little things from Alpaca pals on black cardstock with versamark ink and then I embossed it with white embossingpowder. With black ink I stamped a couple of splatters on the card, I glued the sentiment strips with foamtape on the card. I have die-cut the basic shape of my memory dex card from red cardstock with the Rolodex cards Rounded rectangle 3624-701 from Vaessen creative and glued the white card on top of it.


STAMP: Poppies from Sheepski designs, Little things from Alpaca pals, Basic diagonals from Clearly besotted stamps
COLORING MEDIUM: Polychromos pencils 
PAPER: White, red and black cs
INK: Versafine onyx black, versamark
DIES: Rolodex cards Rounded rectangle 3624-701 from Vaessen creative
ACCESSORIES: White embossingpowder, Black embroidery thread

Wednesday 23 January 2019

Gerda Steiner designs - Penguin with heart


Goedemorgen, vandaag post ik weer een nieuw kaartje op het blog van Gerda Steiner designs. Deze keer heb ik een kaart gemaakt met de digitale stempel Penguin with heart van Gerda Steiner designs. Ik heb de afbeelding ingekleurd met mijn Polychromos potloden en daarna heb ik de afbeelding uitgeknipt. Op een witte kaart heb ik de streepjesstempel van de set Cozy plaid stamps van Lil inkers gestempeld met Tulip red inkt van Versafine clair. Ik heb de pinguin daarna met foamtape op de kaart geplakt. Ik heb een tekst van de set XOXO sentiments van CC designs met Nocturne inkt van Versafine clair net boven de streepjes gestempeld. Uit zwart karton heb ik een aantal hartjes gestanst met de Confetti creative cuts van Mama elephant en die heb ik op mijn kaart geplakt.


Goodmorning, today I am posting a new card on the blog from Gerda Steiner designs. This time I have made a card with the digital stamp Penguin with heart from Gerda Steiner designs. I have coloured the image with my Polychromos pencils and then I have fussy cut the image. I have stamped the stripes from the set Cozy plaid stamps from Lil inkers with Tulip red ink from Versafine clair. I have stamped a sentiment from the set XOXO sentiments from CC designs with Nocturne ink from Versafine clair. From black cardstock I have die-cut a couple of hearts with the Confetti creative cuts from Mama elephant and I decorated my card with those. 


I want to enter this card in the following challenges:
*********************************************************************************
STAMP: Penguin with heart from Gerda Steiner designs, XOXO sentiments from CC designs, Cozy plaid stamps from Lil inkers 
COLORING MEDIUM: Polychromos pencils
PAPER: White and black cs
INK: Versafine clair Nocturne and Tulip red
DIES: Confetti creative cuts from Mama elephant

I am a participant in the Gerda Steiner designs Affiliate Programme. This means that if you click on one of my links and subsequently make a purchase, I will receive a small commission of store credit, at no extra cost to you.

Tuesday 22 January 2019

Thyroid Awareness Month Blog Hop from Milka


January is Thyroid Awareness Month. 26 designers from all over the World joined together in this special blog hop which will last from January 5th until January 30th.

The aim of the hop is to support Thyroid Awareness Month and to raise public awareness of the importance of a Thyroid Gland and problems it can cause when not working properly.


We will be sharing our handmade projects featuring butterfly, butterflies and/or blue paisley pattern. Thyroid looks like butterfly and blue paisley patterned ribbon is a new symbol of Thyroid Awareness month, so it was our choice to incorporate these elements in our handmade projects.

Vandaag post ik op mijn blog een post voor een bloghop die is georganiseerd door Milka voor de speciale maand voor schildklierproblemen. In januari is er extra aandacht voor schildklierproblemen en hieronder heb ik een korte samenvatting voor wat dat nou precies inhoudt. 

Wat zijn schildklierproblemen?

In het kort:
  • Veelvoorkomende schildklierproblemen zijn een te snel werkende schildklier en een te langzaam werkende schildklier.
  • Door een te snel werkende schildklier versnellen lichamelijke en geestelijke processen.
  • Een te traag werkende schildklier vertraagt lichamelijke en geestelijke processen.
  • Schildklierproblemen worden vaak ontdekt voordat ze ernstig worden.

Over een schildklier

Je schildklier is een klier in de halsstreek die ondanks zijn kleine afmetingen een belangrijke taak heeft. Je schildklier is verantwoordelijk voor het goed functioneren van stofwisselingsprocessen en de groei. Dit regelt je schildklier door het afgeven van schildklierhormoon. Schildklierproblemen komen erg veel voor en kunnen meestal vastgesteld worden voordat ze ernstig worden. Hieronder de twee meest voorkomende schildklierproblemen:

Te snel werkende schildklier

Een te snel werkende schildklier (hyperthyreoïdie) maakt te veel schildklierhormoon aan. Hierdoor versnellen lichamelijke en geestelijke processen. Lees meer over de oorzaken, symptomen, behandelingen van een snelwerkende schildklier

Te langzaam werkende schildklier

Een te traag werkende schildklier (hypothyreoïdie) maakt te weinig schildklierhormoon aan. Hierdoor vertragen lichamelijke en geestelijke processen. Lees meer over de oorzaken, symptomen, behandelingen van een trage schildklier

European Thyroid Association (ETA) https://www.eurothyroid.com/
American Thyroid Association (ATA) https://www.thyroid.org/
Asia & Oceania Thyroid Association (AOTA) https://www.aothyroid.org/
Latin American Thyroid Society (LATS) https://www.lats.org/


Symbolen voor deze maand zijn vlinders, de kleur blauw en het paisley motief. Ik heb speciaal voor deze maand daarom dan ook een kaartje gemaakt met de kleur blauw en vlinders. Ik heb op een stuk aquarelpapier met de Altenew watcolour 36 pan set een blauwe achtergrond gemaakt. Ik heb de verf rechtstreeks op mijn papier aangebracht. Daarna heb ik de verf op een matje aangebracht en dat vermengt met Liquid pixie dust van Ink on 3 zodat het heel mooi ging glinsteren. Ik heb het stuk aquarelpapier hier doorheen gehaald en daardoor ontstong het gevlekte patrooon. Nadat alles goed was gedroogd heb ik uit dit papier een aantal vlinders gestanst met de Butterfly wishes die collection van Clearly besotted.

Uit wit karton heb ik met de Crea-nest-lies XXL 83 van Crealies een rechthoek gestanst. Daarop heb ik met zwarte inkt een tekst van de set Brushed greetings II van Clearly besotted stamps (retired) gestempeld. Ik heb de vlinders daarna op mijn kaart geplakt. Het lijfje is op het rechthoek geplakt en onder de vleugels zit foamtape om een mooi effect te krijgen. Ik heb de lijfjes van de vlinders versierd met witte pareltjes en daarna heb ik onder de kleine vlinder een spoortje van parels geplakt.


Symbols for this month are the butterfly, the colour blue and the paisley pattern. I have made a card especially for this month with two symbols, the colour blue and butterflies. On a piece of watercolour paper I made a blue background with paint from the Altenew watcolour 36 pan set. I applied the paint on the paper. Then I applied some paint on a mat and mixed it with some drops of Liquid pixie dust from Ink on 3. I placed the paper on top of that mix and when I removed the paper. it had a great splotchy and shimmery look. After all the paint had dried, I have die-cut a couple of butterflies from this paper with the Butterfly wishes die collection from Clearly besotted.

From white cardstock I have die-cut a rectangle with the Crea-nest-lies XXL 83 from Crealies. I have stamped a sentiment from the set Brushed greetings II from Clearly besotted stamps (retired) on the rectangle Then I glued the butterflies on the card. I glued the body straight on the rectangle and I added foamtape under their wings to give it a nice effect. I have glued little white pearls on their bodies and below the little butterfly I made a little trail with the white pearls.  


Ik had nog een vlinder over en die heb ik binnen in mijn kaart geplakt, is toch net iets leuker afgewerkt zo. ;)

I still had a butterfly left over and I glued it on the inside of my card, the perfect finishing touch. ;)

BLOG HOP LIST:

Hieronder staat de lijst van deelnemers aan de bloghop. Op sommige blogs zijn prijsjes te winnen, maar dan moet je wel een commentaartje achter laten op alle posts van iedereen die aan de bloghop heeft meegedaan.

Below you cand find a list with all participants from this bloghop. Some blogs offer prices, but if you want to make a chance to win these, you have to leave a comments on the  blogposts from every participant.

Milka Gubo (5th)
Ale Suta (14th)
Tanja Kabel (16th)
Donna Mikasa (18th)
Neha Bhatt (24th)
Ishani (26th)
Sue Hastead (29th)


I want to enter this card in the following challenges:
*********************************************************************************
STAMP: Brushed greetings II from Clearly besotted stamps (retired)
COLORING MEDIUM: Altenew watcolour 36 pan set 
PAPER: Watercolour paper, White cs
INK: Versafine onyx black 
DIES: Butterfly wishes die collection from Clearly besotted, Crea-nest-lies XXL 83 from Crealies
ACCESSORIES: Liquid pixie dust from Ink on 3, White pearls

Monday 21 January 2019

A giftbag for 2 little ladies


Goedemorgen, vandaag post ik 2 cadeautasjes die ik heb gemaakt voor kleine dametjes, die een tijdje geleden op de verjaardag van mijn oom waren. Ik heb 2 dezelfde tasjes gemaakt, zodat er geen ruzie kan onstaan wie welke krijgt. ;) Ik heb de tasjes gevuld met een paar lekkere chocolaatjes en volgens mij vielen de tasjes erg goed in de smaak. :)

Goodmorning, today I am posting 2 giftbags that I have made for 2 little ladies, that visited my uncle's birthday a few weeks ago. I made exactly the same bags, so there will be no fighting which girl gets which bag. ;) I filled the bags with a couple of nice chocolates and think they really loved their bags. :)


Op de voorkant van het tasje heb ik de stempel A friendly turn van Create a smile stamps gestempeld en ik heb dezelfde afbeelding ook nog op een los stukje wit karton gestempeld. Op het tasje zelf heb ik het reuzenrad ingekleurd en op het losse blaadje heb ik de bakjes met de sneeuwmannen ingekleurd met mijn Polychromos potloden en de zwarte glaze pen. Op het tasje heb ik een achtergrond gekleurd met een blauw Derwent aquatone potlood (discontinued). Vervolgens heb ik alle bakjes uitgeknipt en met foamtape op het tasje geplakt.


On the front of the bag I stamped the image A friendly turn from Create a smile stamps and I stamped the same image also on another piece of white cardstock. On the bag I coloured the ferris wheel and on the other cardstock I coloured the snowman inn their seats with my Polychromos pencils and the black glaze pen. I coloured a background on the bag with a blue Derwent aquatone pencil (discontinued). Then I have fussy cut all the snowman in their seats and glued those on the bag with foamtape. 


STAMP: A friendly turn from Create a smile stamps
COLORING MEDIUM: Polychromos pencils, Derwent aquatone pencil
PAPER: White cs
INK: Versafine onyx black 
DIES: Bag die
ACCESSORIES: Black glaze pen

Thursday 17 January 2019

As you like it challenge 148 - Pearls or buttons


Goedemorgen, vandaag begint de nieuwe challenge op het As you like it challenge blog en deze keer willen we graag weten wat je liever gebruikt op je kaarten: knopen of parels. Hoewel ik beide erg leuk vind om te gebruiken, zie je niet vaak knopen op mijn kaarten. De eerste reden is dat ik mijn knopencollectie altijd vergeet. Ik heb best wat knopen, maar toch gebruik ik ze dus niet omdat ik er gewoon niet aan denk. De tweede reden is dat een knoop toch een aardige bult kan geven op je kaart en dat is met een parel wat minder. Die zijn soms zelfs in hele kleine maatjes te vinden. Dus ik heb dan ook voor parels gekozen op mijn kaartje van vandaag.

Ik heb vandaag de stempelset Spring botanicals Daffodil van Uniko gebruikt. Ik heb de narcis samen met de tekst op aquarel papier gestempeld met zwarte inkt en daarna heb ik de afbeelding en tekst geëmbost met clear embossingpoeder. Daarna heb ik de afbeelding ingekleurd met de Altenew watcolour 36 pan set. Met de Crea-nest-lies XXL 24 van Crealies heb ik een rechthoek uit geel ruitjespapier van het Classic gingham paperpack van Sunny studio gestanst en deze heb ik op de voorkant van een witte kaart geplakt. Ik heb met dezelfde stans ook de afbeelding en tekst uitgestanst en daarna heb ik aan de rechterkant van dit rechthoek een randje van 1 cm van de rand afgesneden. Ik heb de afbeelding daarna op de kaart geplakt. Daarna heb ik de kaart versierd met een aantal kleine witte pareltjes.


Goodmorning, today a new challenge starts on As you like it challenge blog  and this time we want to know if you rather use buttons or pearls on your creations.Although I love the look of both embellishments, you don't see a buttons on my cards very often. The first reason is that I always forget that I have a button stash. I do have many different, but I don't use them, because I forget they exist. The second reason is that a buttons add a lot of bulk on your card and pearls give less bulk. I love that pearls sometimes come in really tiny sizes. So I decided to use pearls on my card today.

Today I used the stampset Spring botanicals Daffodil from Uniko on my card. I stamped the image and sentiment with black ink on watercolour cardstock and then I embossed them with clear embossingpowder. Then I coloured the image with the Altenew watcolour 36 pan set. With the Crea-nest-lies XXL 24 from Crealies I have die-cut a rectangle from yellow design paper from the Classic gingham paperpack from Sunny studio amd I glued on the front of a white card. I used the same die to die-cut the image. I have cut away a strip of watercolour paper from the right part of the image and then I glued the image on the card. I have decorated the card with tiny white pearls.


STAMP: Spring botanicals Daffodil from Uniko
COLORING MEDIUM: Altenew watcolour 36 pan set 
PAPER: Watercolour paper, Classic gingham paperpack from Sunny studio
INK: Versafine onyx black
DIES: Crea-nest-lies XXL 24 from Crealies
ACCESSORIES: Clear embossingpowder, white pearls

Wednesday 16 January 2019

Gerda Steiner designs - Who's thinking about you?


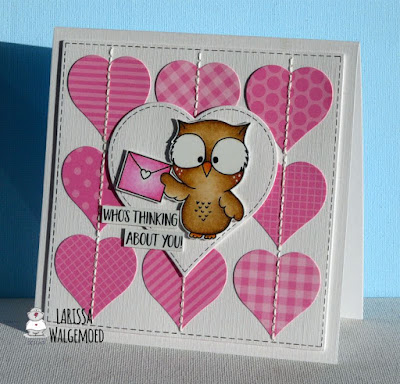
Goedemorgen, vandaag post ik weer een nieuw kaartje op het blog van Gerda Steiner designs. Ik heb deze keer een valentijnskaartje gemaakt en dus gewerkt met hartjes en veel roze (maar dat hadden jullie vast al gezien ;) ).
Ik heb op mijn kaartje één van de schattige uiltjes van de stempelset Owl rather be with you van Gerda Steiner design gebruikt. Nadat ik het uiltje heb gestempeld, heb ik de afbeelding ingekleurd met mijn Polychromos potloden en de zwarte glaze pen. Met een witte gelpen heb ik stipjes op de wangen van de uil getekend. Ik heb de afbeelding vervolgens uitgeknipt.
Ik heb met de Square CDECD0022 Cutting dies van Card deco essentials heb ik een vierkant uit wit karton gestanst. Ik heb hierop met een zwarte fineliner stiklijntjes getekend. Uit een paar velletjes design papier van het Classic gingham, Striped silly en Polka dot parade paperpack van Sunny studio heb ik een aantal hartjes gestanst met de Heart CDECD0024 Cutting dies van Card deco essentials. Ik heb de hartjes met wit borduurgaren op het witte vierkant gestikt en daarna heb ik het vierkant met foamtape op een witte kaart geplakt. Uit wit karton heb ik een groter hart gestanst met de Heart CDECD0024 Cutting dies van Card deco essentials. Ik heb op het hart stiklijntjes getekend met een zwarte fineliner en daarna heb ik dit hart met foamtape op de kaart geplakt. Ik heb de afbeelding daarna met foamtape op de kaart geplakt. De tekst komt ook uit de stempelset Owl rather be with you van Gerda Steiner designs.


Goodmorning, today I am posting a new card on the blog from Gerda Steiner designs. This time I made a valentines card and that is why I used a lot of hearts and pink (but you probably already saw that ;) ).
I have used one of the cute owls from the set Owl rather be with you from Gerda Steiner designs on my card. After I stamped the owl, I coloured the image with my Polychromos pencils and the black glaze pen. With a white gelpen I have added a couple of dots on the cheek of the owl. Then I have fussy cut the image. 
With the Square CDECD0022 Cutting dies from Card deco essentials I have die-cut a square from white cardstock. I added faux stitching with a black pen. From a couple of sheets from the Classic gingham, Striped silly and Polka dot parade paperpack from Sunny studio I have die-cut a couple of little hearts with the Heart CDECD0024 Cutting dies from Card deco essentials. I have stitched the hearts with embroidery thread on the white sqaure and then I glued the square with foamtape on a white card. I have die-cut a bigger heart with the Heart CDECD0024 Cutting dies from Card deco essentials from white cardstock. I added more faux stitching on the heart and then I glued the heart with foamtape on my card. I glued the image on the heart. The sentiment is also from the stampset Owl rather be with you from Gerda Steiner designs


I want to enter this card in the following challenges:
*********************************************************************************
STAMP: Owl rather be with you from Gerda Steiner designs
COLORING MEDIUM: Polychromos pencils
PAPER: White cs, Classic gingham, Striped silly and Polka dot parade paperpack from Sunny studio
INK: Versafine onyx black
DIES: Square CDECD0022 and Heart CDECD0024 Cutting dies from Card deco essentials
ACCESSORIES: Black glaze pen, white gelpen, White embroidery thread, Black pen

I am a participant in the Gerda Steiner designs Affiliate Programme. This means that if you click on one of my links and subsequently make a purchase, I will receive a small commission of store credit, at no extra cost to you.

LinkWithin

Related Posts with Thumbnails