Saturday, 30 October 2021

Di's digi designs challenge - Emboss it (wet or dry)


Goedemorgen, vandaag begint er weer een nieuwe challenge op het Di's digi designs challenge blog en deze keer willen we graag embossing op je kaartje zien, dat mag met een embossingfolder of met embossingpoeder.

Ik heb voor deze challenge een kerstkaartje gemaakt met de digitale stempel Singalong santa van Di's digi stamps. Ik heb de afbeelding op kraft papier geprint. Daarna heb ik de afbeelding ingekleurd met mijn Polychromos potloden, de zwarte glaze pen en een witte gelpen. Ik heb de afbeelding daarna uitgestanst met de Crea-nest-lies XXL 44 van Crealies. Ik heb wit borduurgaren rondom het kraft karton gebonden. Met de Crea-nest-lies XXL 52 van Crealies heb ik een grotere rechthoek uit wit karton gestanst en daar heb ik de afbeelding op geplakt. De tekst komt uit een oud stempelsetje van My favorite things, maar ik weet er helaas geen naam meer van, want ik heb de verpakking niet meer. Ik heb de tekst met Versamark inkt gestempeld en daarna heb ik de tekst geëmbost met witte embossingpoeder. Ik wilde het graag laten sneeuwen op mijn kaartje en daarvoor heb ik Chunky white deep impression embossing enamel van Stampendous gebruikt. Ik heb ook nog wat glitter op mijn kaart aangebracht met wat vloeibare lijm. Ik heb de rechthoeken daarna op een kraft kaart geplakt. 


Goodmorning, today a new challenge starts on the Di's digi designs challenge blog and this time we want to see embossing on your card. It can be dry embossing with an embossingfolder or wet embossing with an embossingpowder.

For this challenge I have made a christmas card with the digital stamp Singalong santa from Di's digi stamps. I have printed the image on kraft cardstock. Then I have coloured the image with my Polychromos pencils, the black glaze pen and a white gelpen. Then I have die-cut the image with the Crea-nest-lies XXL 44 from Crealies. I tied white embroidery thread around it. I used the Crea-nest-lies XXL 52 from Crealies to cut a larger rectangle from white cardstock and I glued the kraft rectangle with the image on top of it. The sentiment is from an old stampset from My favorite things. I don't know the name because the only thing I have is the stampset. I have stamped the sentiment with Versamark ink and then I embossed the sentiment with white embossingpowder. I wanted to add snow on my image, so I used Chunky white deep impression embossing enamel from Stampendous on the image. I also added some glitter on my card with a little bit of liquid glue. I have glued the rectangles on a kraft card. 


I want to enter this card in the following challenges:
*********************************************************************************
STAMP: Singalong santa from Di's digi stamps, Unknown sentiment stampset from My favorite things
COLORING MEDIUM: Polychromos pencils
PAPER: Kraft and white cs
INK: Versamark ink
DIES: Crea-nest-lies XXL 44 and 52 from Crealies
ACCESSORIES: Black and clear glaze pen, White gelpen, Glitter, White embossingpowder, Chunky white deep impression embossing enamel from Stampendous, White embroidery thread

Wednesday, 27 October 2021

Gerda Steiner designs - Happy halloween


Goedemorgen, vandaag is het weer mijn beurt om een kaartje te posten op het blog van Gerda Steiner designs en deze keer heb ik een mini slimline halloween kaartje met een speciaal effect gemaakt. Ik heb de 2 grappige spookjes van de stempelset A boo to you van Gerda Steiner designs gestempeld en daarna heb ik de afbeeldingen ingekleurd met mijn Polychromos potloden en de zwarte glaze pen. Ik heb de spookjes daarna ook nog gekleurd met de Clear Spectrum noir sparkle glitter pen.

Het mini slimline kaartje is gemaakt met de stansset Mini slimline B (CLCZ83) van Crealies. Ik heb de kaart van wit karton gemaakt. Het laagje er boven op is van zwart karton gemaakt. Het paarse geruite papier komt uit het Classic sunburst paperpad van Sunny studio. Ik heb uit wit karton een aantal wolkjes gestanst met de Spooky clouds (retired) van Taylored expressions en die heb ik op het paarse karton geplakt. Met de Star confetti die van Alexandra Renke heb ik sterretjes uit zwart karton gestanst en die heb ik op de kaart geplakt. 

Het bovenste spookje kan rondjes draaien als je aan het touwtje trekt en daarvoor heb ik de tutorial uit dit filmpje van Crealies gebruikt. Voor het vierkant en de cirkels van het mechanisme heb ik de stanssets Crea-nest-lies XXL 21 van Crealies en Crea-nest-lies XXL 22 van Crealies gebruikt. Ik heb hier onder een kort filmpje geplaatst met mijn eigen kaartje erin. Nadat ik het bovenste spookje ook op mijn kaart heb geplakt heb ik een tekst van de stempelset Peekin' pumpkin kitty van Gerda Steiner designs op mijn kaartje gestempeld.


Goodmorning, today it is my turn again to post something on the blog from Gerda Steiner designs and this time I have made a mini slimline halloween card with a special effect. I have stamped the funny ghosts from the stamp set A boo to you from Gerda Steiner designs and then I coloured them with my Polychromos pencils and the black glaze pen. I have coloured the ghosts also with the Clear Spectrum noir sparkle glitter pen.

The mini slimline card is made with the die set Mini slimline B (CLCZ83) from Crealies. I have made the card from white cardstock. The second layer is cut from black cardstock. The purple patterned paper is from the Classic sunburst paperpad from Sunny studio. I have cut a couple of clouds from white cardstock with the Spooky clouds (retired) from Taylored expressions and I glued those on the purple paper. I added stars that I have cut with the Star confetti die from Alexandra Renke from black cardstock. 

The upper ghost can turn when you pull the white cord and to make this I followed a tutorial (dutch spoken) from Crealies. For the squares and circles for the mechanism I have used the die sets Crea-nest-lies XXL 21 from Crealies and Crea-nest-lies XXL 22 from Crealies. I have added a little clip with my turning ghost more down below in this post. After I glued the ghosts both on the card I have added a sentiment that I have stamped on the card with a sentiment from the set Peekin' pumpkin kitty from Gerda Steiner designs


STAMP: A boo to you and Peekin' pumpkin kitty from Gerda Steiner designs
COLORING MEDIUM: Polychromos pencils
PAPER: White and black cs, Classic sunburst paperpad from Sunny studio
INK: Vewrsafine clair nocturne
DIES: Mini slimline B (CLCZ83) from Crealies, Crea-nest-lies XXL 21 and 22 from Crealies, Star confetti die from Alexandra Renke, Spooky clouds (retired) from Taylored expressions
ACCESSORIES: Black glaze pen, Clear Spectrum noir glitter sparkle pen. White embroidery thread, brad. 

I am a participant in the Gerda Steiner designs Affiliate Programme. This means that if you click on one of my links and subsequently make a purchase, I will receive a small commission of store credit, at no extra cost to you.

Tuesday, 26 October 2021

Neat and tangled - You're a treat


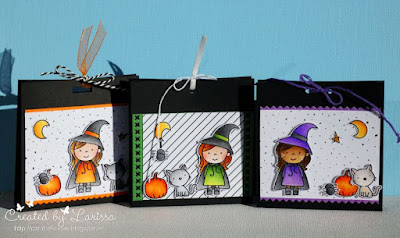
Goedemorgen, vandaag post ik wat kleine halloween tractaties op mijn blog. Ik heb 3 cadeauzakjes gemaakt met daarop wat schattige halloween afbeeldingen. Ik heb de schattige afbeeldingen van de stempelset You're a treat van Neat and tangled (no longer in business) drie keer gestempeld met Versafine clair nocturne inkt op Aquarel papier smooth Wit 200 gram van Vaessen creative. Ik heb daarna alle afbeeldingen geëmbost met clear embossingpoeder. Ik heb daarna alle afbeeldingen ingekleurd met mijn Distress inkt, de zwarte glaze pen en een witte gelpen. Vervolgens heb ik alle afbeeldingen uitgeknipt.

Goodmorning, today I am posting some little halloween treats on my blog. I have made 3 treatbags with some cute halloween images on them. I have stamped the cute images from the set You're a treat from Neat and tangled (no longer in business) three times with Versafine clair nocturne ink on Aquarel papier smooth Wit 200 gram from Vaessen creative. I have embossed all the images with clear embossingpowder. I have coloured them all with my Distress inks, the black glaze pen and a white gelpen and then I have fussy cut them all.


De versiering van de zakjes lijkt redelijk op elkaar. Ik heb alleen wat kleine details veranderd per zakje. Ik heb het tasje zelf gemaakt van zwart karton in een maatje dat goed bij mijn afbeeldingen en de inhoud past.  Het oranje zakje is gemaakt met het stipjespapier van het Do what you love pretty paper block (PK9149 -retired) van Marianne design. Ik heb dit op oranje karton geplakt waar ik de onderste rand van heb gestanst met de Edging dies ED005 van Nellie Snellen. Ik heb het papier en de afbeeldingen daarna op het zwarte tasje geplakt. Ik heb een opening voor het lintje in de bovenkant van het zakje gesneden en daarna heb ik het zakje gesloten met een stukje oranje organza lint en een strikje van zwart-witte bakers twine.

I have decorated the treat bags pretty much the same. Only a couple of small details are changed on the bags. I made the bags my self from black cardstock in a size that was perfect for my images and for the candy that I have put inside the bag. The orange bag is decorated with dotted paper from the Do what you love pretty paper block (PK9149 -retired) from Marianne design. I have glued it on orange cardstock that I have die-cut with the Edging dies ED005 from Nellie Snellen. I glued the images and the papers on the bag. I have cut an opening for my ribbon and closed the bag with orange ribbon and black and white bakers twine.


Voor het groene zakje heb ik gestreept papier van het Do what you love pretty paper block (PK9149 -retired) van Marianne design gebruikt. Ik heb dit papier op groen karton geplakt dat ik aan de beide zijkanten heb gestanst met de Edging dies SD007 van Nellie Snellen. Voor de sluiting heb ik wit lint en wit borduurgaren gebruikt.

On the green bag I have used striped paper from the Do what you love pretty paper block (PK9149 -retired) from Marianne design. I glued it on green cardstock. I have die-cut both of the edges of the green cardstock with the Edging dies SD007 from Nellie Snellen. I used white ribbon and white embroidery thread to close the bag. 


Op het paarse doosje heb ik weer het stipjespapier van het Do what you love pretty paper block (PK9149 -retired) van Marianne design gebruikt. Ik heb dit op paars karton geplakt en daarna heb ik de boven- en onderrand van het paarse karton gestanst met de Edging dies SD007 van Nellie Snellen. Met een gaatjestang heb ik 2 gaatjes boven in het tasje gestanst en daarna heb ik het gesloten met paars borduurgaren.

On the purple box I have used the dotted paper from the Do what you love pretty paper block (PK9149 -retired) from Marianne design again. I glued it on purple cardstock and then I have die-cut the top and bottom edge of the purple paper with the Edging dies SD007 from Nellie Snellen. With a hole punch I added 2 holes in the top of the bag and then I closed the bag with purple embroidery thread. 


Alle tasjes zijn gevuld met een klein zakje halloween snoepjes.

All the treat bags are filled with a little halloween candy bag.

I want to enter this card in the following challenges:
*********************************************************************************
STAMP: You're a treat from Neat and tangled (no longer in business) 
COLORING MEDIUM: Distress inks
PAPER: Black, orange, green and purple cs, Do what you love pretty paper block (PK9149 -retired) from Marianne design
INK: Versafine clair nocturne
DIES: Edging dies ED005 and SD007 from Nellie Snellen
ACCESSORIES: Black glaze pen, Clear embossingpowder, White gelpen, Orange and white ribbon, black and white bakers twine, white and purple embroidery thread. Hole punch

Monday, 25 October 2021

Clearly besotted - Have a wicked halloween


Hallo, vandaag post ik weer een nieuw halloween kaartje op mijn blog. Ik heb een kaart gemaakt met de schattige afbeeldingen van de clear stempel set Frightening friends van Clearly besotted. Ik heb de afbeeldingen op Aquarel papier smooth Wit 200 gram van Vaessen creative gestempeld met Versafine clair nocturne inkt en daarna heb ik de afbeeldingen geëmbost met clear embossingpoeder. Ik heb de afbeeldingen daarna ingekleurd met mijn Distress inkt en daarna heb ik ze allemaal uitgeknipt. 

Op een witte kaart heb ik met het Mini cloud edges stencil van My favorite things en Wilted violet Distress inkt een wolkenachtergrond gemaakt op mijn kaart. Met een zwarte Posca pen heb ik een grote boom op de kaart getekend. Met diezelfde Posca pen heb ik verfspatjes op de kaart aangebracht. Ik heb uit wit karton een grasrandje gestanst met de Grassy hills die-namics van My favorite things. Ik heb het grasrandje gekleurd met Mowed lawn en Rustic wilderness Distress inkt en daarna heb ik het op de kaart geplakt. Ik heb sommige afbeeldingen direct op de kaart geplakt en voor anderen heb ik foamtape gebruikt. Ik heb een tekst van de stempelset Frightening friends van Clearly besotted op wit karton gestempeld en daarna heb ik de tekst in een bannervorm gesneden. Ik heb met een zwarte fineliner een lijntje langs de randen van het bannertje getekend. Ik heb de tekst met een nietje aan de kaart vastgemaakt.


Hello, today I am posting a new halloween card on my blog. I have made a card with the cute images from the clear stamp set Frightening friends from Clearly besotted. I have stamped the images on Aquarel papier smooth Wit 200 gram from Vaessen creative with Versafine clair nocturne ink and then I embossed them with clear embossingpowder. I have coloured the image with my Distress inks and then I have fussy cut them all.

On a white card I have made a cloudy background with the Mini cloud edges stencil from My favorite things and Wilted violet Distress ink. With a black Posca pen I have drawn a big tree on the card. I used the same Posca pen to add paint splatters on the card. I have cut a grass border from white cardstock with the Grassy hills die-namics from My favorite things and then I coloured the grass with Mowed lawn and Rustic wilderness Distress ink and then I glued it on the card. I have glued some of the images straight on the card and others were glued on the card with foamtape. I have stamped a sentiment from the set Frightening friends from Clearly besotted on white cardstock. I have cut it into a bannershape and with a black fineliner I added a frame on the banner. I have attached the sentiment with a staple on the card. 


STAMP: Frightening friends from Clearly besotted
COLORING MEDIUM: Distress inks
PAPER: White cs
INK: Versafine clair nocturne, Mowed lawn, Rustic wilderness and Wilted violet Distress ink
DIES: Grassy hills die-namics from My favorite things
ACCESSORIES: Clear embossingpowder, Black glaze pen, Mini cloud edges stencil from My favorite things, Tiny attacher, Black fineliner, Black Posca pen. 

Thursday, 21 October 2021

As you like it challenge 219 - Critter or people


Goedemorgen, het is deze week wat rustiger op mijn  blog. Ik ben nog aan het genieten van een laatste week vakantie. Hiervoor ben ik lekker 2 weken op vakantie geweest in Limburg. Nu nog even een lekker weekje thuis rommelen. Vandaag komt mijn neefje Niek, dus dat zal wel betekenen dat we lekker gaan knutselen. Eerder deze week is neefje Menno ook al geweest en toen hebben we samen een aantal doosjes gemaakt.

Vandaag begint er weer een nieuwe challenge op het As you like it challenge blog en deze keer worden we gesponsord door Fantastic ribbons. Voor de challenge willen we deze keer graag weten of je liever dieren of mensen op je kaarten gebruikt. Ik vind het erg leuk om dieren te gebruiken. Ik vind het kleuren van mensen gewoon een stuk moeilijker, zeker met het haar en daarom kleur ik liever dieren. Meestal zijn de afbeeldingen ook gewoon super schattig, dus dat is een extra bonus. ;)

Ik heb voor deze challenge een kaart gemaakt met de schattige nijlpaardjes van de stempelset BB happy hippos van My favorite things. Ik heb een aantal afbeeldingen gestempeld en daarna heb ik alle afbeeldingen ingekleurd met mijn Polychromos potloden, de zwarte glaze pen en een witte gelpen. Ik heb de afbeeldingen daarna uitgeknipt. Ik heb op een witte kaart 2 strips regenboog papier van het Really rainbow petite paper pack van Lawn fawn geplakt. Met een pons heb ik daarna de hoeken van de kaart afgerond. Op een stuk wit karton heb ik met behulp van de Hillside stencils van Lawn fawn een achtergrond voor mijn afbeelding gemaakt met Tumbled glass distress inkt en Mowed lawn distress inkt. Met een zwarte fineliner heb ik een lijntje langs de randen van het witte karton getekend. Ik heb het witte karton met foamtape op de kaart geplakt. Ik heb daarna een tekst van de stempelset BB happy hippos van My favorite things op de kaart gestempeld. Ik heb de afbeeldingen met foamtape op de kaart geplakt. Ik heb de kaart versierd met 3 enamel hartjes. 


Goodmorning, this week I haven't posted yet on my blog. I am enjoying a last week of vacation. I have been away on vacation in Limburg (the south of the Netherlands) for 2 weeks before this week. Now I am enjoying a quiet week at home. Today my nephew Niek comes for a visit and I am guessing he wants to craft. :) My other nephew Menno was here on monday and we made some little boxes and he had so much fun.

Today a new challenge starts on the As you like it challenge blog and this time we are being sponsored by Fantastic ribbons. For this challenge we want to know if you prefer making cards with critter or people on it and why you love the one or other. I really love using animal stamps. I think the colouring of people is much harder, especially the hair. So I enjoy animals so much more. I also love the cute animals you see in so many stampsets and I love that!

I have made a card for this challenge with the cute hippos from the stampset BB happy hippos from My favorite things. I have stamped a couple of the images and then I coloured them all with my Polychromos pencils, a black glaze pen and a white gelpen. I have fussy cut all the images. On a white card I have glued 2 strips of rainbow patterned paper from the Really rainbow petite paper pack from Lawn fawn. I used a punch to round all the corners of the card. On white cardstock I have made a background for the images with Tumbled glass distress ink and Mowed lawn distress ink. I have glued the white cardstock with foamtape on the card. With a black fineliner I have drawn a frame around the edges of the white cardstock. In the corner I have stamped a sentiment from the set BB happy hippos from My favorite things. I glued all the images with foamtape on the card. The card is decorated with 3 enamel hearts. 


I want to enter this card in the following challenges:
*********************************************************************************
STAMP: BB happy hippos from My favorite things
COLORING MEDIUM: Polychromos pencils
PAPER: White cs, Really rainbow petite paper pack from Lawn fawn
INK: Versafine clair nocturne, Tumbled glass and Mowed lawn Distress ink
ACCESSORIES: Black glaze pen, White gelpen, Enamel hearts, Black fineliner, Hillside stencils from Lawn fawn, Corner punch

Saturday, 16 October 2021

Di's digi designs challenge - Creepy or cute + Kleuren met potloden


Goedemorgen, vandaag post ik een kaartje voor de nieuwe challenge op het Di's digi designs challenge blog en ook voor mijn post op het Kleuren met potloden blog. De challenge bij Di's digi stamps is Creepy or cute, de perfecte aanleiding dus om nog een halloween kaartje te maken.

Ik heb een slimline kaart gemaakt met de digitale stempel Cutest pumpkin in the patch van Di's digi stamps. Ik heb de afbeelding ingekleurd met mijn Polychromos potloden, de zwarte glaze pen en een witte gelpen. Ik heb de hoed van de egel gekleurd met de Clear Spectrum noir sparkle glitter pen. Ik heb de afbeelding daarna uitgeknipt. Ik heb van oranje karton een kaart gemaakt met de Slimline frames (CR1537) van Marianne design. Het zwart-witte stipjespapier komt uit het Do what you love pretty paper block ( PK9149 - retired) van Marianne design. Ik heb het woord Boo uit zwart karton gesneden met de Silhouette cameo. Ik heb de letters op de kaart geplakt en daarna heb ik met een witte gelpen accentjes op de letters aangebracht. Ik heb de afbeelding met foamtape op de kaart geplakt.


Goodmorning, today I am posting a card for the new challenge on the Di's digi designs challenge blog and also for my post on the Kleuren met potloden blog. The challenge at Di's digi stamps is Creepy or cute, so that was the perfect opportunity to make a halloween card.

I have made a slimline card with the digital stamp Cutest pumpkin in the patch from Di's digi stamps. I have coloured the image with my Polychromos pencils, the black glaze pen and a white gelpen. I have coloured the hat also with the Clear Spectrum noir sparkle glitter pen. Then I have fussy cut the image. I have made a card from orange cardstock with the Slimline frames (CR1537) from Marianne design. The black and white dotted paper is from the Do what you love pretty paper block ( PK9149 - retired) from Marianne design. I have cut the word Boo from black cardstock with the Silhouette cameo and then I glued the letters on the card. I used a white gelpen to add accents on the letters. I have glued the image with foamtape on the card. 


Ik heb de volgende potloden gebruikt:
I have used the following pencils:

Egels:

9201-132 Light flesh, 9201-189 Cinnamon, 9201-192 Indian red, 9201-182 Brown ochre, 9201-180 Raw umber, 9201-179 Bistre, 9201-283 Burnt sienna, 9201-280 Burnt umber.

Pompoen en ballon:

9201-106 Light chrome yellow, 9201-111 Cadmium orange, 9201-115 Dark cadmium orange, 9201-121 Pale geranium lake.

Hoed:

9201-106 Light chrome yellow, 9201-199 Black, 9201-205 Cadmium yellow, 9201-170 May green,

9201-168 Earth green yellowish, 9201-167 Permanent green olive, 9201-278 Chrome oxide green

I want to enter this card in the following challenges:
    *********************************************************************************
    STAMP: Cutest pumpkin in the patch from Di's digi stamps
    COLORING MEDIUM: Polychromos pencils
    PAPER: White, orange and black cs, Do what you love pretty paper block ( PK9149 - retired) from Marianne design
    DIES: Slimline frames (CR1537) from Marianne design
    ACCESSORIES: Black glaze pen, White gelpen, Clear Spectrum noir sparkle glitter pen

    Wednesday, 13 October 2021

    Gerda Steiner designs - A boo for you


    Goedemorgen, vandaag mag ik weer een blogpost plaatsen op het blog van Gerda Steiner designs. Deze keer heb ik een slimline halloween kaart gemaakt met de clear stempelset A Boo for you van Gerda Steiner designs. Ik heb de afbeeldingen ingekleurd met mijn Polychromos potloden en de zwarte glaze pen en daarna heb ik de afbeeldingen uitgeknipt.

    Uit wit karton heb ik met de Slimline Distressed (CR1569) van Marianne design een grote rechthoek gestanst. Ik heb hier met Mustard seed, Carved pumpkin, Crackling campfire en Black soot Distress inkt een achtergrond op gemaakt. Voor het gras heb ik het Stencil 20 van Gummiapan gebruikt. Ik heb het gras met Versafine clair nocturne inkt op de achtergrond geblend om het echt zwart te laten zijn. Daarna heb ik zelf de twee bomen op de achtergrond getekend en ik heb ze ingekleurd met een permanente zwarte marker. Vervolgens heb ik de achtergrond op een witte slimline kaart geplakt. De twee spookjes zijn met foamtape op de kaart geplakt. Ik heb de tekst van de stempelset A Boo for you van Gerda Steiner designs op wit karton gestempeld en daarna heb ik de woorden uitgeknipt en op de kaart geplakt. Als laatste heb ik zwarte rub on sterretjes op de achtergrond aangebracht.


    Goodmorning, today it is my turn again to post something on the blog from Gerda Steiner designs. This time I have made a halloween slimline card with the clear stamp set A Boo for you from Gerda Steiner designs. I have coloured the images with my Polychromos pencils and the black glaze pen and then I have fussy cut the images.

    From white cardstock I have cut a large rectangle with a die from the set Slimline Distressed (CR1569) from Marianne design. I made a spooky background on it with Mustard seed, Carved pumpkin, Crackling campfire and Black soot Distress ink. I have added the grass with the Stencil 20 from Gummiapan. I blended the grass on the card with Versafine clair nocturne ink to make it really black. I have drawn the 2 trees on the background and coloured them with a black permanent marker. I have glued the background on a white slimline card. For the little ghosts I used foamtape to add them on the card. I have stamped a sentiment from the clear stamp set A Boo for you from Gerda Steiner designs on white cardstock and then I have fussy cut all the words and glued them on the card. I have decorated the sky with black star rub-ons.

    *********************************************************************************
    STAMP: A Boo for you from Gerda Steiner designs
    COLORING MEDIUM: Polychromos pencils, Distress inks
    PAPER: White cs
    INK: Versafine clair nocturne ink, Mustard seed, Carved pumpkin, Crackling campfire and Black soot Distress ink
    DIES: Slimline Distressed (CR1569) from Marianne design
    ACCESSORIES: Black glaze pen, Black star rub ons, Black permanent marker, Stencil 20 from Gummiapan 


    I am a participant in the Gerda Steiner designs Affiliate Programme. This means that if you click on one of my links and subsequently make a purchase, I will receive a small commission of store credit, at no extra cost to you.


    Friday, 8 October 2021

    From the heart stamps - Voor de chick met de nieuwe knie!


    Goedemorgen, mijn tante is een tijdje geleden geopereerd aan een nieuwe knie en dan is het natuurlijk wel zo leuk om een kaartje te sturen. En dan is het nog leuker om een heel toepasselijk kaartje te maken. De bijnaam van mijn tante is chicken, dus dan past deze leuke afbeelding echt goed bij haar.

    Ik heb de Spectacular birdbrain van From the heart stamps (no longer in business) geprint en daarna heb ik de afbeelding ingekleurd met mijn Polychromos potloden en daarna heb ik de afbeelding uitgeknipt. Ik had de bril twee keer geprint en nadat ik deze had gekleurd heb ik hem uitgeknipt en ook de glazen heb ik uitgesneden. Ik heb een plastic sheet achter de glazen geplakt om de bril echter te laten lijken en dat is goed gelukt.  Ik heb de vleugels een beetje losgeknipt van het lijft. Uit wit karton heb ik met de Silhouette cameo 2 krukken gesneden. Ik heb hiervoor het bestand Crutch (4536) van Loni Harris gebruikt. Ik heb de krukken gekleurd met Brushed corduroy Distress inkt. Ik heb de krukken onder de vleugels gestopt en ze daarna aan de achterkant van de afbeelding vastgeplakt. 

    Op een witte kaart heb ik met Mini cloud edges stencil van My favorite things en Peacock feathers Distress inkt een wolkenachtergrond gemaakt. Met een zwarte fineliner heb ik een lijntje langs de randen van de kaart gedoodled. Met de Fringe - Creative cuts van Mama elephant heb ik uit groen design papier van het Striped silly paperpad van Sunny studio stamps een randje gestanst, die ik als gras op mijn kaart heb gebruikt. Ik heb het randje alleen aan de onderkant vastgeplakt, zodat ik sommige strookjes wat naar voren kon buigen. Ik heb de afbeelding met foamtape op de kaart geplakt, nadat ik eerst nog een echt verbandje om de knie van mijn birdbrain te draaien. Ik heb de tekst gemaakt met zwarte sticker letters. Uit roze karton heb ik een aantal kleine bloemetjes geponst met een bloemenpons en nadat ik die op de kaart heb geplakt, heb ik de bloemen versierd met zwarte hotfix steentjes. Op de bril heb ik kristallen hotfix steentjes geplakt. Ik heb er geen foto van, maar binnen in de kaart heb ik de tekst beterschap geplaatst met de zwarte sticker letters.


    Goodmorning, a few weeks ago my aunt had to undergo surgery for a new knee and that was the perfect opportunity for a card. My aunts nickname is chicken, so this image is perfect for her. 

    I have printed the Spectacular birdbrain from From the heart stamps (no longer in business) and then I coloured the image with my Polychromos pencils and then I have fussy cut the image. I have printed the glasses another time and after I coloured them, I have fussy cut the image. I added a plastic sheet behind the image to make it look like real glasses and I love the look. From white cardstock I have cut 2 crutches with the file Crutch (4536) from Loni Harris. I have coloured them with Brushed corduroy Distress ink. Then I placed the crutches under the wings of the chicken.

    On a white card I have made a cloudy background with the Mini cloud edges stencil from My favorite things and Peacock feathers Distress ink. With a black fineliner I have doodled a line on the edges of the card. With the Fringe - Creative cuts from Mama elephant I have cut a grass border from green patterned paper from the Striped silly paperpad from Sunny studio stamps and then I glued it on the card. I put a bandage around the knee of the chicken and then I glued the image on the card. The sentiment  (for the chick with the new knee) is made with black sticker letters. From pink cardstock I have punched a couple of little flowers and then I glued them on the card and on the chicken. I have decorated all the flowers with a black hotfix gem. I have glued crystal hotfix gems on the glasses. Inside the card I have added the sentiment beterschap with the black sticker letters. 


    *********************************************************************************
    STAMP: Spectacular birdbrain from From the heart stamps (no longer in business)
    SILHOUETTE CUTTING FILE: Crutch (4536) from Loni Harris
    COLORING MEDIUM: Polychromos pencils, Distress inks, 
    PAPER: White and pink cs, Striped silly paperpad from Sunny studio stamps, Plastic sheet
    INKS: Peacock feathers and Brushed corduroy Distress ink
    DIES: Fringe - Creative cuts from Mama elephant
    ACCESSORIES: Mini cloud edges stencil from My favorite things, Black fineliner, Black and crystal hotfix gems, Black sticker letters, Flowerpunch

    Thursday, 7 October 2021

    As you like it challenge 218 - Your favourite non card project


    Goedemorgen, vandaag begint er weer een nieuwe challenge op het As you like it challenge blog. Deze keer wordt onze challenge gesponsord door Lili of the valley. Onze challenge is deze keer om te laten zien wat je graag naast het kaarten maken doet. Ik vind het heel leuk om persoonlijke cadeautjes te maken en die dan ook zodanig in te pakken dat het echt bij een persoon of bij het cadeautje past. Ik heb voor deze challenge bijvoorbeeld een doosje gemaakt waarin een stervormige bruisbal perfect past.

    Ik heb de afbeelding Scruffy puppy bubbles van Di's digi stamps gebruikt, omdat dat natuurlijk de perfecte afbeelding is voor bij een bruisbal. Ik heb de afbeelding ingekleurd met mijn Polychromos potloden, de zwarte glaze pen en een witte gelpen. Ik heb het zeepsop en het water gekleurd met de Clear Spectrum noir sparkle glitter pen. Ik heb de afbeelding uitgestanst met de Crea-nest-lies XXL 21 van Crealies. En uit geel papier van het Everyday flair paper pad (retired) van My mind's eye heb ik met de Crea-nest-lies XXL 33 van Crealies een grotere cirkel gestanst. Ik heb de cirkel met de afbeelding gekleurd met Antique linen en Walnut stain Distress inkt. Met de Crea-nest-lies XXL 22 van Crealies en de Crea-nest-lies XXL 34 van Crealies heb ik uit design papier van het Everyday flair paper pad (retired) van My mind's eye 2 vierkanten gesneden. Ik heb de vierkanten op mijn doosje geplakt en daarna heb ik de cirkels met de afbeelding op het doosje geplakt met foamtape. 

    Goodmorning, today a new challenge starts on the As you like it challenge blog. This time we are being sponsored by Lili of the valley. Our challenge this time to show what kind of thing you like to do next to card making. I love making personal gifts and to decorate them to make it really personal for the person who gets the present. For this challenge I have made a box with the perfect shape for a star bath bomb.

    I have used the digital stamp Scruffy puppy bubbles from Di's digi stamps, because it is the perfect image for a bath bomb. I have coloured the image with my Polychromos pencils, the black glaze pen and a white gelpen. I have coloured the soap and the water with the Clear Spectrum noir sparkle glitter pen. I have die-cut the image with the Crea-nest-lies XXL 21 from Crealies. I have cut a larger circle from yellow paper from the Everyday flair paper pad (retired) from My mind's eye with the Crea-nest-lies XXL 33 from Crealies. I have coloured the circle with the image with Antique linen and Walnut stain Distress ink. With the Crea-nest-lies XXL 22 from Crealies and Crea-nest-lies XXL 34 from Crealies I have cut 2 squares from patterned paper from the Everyday flair paper pad (retired) from My mind's eye. I have glued the squares on the box and added the circles with foamtape on the box. 


    Het doosje heb ik uit creme cardstock gesneden met de Silhouette cameo. Binnenin het doosje heb ik een stervorm uitgesneden waar de bruisbal perfect in past.

    The box is cut from cream cardstock with the Silhouette cameo. Inside the box I have cut a star shape. The bath bomb fits perfect in the star shape.


    *********************************************************************************
    STAMP: Scruffy puppy bubbles from Di's digi stamps
    COLORING MEDIUM: Polychromos pencils, Distress inks
    PAPER: Cream cs, Everyday flair paper pad (retired) from My mind's eye
    INK: Antique linen and Walnut stain Distress ink
    DIES: Crea-nest-lies XXL 21, 22, 33 and 34 from Crealies
    ACCESSORIES: Black glaze pen, White gelpen, Clear Spectrum noir sparkle glitter pen

    Wednesday, 6 October 2021

    Gerda Steiner designs - Trick or treat!


    Goedemorgen, vandaag is het weer mijn beurt om een projectje te posten op het blog van Gerda Steiner designs. Deze keer heb ik een klein doosje gemaakt voor halloween met daarin een zakje snoepjes. Het doosje is versierd met de digitale stempel Dog dressed as ghost van Gerda Steiner designs. Ik heb de afbeelding ingekleurd met mijn Polychromos potloden en de zwarte glaze pen. Ik heb de afbeelding daarna uitgeknipt.

    Het doosje is gemaakt met de Silhouette cameo uit paars karton. Ik heb het doosje versierd met zwart-wit stippen papier van het Do what you love pretty paper block ( PK9149 - retired) van Marianne design. Ik heb hier een wit lintje omheen gebonden en daarna heb ik het op het doosje geplakt. Ik heb de afbeelding met foamtape op het doosje geplakt.


    Goodmorning, today it it my turn again to post a project on the blog from Gerda Steiner designs. This time I have made a little box for halloween and I filled it with candy in a little bag. The box is decorated with the digital stamp Dog dressed as ghost from Gerda Steiner designs. I have coloured the image with my Polychromos pencils and the black glaze pen. I have fussy cut the image. 

    The box is made from purple cardstock with the Silhouette cameo. I have decorated the box with black and white dotted paper from the Do what you love pretty paper block ( PK9149 - retired) from Marianne design. I have tied a white ribbon around it and then I glued it on the box. I have added the image with foamtape.

    Op de achterkant van het doosje heb ik weer het zwart-witte stippenpapier geplakt. Ik heb de hoeken van het papier afgerond met een hoekpons. Op een stukje wit karton heb ik een tekst van de stempelset Happy haunting van Mama elephant gestempeld. Ik heb de tekst uitgestanst met de Crea-nest-lies XXL 33 van Crealies en daarna heb ik de tekst op het doosje geplakt. Het doosje sluit met een klittenband rondje.

    On the backside of the box I have added the black and white dotted paper again. I have rounded the corners from the paper with a corner punch. I have stamped a sentiment from the set Happy haunting from Mama elephant on white cardstock. I have die-cut the sentiment with the Crea-nest-lies XXL 33 from Crealies and then I glued it on the box. The box closes with a velcro circle. 


    *********************************************************************************
    STAMP: Dog dressed as ghost from Gerda Steiner designs, Happy haunting from Mama elephant
    COLORING MEDIUM: Polychromos pencils
    PAPER: Purple cs, Do what you love pretty paper block ( PK9149 - retired) from Marianne design
    INK: Versafine clair nocturne
    DIES: Crea-nest-lies XXL 33 from Crealies
    ACCESSORIES: Black glaze pen, white ribbon, Corner punch, Velcro

    I am a participant in the Gerda Steiner designs Affiliate Programme. This means that if you click on one of my links and subsequently make a purchase, I will receive a small commission of store credit, at no extra cost to you.

    Tuesday, 5 October 2021

    Crealies - Cadeautje met tag


    Goedemorgen, de afgelopen 2 weken heb ik al wat projectjes laten zien die ik heb gemaakt met de mooie bloemenstempels die ik heb gekregen van Crealies en vandaag laat ik weer een nieuw project zien. Ik heb deze keer op roze inpakpapier de mooie bloemen en blaadjes van de stempelsets A perfect match stempels - Bloemen A (CLPMS02) van Crealies en A perfect match stempels - Bloemen boeket A (CLPMS01) van Crealies gestempeld met zwarte inkt. Ik heb ook nog gestempeld met een Dot stamp van Rubber stamp tapestry. Ik heb daarna een cadeautje ingepakt met het inpakpapier.

    Goodmorning, the past 2 weeks I have posted a couple of projects that I have made with pretty flowerstamps that I have gotten from Crealies and today I have a new project. This time I have stamped on pink wrapping paper with the A perfect match stempels - Bloemen A (CLPMS02) from Crealies and A perfect match stempels - Bloemen boeket A (CLPMS01) from Crealies. I also stamped with the Dot stamp from Rubber stamp tapestry. Then I wrapped a present with the pink wrapping paper.


    Ik heb voor bij het cadeautje nog een bijpassende tag gemaakt. Ik heb de tag uit wit karton en het roze inpakpapier gestanst met de Labelzz & tagzz stansen no.13 Met stiksteeklijn (CLLT13) van Crealies. Ik heb met een zwarte fineliner een stiklijntje op de tag getekend. Met de stempelset Tekst & zo Duo font stempels, jarig 01 (CLTSDF01) van Crealies heb ik een tekst op de tag gestempeld. Ik heb een aantal blaadjes van de set A perfect match stempels - Bloemen A (CLPMS02) van Crealies op wit papier gestempeld en daarna heb ik de bloemen op het roze papier gestempeld. Ik heb de bloemen en blaadjes gekleurd met mijn Polychromos potloden. Ik heb daarna de bloemen en blaadjes uitgeknipt (ik was mijn stansjes even vergeten, omdat ik meestal mijn afbeeldingen uitknip) en op de tag geplakt. Ik heb de bloemen versierd met een witte parel. 

    I have made a matching tag that goes together with the present. I have cut a tag from white cardstock and the pink wrapping paper with the Labelzz & tagzz stansen no.13 Met stiksteeklijn (CLLT13) from Crealies. I added faux stitching with a black fineliner. With the stamp set Tekst & zo Duo font stempels, jarig 01 (CLTSDF01) from Crealies I have stamped a sentiment on the tag. I have stamped some leafs from the set A perfect match stempels - Bloemen A (CLPMS02) from Crealies on white cardstock and also 2 flowers on the pink wrapping paper. I have coloured them all with my Polychromos pencils. I have fussy cut all the images ( I had forgotten that I have the die-cuts, because I always fussy cut my images) and glued them on the tag. I have decorated the flowers with a white pearl. 


    *********************************************************************************
    STAMP: A perfect match stempels - Bloemen boeket A (CLPMS01) and A perfect match stempels - Bloemen A (CLPMS02) van Crealies, Tekst & zo Duo font stempels, jarig 01 (CLTSDF01) from Crealies, Dot stamp from Rubber stamp tapestry
    COLORING MEDIUM: Polychromos pencils
    PAPER: White cs, Pink wrapping paper
    INK: Versafine clair nocturne
    DIES: Labelzz & tagzz stansen no.13 Met stiksteeklijn (CLLT13) from Crealies
    ACCESSORIES: White ribbon, White pearls, Black fineliner

    LinkWithin

    Related Posts with Thumbnails