Wednesday, 12 October 2016

Gerda Steiner designs - Cute and cold hedgehog


Goedemorgen, vandaag post ik weer eens een ander kaartje dan een halloween kaartje. Dit is het kaartje dat ik heb gemaakt voor de progressieve challenge van Gerda Steiner designs. Als je een kaartje maakt met de afbeelding van die maand, ontvang je de afbeelding voor de maand erna gratis! Een leuke manier om aan hele leuke digitale stempels te komen!
Deze maand moet je een kaart maken met de afbeelding Cute and cold Hedgehog van Gerda Steiner designs. Ik heb de afbeelding ingekleurd met mijn Polychromos potloden en de zwarte glaze pen. De lucht is gekleurd met een blauw derwent aquatone potlood. Ik heb de afbeelding uitgesneden met de Crea-nest-lies XXL 33 van Crealies. Op een gele kaart heb ik papier uit het Perfectly plaid fall paperpad van Lawn fawn geplakt nadat ik dat had gesneden met de Crea-nest-lies XXL 34 van Crealies. Onder de afbeelding heb ik een gele geschulpte cirkel geplaatst die ik heb ik uitgensneden met mijn nestabilities. Ik heb zwarte hotfix steentjes op de gele cirkel geplakt. De tekst is op de computer gemaakt en op groen karton geplakt en daarna op de afbeelding geplakt.


Goodmorning, today I posting another card than a halloween card. This is the card that I made for the monthly progressive challenge from Gerda Steiner designs. If you make a card with the image from this month, you will receive the image for the next month for free! A really nice way to receive very cute digital stamps!
This month you have to make a card with the image Cute and cold Hedgehog from Gerda Steiner designs. I have coloured the image with my Polychromos pencils and the black glaze pen. I coloured the sky with a blue derwent aquatone pencil. I have cut the image out with the Crea-nest-lies XXL 33 from Crealies. On a yellow card I adhered paper from the Perfectly plaid fall paperpad from Lawn fawn that I have cut with the Crea-nest-lies XXL 34 from Crealies. Under the image I added a yellow scalloped circle that I have cut with the nestabilities. I adhered black hotfix gems on the circle. The sentiment was made on the computer and I adhered it on green cardstock.


STAMP: Cute and cold Hedgehog from Gerda Steiner designs
COLORING MEDIUM: Polychromos pencils, Blue derwent aquatone pencil
PAPER: Perfectly plaid fall paperpad from Lawn fawn, yellow, green and white cs
DIES: Crea-nest-lies XXL 33 and 34 from Crealies
ACCESSORIES: Black glaze pen, black hotfix

Tuesday, 11 October 2016

Fairytale challenge 153 - Monsters


Goedemorgen, vandaag begint de nieuwe challenge op het Fairytale challenge blog. Deze keer is de challenge Monsters. De perfecte kans om eens een foto van mezelf te gebruiken toen ik mijn vleermuis vliegles aan het geven was. ;) Hihi Ben ik ontzettend knap? ;)
Dit grappige monstertje is de afbeelding Little monster & bat van Dilly beans designs. Ik heb de afbeelding ingekleurd met mijn Polychromos potloden en de zwarte glaze pen en daarna heb ik glossy accents op de ogen aangebracht. Daarna heb ik de afbeelding uitgeknipt. Op een witte kaart heb ik een laag oranje papier geplakt en daarna zwart Honeycomb papier van Pink petticoat. Daarna heb ik nog een strip oranje papier opgeplakt en daarop heb ik stiklijntjes getekend met een zwarte pen. De tekst van de set Gone batty van Taylored expressions heb ik op oranje papier gestempeld en daarna in een bannervorm uitgesneden. Ook hier heb ik stiklijntjes op gemaakt met de zwarte pen.


Goodmorning, today the new challenge starts on the Fairytale challenge blog. This time our challenge is Monsters. The perfect oppurtunity to use my own photo from when I was learning my bat to fly. ;) Hihi. Aren't I really pretty? ;)
This cute monster is the image Little monster & bat from Dilly beans designs. I have coloured the image with my Polychromos pencils and the black glaze pen. I have fussy cut the image. On a white card I adhered a layer of orange cardstock and then some black Honeycomb paper from Pink petticoat. I added a strip of orange cardstock and I added faux stitching on it with a black pen. The sentiment from the set Gone batty from Taylored expressions is stamped on orange cardstock and then I cut it into a bannershape. Again I added faux stitching. 


Binnen in de kaart heb ik nog een stukje zwart Honeycomb papier van Pink petticoat geplakt. Ik heb nog een andere tekst van de Gone batty set van Taylored expressions op oranje papier gestempeld en deze heb ik op het design papier geplakt.

Inside the card I glued another piece of the black Honeycomb paper from Pink petticoat. On top of it I adhered orange cardstock on which I stamped another sentiment from the set Gone batty from Taylored expressions


STAMP: Little monster & bat from Dilly beans designs
COLORING MEDIUM: Polychromos pencils
PAPER: White and orange cs, Honeycomb from Pink petticoat
INK: Versafine onyx black
ACCESSORIES: Black glaze pen, glossy accents, black pen

Monday, 10 October 2016

Teddy Bea asks Trick or treat?


Goedemorgen, vandaag alweer een halloween kaartje op mijn blog. Deze keer met een afbeelding die ik vorig jaar al had ingekleurd. Ik was nog niet helemaal tevreden, dus ik ben nog even met mijn potloden aan de gang gegaan en heb de afbeelding nog iets verbeterd. Het is de afbeelding TeddyBea 102 van TeddyBoandCo. Momenteel zie ik deze afbeelding niet in hun etsy shop staan, maar volgens mij kan je ze gewoon mailen en vragen of ze hem toch nog in de shop willen plaatsen. Na het kleuren heb ik de afbeelding uitgeknipt. Van een witte kaart heb ik een randje papier van de onderkant van de kaart afgesneden en daarna heb ik zwart Little chevron papier van Pink petticoat en een smal randje oranje papier opgeplakt. Met een zwarte pen heb ik lijntjes op de kaart gedoodled en daarna heb ik de afbeelding op de kaart geplakt. De tekst en het spinnetje komen uit de set All in onesie Halloween van Clearly besotted. Omdat ik de kaart nog een beetje kaal vond heb ik kleine zwarte rub-on sterretjes rondom de afbeelding geplaatst.


Goodmorning, today I am posting a new halloween card on my blog. This time with an image that I already had coloured last year. I wasn't totally satisfied, so I made some little improvements and I love how it turned out. It is the image TeddyBea 102 from TeddyBoandCo. I can't find it in their etsy store right now, but you could always try to send them a message and ask if they will post it in their store. After I was done colouring the image, I have fussy cut it. I cut the bottom edge from the front panel of a white card and replaced it with black Little chevron paper from Pink petticoat and ta tiny strip of oramge cardstock. I doodled some lines with a black pen and then I adhered the image with foamtape on the card. The little spider and the sentiment are from the stampset All in onesie Halloween from Clearly besotted. Because I felt that something was missing on my card, I added a couple of tiny black star rub-ons. 


STAMP: TeddyBea 102 from TeddyBoandCo, All in onesie Halloween from Clearly besotted
COLORING MEDIUM: Pencils & OMS
PAPER: White and orange cs, Little chevron from Pink petticoat
INK: Versafine onyx black
ACCESSORIES: Black glaze pen, clear Spectrum noir sparkle pen, black star rub-ons, black pen. 

Sunday, 9 October 2016

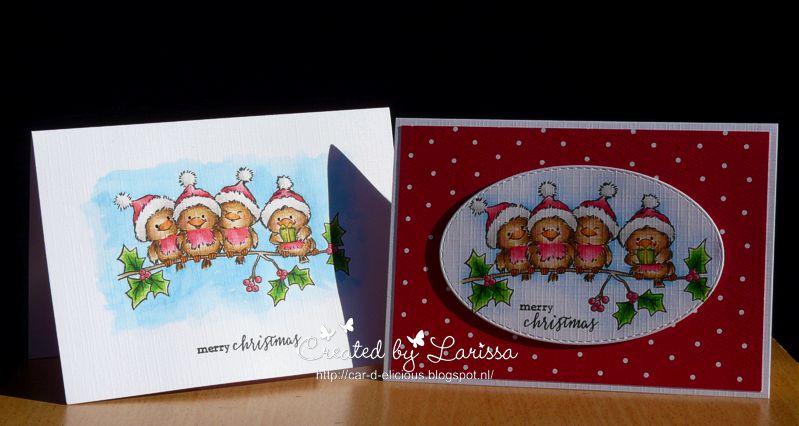
Christmas cards 2016: Robins on branch


Goedmorgen, vandaag post ik weer een nieuw kerstkaartje op mijn blog. Vandaag zelfs 2. Zo schiet het lekker op met mijn voorraad!

Goodmorning, today I am posting a new christmascard on my blog. Today even 2 christmascards. My stash growing really fast now!


Voor mijn kerstkaartjes van vandaag heb ik de stempel Robins on branch van Wild rose studio gebruikt. Ik heb de stempel ingekleurd met mijn Polychromos potloden, de zwarte glaze pen en de clear Spectrum noir sparkle pen. Ik heb de afbeelding uitgesneden met de Crea-nest-lies XXL 35 van Crealies. Daarna heb ik een tekst van de stempelset Message me van Clearly besotted stamps onder de afbeelding gestempeld. Op een witte kaart heb ik rood stipjesppaier uit het Red devil paperpack van Bazzil basics geplakt en daarna heb ik de ovaal met foamtape op de kaart geplakt.

Aantal kerstkaarten 2016: 25
Aantal kerst cadeau envelopjes 2016: 2
Aantal kerst tags/cadeaukaartjes: 4


On my christmascards I used the stamp Robins on branch from Wild rose studio. I have coloured the image with my Polychromos pencils, the black glaze pen and the clear Spectrum noir sparkle pen. I have cut the image out with the Crea-nest-lies XXL 35 from Crealies. Under the image I stamped a sentiment from the set Message me from Clearly besotted stamps. On a white card I adhered red dotted design paper from the Red devil paperpack from Bazzil basics and on top of it I adhered the oval with foamtape.

Number of christmascards 2016: 25
Number of christmas gift wallets 2016: 2
Number of christmas tags: 4


Het tweede kaartje is een clean and simple kaartje geworden. Ik heb rechtstreeks op een witte kaart de afbeelding Robins on branch van Wild rose studio gestempeld. Deze heb ik daarna ingekleurd met mijn Polychromos potloden, de zwarte glaze pen en de clear Spectrum noir sparkle pen. Onder de afbeelding heb ik de tekst van de set Message me van Clearly besotted stamps gestempeld. Op deze kaart is de lucht gekleurd met een blauw Derwent aquatone potlood. Ik ga de kaart nu even nog onder iets zwaars leggen, zodat hij weer mooi recht wordt. ;)

Aantal kerstkaarten 2016: 25
Aantal kerst cadeau envelopjes 2016: 2
Aantal kerst tags/cadeaukaartjes: 4


The second card is a clean and simple card. I stamped the image Robins on branch from Wild rose studio straight onto a white card. The image is coloured with my Polychromos pencils, the black glaze pen and the clear Spectrum noir sparkle pen. Under the image I stamped a sentiment from the set Message me from Clearly besotted stamps. This time I coloured the sky with a blue Derwent aquatone pencil. I am going to put something heavy on my card right now, so I will be straight again. ;)

Number of christmascards 2016: 25
Number of christmas gift wallets 2016: 2
Number of christmas tags: 4

STAMP: Robins on branch from Wild rose studio, Message me from Clearly besotted stamps
COLORING MEDIUM: Polychromos pencils
PAPER: White cs, Red devil paperpack from Bazzil basics
INK: Versafine onyx black
DIES: Crea-nest-lies XXL 35 from Crealies
ACCESSORIES: Black glaze pen, clear Spectrum noir sparkle pen


STAMP: Robins on branch from Wild rose studio
COLORING MEDIUM: Polychromos pencils, Derwent aquatone pencil
PAPER: White cs
INK: Versafine onyx black
ACCESSORIES: Black glaze pen, clear Spectrum noir sparkle pen

Saturday, 8 October 2016

Lili of the valley - Happy haunting


Hallo, vandaag post ik weer een nieuw Halloween kaartje, na de vorige kaart heb ik, geloof ik, toch wel een beetje de smaak te pakken. ;)
Ik weer een kaartje gemaakt met een digitale stempel van Lili of the valley. Deze keer heb ik de afbeelding Halloween van Lili of the valley gebruikt. Ik heb de afbeelding ingekleurd met mijn Polychromos potloden, de zwarte glaze pen en de clear Spectrum noir sparkle pen. Ik heb het gras iets verlengd door er zelf een stukje bij aan te tekenen met een zwarte pen. Daarna heb ik de afbeelding uitgeknipt. Op een witte kaart heb ik een achtergrond gemaakt met Carved pumpkin distress inkt en daarna heb ik de afbeelding met foamtape op de kaart geplakt. De tekst en sterretjes komen uit de set Best witches van Reverse confetti en deze heb ik rondom de afbeelding gestempeld. Daarna heb ik nog een aantal Sparkling clear sequins 4 mm van Pretty pink posh rondom de afbeelding geplakt met een gluedot.


Hello, today I am posting another new halloween card, after the last card, I really wanted to make another one.
I made a card with another stamp from Lili of the valley. This time I used the image Halloween from Lili of the valley. I have coloured the image with my Polychromos pencils, the black glaze pen and the clear Spectrum noir sparkle pen. With a black pen I drew a little more grass on the edhges of the image, so it would be the perfect size for my card. Then I fussy cut the image. On a white card I made a background with Carved pumpkin distress ink and then I adhered the image with foamtape on the card. The sentiment and stars are from the set Best witches from Reverse confetti and I stamped those around the image. Then I added a couple of Sparkling clear sequins 4 mm from Pretty pink posh around the image.


STAMP: Halloween from Lili of the valley,  Best witches from Reverse confetti
COLORING MEDIUM: Polychromos pencils 
PAPER: Whitecs
INK: Versafine onyx black, Carved pumpkin distress ink
ACCESSORIES: Black glaze pen, clear Spectrum noir sparkle pen, black pen, Sparkling clear sequins 4 mm from Pretty pink posh

Thursday, 6 October 2016

Lili of the valley - Halloween cats


Hallo, vandaag post ik een halloween kaartje. Normaal vind ik het ieder jaar geweldig om halloween kaartjes te maken, hoewel we het niet eens vieren hier in Nederland, maar dit jaar komt mijn trek in halloween kaartjes maar langzaam op gang. Ik kan gewoon erg genieten van de geweldige kleurencombinaties die ik kan gebruiken bij halloween kaarten.
Het kaartje van vandaag is gemaakt met de afbeelding Halloween cats van Lili of the valley. Ik heb de afbeelding ingekleurd met mijn Polychromos potloden en de zwarte glaze pen. De lucht is gekleurd met een blauw Derwent aquatone potlood. Op de afbeelding heb ik een tekst gestempeld van de set Message me van Clearly besotted stamps. Ik heb de afbeelding uitgeknipt. Op een witte kaart heb ik een laag oranje papier geplakt en daarover heen een strip zwart glitter papier. De afbeelding heb ik vervolgens met foamtape op de kaart geplakt.


Hello, today I am posting a halloween card. Normally I love making halloween cards every year, although we even't celebrate it in the Netherlands, but this year I don't feel like making halloween cards (yet). I do love the crazy colour combinations that you can use on halloween cards.
Today's card is made with the image Halloween cats from Lili of the valley. I have coloured the image with my Polychromos pencils and the black glaze pen. The sky is coloured with a blue Derwent aquatone pencil. On the image I stamped a sentiment from the set Message me from Clearly besotted stamps. On a white card I adhered a layer of orange cardstock and then I added a strip of black glitter paper. I adhered the image with foamtape on the card. 


I want to enter this card in the following challenges:
*********************************************************************************
STAMP: Halloween cats from Lili of the valley, Message me from Clearly besotted stamps
COLORING MEDIUM: Polychromos pencils, Derwent aquatone pencils
PAPER: White and orange cs, black glitter paper
INK: Versafine onyx black
ACCESSORIES: Black glaze pen, white gelpen

Tuesday, 4 October 2016

Tiddly Inks challenge 192 - Happy fall y'all!


Goedemorgen! Vandaag begint er weer een nieuwe challenge op het Tiddly Inks challenge blog en deze keer is de challenge: Happy fall y'all, oftewel maak een herfstkaartje.
Ik heb een kaartje gemaakt met de Couple of fall cuties van Tiddly Inks. Ik heb de afbeelding ingekleurd met mijn Polychromos potloden en de zwarte glaze pen en daarna heb ik nog glossy accents op de neusjes aangebracht. Ik heb uit wit karton een vierkant gestanst met de Crea-nest-lies XXL 42 van Crealies en deze heb ik op donkerbruin karton geplakt. Uit hetzelfde donkerbruine karton heb ik nog een vierkant gestanst en deze heb ik schuin achter de afbeelding geplakt. Uit een geruit papiertje van het Perfectly plaid fall paperpad van Lawn fawn heb ik ook nog een grote vierkant gesneden met de Crea-nest-lies XXL 42 van Crealies. Ook deze heb ik gemat op donkerbruin karton. Ik heb de kaart versierd met zwarte hotfix steentjes.


Goodmorning! Today a new challenge is posted on the Tiddly Inks challenge blog and this time we have the Happy fall y'all challenge for you. We want to see autumn cards.
I made a card with the Couple of fall cuties from Tiddly Inks. I have coloured the image with my Polychromos pencils and the black glaze pen and then I applied glossy accents on the little noses. I have cut a sqaure from white cardstock with the Crea-nest-lies XXL 42 from Crealies and then I matted it on brown cardstock. I have cut another square from the same dark brow cardstock and adhered it behind the square with the image. From some plaid paper from the Perfectly plaid fall paperpad from Lawn fawn I have cut a big square with the Crea-nest-lies XXL 42 from Crealies. This one I also adhered on brown cardstock and then I adhered it on my white card. I decorated the card with a couple of black hotfix gems.


Op de voorkant van de kaart was er geen plaats meer voor deze grote tekst van de set Birthday wishes & balloons van My favorite things, dus die heb ik maar binnenin de kaart gestempeld. Ik heb het hartje gekleurd met mijn Polychromos potloden.

On the front of the card I didn't have room for this large sentiment from the set Birthday wishes & balloons from My favorite things, so I stamped it inside the card. I have coloured the little heart with my Polychromos pencils.


STAMP: Couple of fall cuties from Tiddly Inks, Birthday wishes & balloons from My favorite things
COLORING MEDIUM: Polychromos pencils
PAPER: White and dark brown cs, Perfectly plaid fall paperpad from Lawn fawn
INK: Versafine onyx black
DIES: Crea-nest-lies XXL 42 from Crealies
ACCESSORIES: Black glaze pen, glossy accents, black hotfix, white ribbon

Thursday, 29 September 2016

Critter loving cardmakers card swap - September


Goedemorgen, ook deze maand was er weer een kaartenswap van de Critter loving papercrafters groep op facebook en natuurlijk heb ik deze maand ook weer meegedaan. Ik stuur mijn kaartjes eigenlijk bijna nooit op (erg he) en nu maak ik eens gericht een kaartje voor iemand. Heel leuk om te doen en het is ook iedere maand weer een leuke verrassing als je het kaartje ontvangt dat voor jou is gemaakt.

Dit is het kaartje dat ik deze maand heb gemaakt. Ik heb een digitale stempel uit de augutstus stempel bundel van Gerda Steiner designs gebruikt. Dit is Juggling tiger van Gerda Steiner designs. Ik heb de afbeelding iets aangepast op de computer. Ik heb de balletjes weggegumd en daarna de afbeelding geprint. Ik heb de afbeelding vervolgens met Polychromos potloden ingekleurd. Op de pootjes en de neus heb ik glossy accents aangebracht. Met het Moxie alfabet van quickutz heb ik het woord Hello uit emerald karton gestanst. De letters heb ik op de plekken van de ballen opgeplakt met foamtape. Vervolgens heb ik ze gekleurd met de clear spectrum noir sparkle pen en daarna heb ik glossy accents op de letters aangebracht. Ik heb de afbeelding uitgesneden met de Crea-nest-lies XXL 36 van Crealies en deze daarna op emerald karton geplakt. Op een witte kaart heb ik emerald karton geplakt en daarna ruitjespapier uit het Perfectly plaid fall paperpad van Lawn fawn. Daarna heb ik nog een strip emerald karton op de kaart geplakt nadat ik daar eerst een wit lintje omheen heb gebonden.


Goodmorning, this month we had a new card swap from the Critter loving papercrafters group on facebook and this month I again made a card for it. I hardly ever post my cards (oops) and I really love making the card for someone special. I really enjoy and it is a nice surprise every month when you receive the card that has been made especially for you. 

This is the card that I made this month. I have used an image from the August stamp bundle from Gerda Steiner designs. This is Juggling tiger from Gerda Stener designs. I did change the image a bit on the computer. I erased the balls and then I printed the image. I have coloured the image with my Polychromos pencils. On the paws and the nose I added glossy accents. With the Moxie alphabet from quickutz I cut the word Hello from Emerald cardstock. I adhered the letters with foamtape on the spots where the balls were. Then I coloured the letters with the Clear spectrum noir sparkle pen and then I applied glossy accents on them. I have cut the image out with the Crea-nest-lies XXL 36 from Crealies and then I layered it on emerald cardstock. On a white card I adhered emerald cardstock and then plaid paper from the Perfectly plaid fall paperpad from Lawn fawn. I added a strip of emerald cardstock after I wrapped a white ribbon around it.


STAMP: Juggling tiger from Gerda Steiner designs
COLORING MEDIUM: Polychromos pencils
PAPER: Perfectly plaid fall paperpad from Lawn fawn, white and emerald cs
DIES: Moxie alphabet from quickutz, Crea-nest-lies XXL 36 from Crealies
ACCESSORIES: Glossy accents, clear Spectrum noir sparkle pen, white ribbon

Wednesday, 28 September 2016

Gerda Steiner designs - Two more parachute piggies


Goedemorgen, dit zijn (voorlopig) echt de laatste kaartjes met Parachute piggy van Gerda Steiner designs. Ik had de afbeelding één keer groot en drie keer klein uitgeprint en die heb ik nu allemaal meteen opgemaakt, dus voorlopig zijn jullie van dit varkentje verlost. ;)
Ook deze keer heb ik de afbeelding ingekleurd met mijn Polychromos potloden, de zwarte glaze pen en glossy accents. Ik heb met een witte gelpen stipjes op de parachute getekend en daarna heb ik de afbeelding uitgeknipt. Op een witte kaart heb ik een wolkenachtergrond gemaakt met Soap powder inkt van Jenni Bowlin. Ik heb met de Stitched cloud edges die-namics van My favorite things een malletje gemaakt waardoor ik de wolken op de kaart kon maken. Uit wit karton heb ik met de Crea-nest-lies XXL 35 & 36 van Crealies een voorpaneel gesneden en deze heb ik met foamtape op de kaart geplakt.


Goodmorning, these are my (for now) last 2 cards that I made with the image Parachute piggy from Gerda Steiner designs. I printed one large image and three little ones and now I used them all, so for now the piggy won't whow up again on my blog. ;)
Again I coloured the image with my Polychromos pencils, the black glaze pen and glossy accents. I added doodling on the parachute with a white gelpen and then I fussy cut the image. On a white card I made a cloudy sky with Soap powder ink from Jenni Bowlin. I used the Stitched cloud edges die-namics from My favorite things to make a stencil so I could apply the clouds on the card. From white cardstock I cut a front panel with the Crea-nest-lies XXL 35 & 36 from Crealies and I adhered it with foamtape on the front of the card.


En dit is het laatste kaartje met Parachute piggy van Gerda Steiner designs. Het inkleuren is hetzelfde gegaan als hierboven. Deze keer heb ik rechtstreeks op de voorkant van de kaart een blauw stuk gemaakt door de randen af te plakken met washi tape en daarna een lucht te kleuren met Soap powder inkt van Jenni Bowlin. Uit wit karton heb ik daarna wolken uitgestanst met de Simple puffy clouds die from Lawn fawn en deze heb ik op het blauwe vlak geplakt en daarna heb ik de afbeelding opgeplakt. De tekst van deze kaart en ook de eerste kaart komt uit de set Essential sentiments van My favorite things (retired).


And this is the last card with Parachute piggy from Gerda Steiner designs. I coloured the image the same as the one on the first card. This time I made a sky on the front of the card. I masked the edges of the front of the card with washi tape and then I coloured the sky with Soap powder ink from Jenni Bowlin. From white cardstock I die-cut a couple of clouds with the Simple puffy clouds die from Lawn fawn and I adhered those on the blue part of the card and then I adhered the image. The sentiment from both cards is from the set Essential sentiments from My favorite thngs (retired).


En dit zijn alle kaartjes nog even samen. 

And these are all cards together.

Hi there
STAMP: Parachute piggy from Gerda Steiner designs, Essential sentiments from My favorite things (retired)
COLORING MEDIUM: Polychromos pencils
PAPER: White cs
INK: Versafine onyx black, Soap powder from Jenni Bowlin
DIES: Crea-nest-lies XXL 35 & 36 from Crealies, Stitched cloud edges die-namics from My favorite things
ACCESSORIES: Black glaze pen, glossy accents, white gelpen

I'm here for you:
STAMP: Parachute piggy from Gerda Steiner designs, Essential sentiments from My favorite things (retired)
COLORING MEDIUM: Polychromos pencils
PAPER: White cs
INK: Versafine onyx black, Soap powder from Jenni Bowlin
DIES: Simple puffy clouds die from Lawn fawn
ACCESSORIES: Black glaze pen, glossy accents, white gelpen

Tuesday, 27 September 2016

Fairytale challenge 152 - Bookmarks


Goedemorgen, het is dinsdag en deze dinsdag betekent dat de nieuwe challenge weer op het Fairytale challenge blog staat. Deze keer is de challenge: Maak een boekenlegger. Heel leuk! Dit jaar ben ik weer een beetje meer beginnen te lezen, na een paar jaar niet zoveel te hebben gelezen en dat bevalt goed! En dan heb je natuurlijk een boekenleger nodig voor alle echte boeken die ik lees, naast de boeken op mijn e-reader.
Mijn favoriete afbeelding voor een boekenlegger is School girl van Tiddly Inks. Ik heb al twee keer eerder deze afbeelding op een boekenlegger gebruikt. ;) Ik heb de afbeelding deze keer redelijk groot geprint en daarna heb ik het meisje ingekleurd met mijn Polychromos potloden en de zwarte glaze pen en daarna heb ik de afbeelding uitgeknipt. De boekenlegger is gemaakt van kraft karton en deze is 10 x 29.6 cm en daarna heb ik hem dubbelgevouwen. Bijna het formaat van een kaart dus. Langs de rechterrand heb ik een strip streepjespapier uit een paperpad van de Action geplakt. Daarnaast heb ik een smalle strip zwart karton geplakt. Met een witte gelpen heb ik stiklijntjes getekend. Uit rood karton heb ik met de hartjesdie van de Pocket tag van Create a smile stamps een aantal hartjes gestanst en deze heb ik naast het meisje geplaatst. Binnenin de boekenlegger heb ik 2 magneetjes geplakt waardoor hij heel mooi in je boek blijft zitten.


Goodmorning, it is Tuesday and this Tuesday it means that a new challenge is posted on the Fairytale challenge blog. This time our challenge is: Make a bookmark. Really fun! This year I started reading a bit more again, after a few years of hardly reading at all and I am really enjoying it! And then you need a good bookmark for all the real books you are reading next to the books on my e-reader. 
My favorite bookmark image is School girl from Tiddly Inks. I have made 2 more bookmarks with this image. ;) I printed the image pretty large this time and then I coloured it with my Polychromos pencils and the black glaze pen and then I fuss cut it. From kraft cardstock I made a bookmark with almost the size of an card. I added a strip of striped paper from a paperpad from a Dutch store on the right and then I added another strip of black cardstock. I added faux stitching with a white gelpen. From red cardstock I cut a couple of hearts with the hearts die from the Pocket tag from Create a smile stamps and I adhered those next tot the girl. In side the bookmark I attachted 2 tiny magnets, so the bookmark stays closed.


I want to enter this card in the following challenges:
*********************************************************************************
STAMP: School girl from Tiddly Inks
COLORING MEDIUM: Polychromos pencils
PAPER: Kraft cs, black and red cs, Action paperpad
DIES: Pocket tag from Create a smile stamps
ACCESSORIES: Black glaze pen, white gelpen

LinkWithin

Related Posts with Thumbnails