Wednesday, 30 September 2020

Gerda Steiner designs - Happy halloween


Goedemorgen, vandaag mag ik weer een kaartje laten zien, dat ook op het blog van Gerda Steiner designs wordt gepost. Deze keer heb ik een halloween kaartje gemaakt met de clear stempel Peekin' pumkin kitty van Gerda Steiner designs. Ik heb deze keer mijn afbeelding eens niet op aquarelpapier gestempeld, maar op parelmoer papier. Hoewel dit dus eigenlijk niet voor aquarelverf geschikt is, kun je er toch heel goed op kleuren met Distress inkt. Het is alleen niet te doen om goed op de foto te krijgen. Op de bovenste foto zie je de parelmoer niet goed en op de onderste foto zie je vooral de parelmoer en niet hoe het gekleurd is. Jammer, want in het echt is het echt heel leuk. Ik heb het katje met Versafine clair nocturne inkt gestempeld en daarna heb ik de afbeelding geëmbost met clear embossingpoeder. Ik heb de afbeelding daarna ingekleurd met Distress inkt en daarna heb ik de afbeelding uitgeknipt.

Met de Crea-nest-lies XXL 33 van Crealies heb ik een cirkel uit zwart-wit stipjes papier van het Black & white collection paperpad van Action gestanst. Met de Crea-nest-lies XXL 92 van Crealies heb ik een cirkel uit oranje papier gestanst en daarna heb ik de kleinere cirkel op de oranje cirkel geplakt. Op een oranje kaart heb ik zwart-wit geruit papier van het Black & white collection paperpad van Action geplakt. Daarna heb ik een strip oranje karton op de kaart geplakt nadat ik er eerst zwarte seam binding omheen heb gebonden. Ik heb de daarna de cirkels en de afbeelding met foamtape op de kaart geplakt. Met de Star confetti die van Alexandra Renke heb ik een aantal sterren uit het oranje karton gestanst en deze heb ik op de kaart geplakt. De tekst is ook van de stempelset Peekin' pumkin kitty van Gerda Steiner designs en die heb ik op het oranje karton gestempeld en daarna heb ik deze rechts onder op de kaart geplakt. 


Goodmorning, today it is my turn again to post a card, that also will be posted on the blog from Gerda Steiner designs. This time I have made a halloween card with the clear stampset Peekin' pumkin kitty from Gerda Steiner designs. This time I didn't stamp the image on watercolour paper, but instead of that I stamped it on pearlescent paper. Although it is not meant for watercolouring, I really had good results. Unfortunately it is really difficult to take good pictures. On the top picture you can't see it shine at all and on the second picture you see really well how the images shines, but you can't see really well how I coloured the image. That is a shame, because in real it looks really great. I have stamped the cat with Versafine clair nocturne ink on the pearlescent paper and then I embossed the image with clear embossingpowder. I have coloured the image with my Distress inks and then I have fussy cut the image. 

With the Crea-nest-lies XXL 33 from Crealies I have die-cut a circle from black and white patterned paper from the Black & white collection paperpad from Action. I used the Crea-nest-lies XXL 92 from Crealies to cut a larger circle from orange cardstock and then I glued the smaller circle on top of it. On a card from orange cardstock I glued black and white patterned paper from the Black & white collection paperpad from Action. Then I glued a strip orange cardstock on the card after I tied black seam binding around it. Then I glued the circles and the image with foamtape on the card. With the Star confetti die from Alexandra Renke I have die-cut a couple of stars from orange cardstock and I glued those on the card. The sentiment is also from the stamp set Peekin' pumkin kitty from Gerda Steiner designs. I stamped the sentiment on orange cardstock and glued it on the card. 


STAMP: Peekin' pumkin kitty from Gerda Steiner designs
COLORING MEDIUM: Distress inks
PAPER: Pearlescent paper, Orange cs, Black & white collection paperpad from Action
INK: Versafine clair nocturne
DIES: Crea-nest-lies XXL 33 & 92 from Crealies, Star confetti die from Alexandra Renke
ACCESSORIES: Clear embossingpowder, Black seam binding

I am a participant in the Gerda Steiner designs Affiliate Programme. This means that if you click on one of my links and subsequently make a purchase, I will receive a small commission of store credit, at no extra cost to you.

Tuesday, 29 September 2020

CC. Designs - Trick or treat


Goedemorgen, vandaag post ik weer een halloween kaartje op mijn blog. Deze keer heb ik een kaartje gemaakt met de clear stempelset Halloween pinkies (retired) van CC. designs. Ik heb de afbeelding gestempeld op Florence watercolour paper smooth van Vaessen creative met Versafine clair nocturne inkt en daarna heb ik deze geëmbost met clear embossingpoeder. Vervolgens heb ik de afbeelding ingekleurd met mijn Distress inkt. Op de lolly heb ik Clear sparkle embossing glitter (WS15R) van Wow aangebracht. Ik heb de afbeelding met foamtape op een oud kaartje van de Ikea geplakt. Ik vond er 2 tijdens het opruimen en nu heb ik ze allebei dus inmiddels gebruikt. 

Ik heb de tekst uit zwart karton gestanst met de Delicate letters thinlits (661040) van Sizzix en die heb ik naast de afbeelding geplakt. Ik heb een stukje aquarelpapier gekleurd met Seedless preserves Distress inkt en daarna heb ik met de Star confetti die van Alexandra Renke een aantal sterren uit dit papier gestanst en die heb ik op de kaart geplakt.

Goodmorning, today I am posting another halloween card on my blog. This time I have made a card with the clear stamp set Halloween pinkies (retired) from CC. designs. I have stamped the image on Florence watercolour paper smooth from Vaessen creative with Versafine clair nocturne ink and then I embossed the image with clear embossingpowder. I have coloured the image with my Distress inks and then I have fussy cut the image. On the lolly I applied Clear sparkle embossing glitter (WS15R) from Wow. I have glued the image with foamtape on an old card from Ikea that I found when I was going through my craft stash. 

I have die-cut the sentiment from black cardstock with the Delicate letters thinlits (661040) from Sizzix and then I glued it on the card. I have coloured a little piece of the watercolour paper with Seedless preserves Distress ink and then I used the Star confetti die from Alexandra Renke to cut a couple of stars from it. I glued those on the card. 


STAMP: Halloween pinkies (retired) from CC. designs
COLORING MEDIUM: Distress inks
PAPER: Card from Ikea, Black cs, Watercolour paper
INK: Verafine clair nocturne, Seedless preserves Distress ink
DIES: Delicate letters thinlits (661040) from Sizzix, Star confetti die from Alexandra Renke
ACCESSORIES: Clear embossingpowder, Clear sparkle embossing glitter (WS15R) from Wow

Monday, 28 September 2020

Clearly besotted - Happy halloween


Goedemorgen, vandaag plaats ik een nieuw halloween kaartje op mijn blog. Voor deze kaart heb ik een stempel van de set Creepy corners van Clearly besotted stamps gestempeld op Florence watercolour paper smooth van Vaessen creative met Versafine clair nocturne inkt en daarna heb ik de afbeelding geëmbost met clear embossingpoeder. Vervolgens heb ik de afbeelding ingekleurd met de Altenew watcolour 36 pan set. Ik heb de afbeelding daarna uitgeknipt.

Ik heb op een wit kaartje een achtergrond voor mijn afbeelding gemaakt met het Basic diagonals II stencil van Clearly besotted stamps met grijze inkt. Ik heb in de rechterbovenhoek meer inkt aangebracht en het laten vervagen naar de linker onderhoek. Ik heb de afbeelding met foamtape op de kaart geplakt en daarna heb ik een tekst van de stempelset Creepy corners van Clearly besotted stamps op de kaart gestempeld. 

Goodmorning, today I am posting a new halloween card on my blog. For this card I have stamped an image from the set Creepy corners from Clearly besotted stamps on Florence watercolour paper smooth from Vaessen creative with Versafine clair nocturne ink and then I embossed the image with clear embossingpowder. I have coloured the image with the Altenew watcolour 36 pan set. Then I have fussy cut the image. 

I have made a background on my white card with the Basic diagonals II stencil from Clearly besotted stamps with grey ink. I applied more ink in the right upper corner and let it fade into the left bottom corner. I have glued the image with foamtape on the card and then I stamped a sentiment from the set Creepy corners from Clearly besotted stamps on the card. 


STAMP: Creepy corners from Clearly besotted stamps
COLORING MEDIUM: Altenew watcolour 36 pan set
PAPER: white cs, Florence watercolour paper smooth from Vaessen creative
INK: Versafine clair nocturne and Morning mist, Grout gray hybrid ink from My favorite things
ACCESSORIES: Clear embossingpowder, Basic diagonals II stencil from Clearly besotted stamps

Sunday, 27 September 2020

A simple hello card


Goedemorgen, een tijdje geleden heb ik een doosje gemaakt van donkerblauw karton en dit bloemetjes design papier. Ik had een velletje A5-papier van dit bloemenpapier en ik wilde er meteen nog iets mee maken. Uiteindelijk heb ik met dit ene velletje een doosje, een kaartje en 3 tags gemaakt. De tags zullen nog worden gepost en dan heb ik ook het volledige vel design papier gebruikt.
Vandaag laat ik dus het kaartje zien. Het kaartje is gemaakt van donkerblauw karton en de voorkant heb ik gestanst met de Shaker shapes - Square hello (retired) van Clearly besotted. Daarna heb ik het bloemenpapier achter het gat geplakt. Met een witte gelpen heb ik stiklijntjes op de kaart getekend. Uit wit karton heb ik een aantal vlinders gestanst met de Dancing butterflies (98576) (retired) van Memory box en die heb ik op de kaart geplakt. Ik heb de vlinders versierd met witte hotfix steentjes.


Goodmorning, a while ago I made this box from dark blue cardstock and a sheet of flower patterned paper. I just had one sheet of the patterned paper and after I made the box I wanted to make something else with it. I ended up making one box, a card and 3 tags with the one a5 sheet of patterned paper. The tags will be posted later.
Today I am showing the card. The card is made from darkblue cardstock and the front of the card is cut with the Shaker shapes - Square hello (retired) from Clearly besotted. I glued the flower patterned paper behind the hole. I added faux stitching with a white gelpen. From white cardstock I have die-cut a couple of butterflies with the Dancing butterflies (98576) (retired) from Memory box and I glued those on the card. I decorated the flowers with white hotfix gems. 


I want to enter this card in the following challenges:
*********************************************************************************
PAPER: Dark blue and white cs, Flower patterned paper
DIES: Shaker shapes - Square hello (retired) from Clearly besotted, Dancing butterflies (98576) (retired) from Memory box
ACCESSORIES: White gelpen, White hotfix gems

Saturday, 26 September 2020

Di's digi designs challenge - Make it masculine


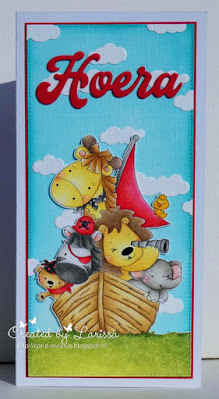
Goedemorgen, vandaag begint er weer een nieuwe challenge op het Di's digi designs challenge blog. Onze challenge deze keer is om een kaartje te maken voor een man of een jongen. Ik heb voor deze challenge een verjaardagskaartje gemaakt voor een jongen.

Op mijn kaartje heb ik de digitale stempel Animals ahoy van Di's digi stamps gebruikt. Ik heb de afbeelding ingekleurd met mijn Polychromos potloden, de zwarte glaze pen en een witte gelpen. Daarna heb ik de afbeelding uitgeknipt. Daarna heb ik de onderkant van de afbeelding uitgestanst met een stans van de DL "Slimline kaart 2" (CDSN-0058) van Carlijn design. Daarna heb ik met deze zelfde stans een rechthoek uit wit karton gestanst. Ik heb deze rechthoek daarna gekleurd met Peacock feathers Distress inkt. Ik heb deze rechthoek op een rechthoek van rood karton geplakt en daarna heb ik ze samen op een witte slimline kaart geplakt. Uit wit karton heb ik met de Petite clouds die-namics van My favorite things een aantal wolken gestanst en die heb ik daarna op de achtergrond geplakt. Vervolgens heb ik de afbeelding met foamtape op de kaart geplakt. Ik heb de tekst Hoera 3 keer uit rood karton gestanst met de Snijmallen grote teksten 2 "Hoera" (CDSN-0051) van Carlijn design. Ik heb de woorden op elkaar geplakt en daarna heb ik de tekst op de kaart geplakt. 

Goodmorning, today a new challenge starts on the Di's digi designs challenge blog. Our challenge this time is to make a masculine card. I have made a birthday card for a little boy.

On my card I have used the digital stamp Animals ahoy from Di's digi stamps. I have coloured the image with my Polychromos pencils, the black glaze pen and a white gelpen. Then I have fussy cut tthe image. I have cut the bottom part of the image with a die from the set  DL "Slimline kaart 2" (CDSN-0058) from Carlijn design. I used the same die to cut another rectangle from white cardstock. I coloured that rectangle with Peacock feathers Distress ink. I glued this rectangle on a rectangle from red cardstock and then I glued them together on a white slimline cardFrom white cardstock I have cut a couple of clouds with the Petite clouds die-namics from My favorite things and then I glued those on the background. I have added the image with foamtape on the card. I have die-cut the word hoera (hurray) 3 times from red cardstock with the Snijmallen grote teksten 2 "Hoera" (CDSN-0051) from Carlijn design. I glued those on top of each other and then I glued the word on the card. 


I want to enter this card in the following challenges:
                                                 *********************************************************************************
STAMP: Animals ahoy from Di's digi stamps
COLORING MEDIUM: Polychromos pencils
PAPER: White and red cs
INK: Peacock feathers Distress ink 
DIES: DL "Slimline kaart 2" (CDSN-0058) and Snijmallen grote teksten 2 "Hoera" (CDSN-0051) from Carlijn design, Petite clouds die-namics from My favorite things
ACCESSORIES: Black glaze pen, white gelpen

Thursday, 24 September 2020

As you like it challenge 192 - Pastels or brights colours


Goedemorgen, vandaag begint de nieuwe challenge op het As you like it challenge blog en deze challenge worden we gesponsord door Lawn fawn. Onze challenge deze keer is dat we graag willen weten of je liever felle or pastel kleuren op je kaarten gebruikt. Ik vind beide erg leuk, het ligt dan vooral aan de gelegenheid waar het kaartje voor is. Ik denk wel dat ik veel vaker felle kleuren gebruik. Ik probeer soms wel om iets in pastel te maken en dan wordt het uiteindelijk toch fel. ;)

Voor deze challenge heb ik een halloween kaartje gemaakt. Ik heb hierop de digitale stempel Penguin spook nite van Whimsy stamps gebruikt. Ik heb de afbeelding ingekleurd met mijn Polychromos potloden en de zwarte glaze pen en daarna heb ik de afbeelding uitgeknipt. Voor mijn kaart heb ik een oude kaart van de Ikea gebruikt. Ik kwam deze tegen tijdens het opruimen en heb er maar meteen een kaartje mee gemaakt. Met de Crea-nest-lies XXL 7 van Crealies heb ik uit glitter inpakpapier een cirkel gesneden en deze heb ik op de kaart geplakt. Daarna heb ik de afbeelding met foamtape op de kaart geplakt. Met de alfabet stans van het Karin Joan letterboard (DF3454) van Marianne design heb ik uit paars design papier van het Kraft in colour - colour paperpad van Doodlebug de tekst gestanst en deze heb ik onder de afbeelding geplakt. Ik heb met de Star confetti die van Alexandra Renke een aantal sterren uit het glitterpapier gestanst en deze heb ik rondom de afbeelding geplakt. 


Goodmorning, today a new challenge starts on the As you like it challenge blog and this challenge we are being sponsored by Lawn fawn. Our challenge this time is that we want know if you prefer making cards in pastel or bright colours. I love both depending on the occasion I am making the card for, but most of the times I make bright cards. Sometimes I start making a card in pastel colours, but somehow most of the times it ends up having bright colours.. ;)

For this challenge I have made a halloween card. I have used the digital stamp Penguin spook nite from Whimsy stamps on it. I have coloured the image with my Polychromos pencils and the black glaze pen and then I have fussy cut the image. I used an old card from Ikea for this card. I found it when I was cleaning my craft room and used it immediately. With the Crea-nest-lies XXL 7 from Crealies I have die-cut a circle from glitter wrapping paper and then I glued it on the card. I added the image with foamtape on the card. With the alphabet die from the Karin Joan letterboard (DF3454) from Marianne design I have die-cut the sentiment from purple patterned paper from the Kraft in colour - colour paperpad from Doodlebug. I glued the sentiment under the image. With the Star confetti die from Alexandra Renke I have cut a couple of stars from the glitter paper and I glued those around the image.


I want to enter this card in the following challenges:
*********************************************************************************
STAMP: Penguin spook nite from Whimsy stamps
COLORING MEDIUM: Polychromos pencils
PAPER: Card (retired) from Ikea,  Glitter wrapping paper, Kraft in colour - colour paperpad from Doodlebug
DIES: Crea-nest-lies XXL 7 from Crealies, Star confetti die from Alexandra Renke, Karin Joan letterboard (DF3454) from Marianne design
ACCESSORIES: Black glaze pen

Wednesday, 23 September 2020

Gerda Steiner designs - Thanks a latte!


Hallo, ik ben Larissa van het blog Car-d-elicious en vandaag is het weer mijn beurt om hier op het Kleuren met potloden blog een kaartje te plaatsen.. Deze keer heb ik een doosje gemaakt met daarin 2 koffie cups. Gewoon een klein aardigheidje om iemand te bedanken.

Ik heb op mijn creatie de digitale stempel Coffee chick van Gerda Steiner designs gebruikt. Ik heb de afbeelding ingekleurd met mijn Polychromos potloden en de zwarte glaze pen en daarna heb ik de afbeelding uitgeknipt. Met de Silhouette cameo heb ik uit kraft karton de Valentine coffee break tag box (247852) van Suzanne Cannon gesneden. Met de Crea-nest-lies XXL 52 van Crealies heb ik uit geel design papier van het Surprise party paper pack van Sunny studio een rechthoek gestanst en die heb ik op mijn doosje geplakt. Met de Crea-nest-lies XXL 49 van Crealies heb ik een cirkel uit wit karton gestanst en die heb ik op een geschulpte cirkel geplakt die ik uit zwart karton heb gestanst met de Crea-nest-lies XXL 53 van Crealies. Nadat ik de afbeelding op de cirkels heb geplakt, heb ik deze op het doosje geplakt. De tekst komt uit een setje rub-ons van een onbekend merk. Uit rood karton heb ik 2 hartjes gestanst met de Mini hearts set van Simon says stamp en die heb ik bij de tekst geplakt. Ik heb het doosje dicht gebonden met zwarte jute koord. 


Goodmorning, today it is my turn ago to post something on the blog from Gerda Steiner designs. This time I have made a little box with 2 coffee cups inside. Just a little present to thank someone!

I have used the digital stamp Coffee chick from Gerda Steiner designs on my creation. I have coloured the image with my Polychromos pencils and the black glaze pen and then I have fussy cut the image. With the Silhouette cameo I have cut the Valentine coffee break tag box (247852) from Suzanne Cannon from kraft cardstock. With the Crea-nest-lies XXL 52 from Crealies I have die-cut a rectangle from yellow patterned paper from the Surprise party paper pack from Sunny studio and then I glued it on the box. With the Crea-nest-lies XXL 49 from Crealies I have glued a circle from white cardstock and then I glued it on a scalloped circle that I have cut from black cardstock with the Crea-nest-lies XXL 53 from Crealies. After I glued the image on the circles I glued them on the box. The sentiment is from a set of rub-ons from an unknown brand. From red cardstock I have cut 2 hearts with the Mini hearts set from Simon says stamp and I glued those around the sentiment. I tied the box together with black jute thread. 


Het leek me ook leuk om de koffie cupjes te versieren. Met de Crea-nest-lies XXL 49 van Crealies heb ik een cirkel uit het gele design papier van het Surprise party paper pack van Sunny studio gestanst en die heb ik heb op een zwarte geschulpte cirkel geplakt die ik met de Crea-nest-lies XXL 53 van Crealies heb gestanst. Uit rood karton heb ik met de Hearts dies (retired) van Paper smooches een groot hart gestanst en die heb ik op de cirkels geplakt. Daarna heb ik de cirkels op de koffie cupjes geplakt. Ik heb ze er met een gluedotje opgeplakt, zodat ze er ook weer heel makkelijk van af zijn te halen.


I thought it would be fun to decorate the coffee cups. With the Crea-nest-lies XXL 49 from Crealies I have die-cut a circle from yellow patterned paper from the Surprise party paper pack from Sunny studio and I glued those on the scalloped circles that I have cut from black cardstock with the  Crea-nest-lies XXL 53 from Crealies. I have cut 2 large hearts from red cardstock with the Hearts dies (retired) from Paper smooches and I glued those on the circles. Then I glued the circles on the coffee cups. I used a gluedot to attach them on the cups, because that is really to remove the decoration from the cups when you want to use them. 


I want to enter this card in the following challenges:
                                          *********************************************************************************
STAMP: Coffee chick from Gerda Steiner designs
SILHOUETTE CUTTING FILE: Valentine coffee break tag box (247852) from Suzanne Cannon
COLORING MEDIUM: Polychromos pencils
PAPER: Kraft, black, white and red cs, Surprise party paper pack from Sunny studio
DIES: Crea-nest-lies XXL 49, 52 and 53 from Crealies, Hearts dies (retired) from Paper smooches, Mini hearts set from Simon says stamp
ACCESSORIES: Black glaze pen, Black jute thread, Sentiment rub-ons

I am a participant in the Gerda Steiner designs Affiliate Programme. This means that if you click on one of my links and subsequently make a purchase, I will receive a small commission of store credit, at no extra cost to you.

Sunday, 20 September 2020

Kleuren met potloden - Hold on, stay strong!


Goedemorgen, vandaag mag ik weer een kaartje posten op het Kleuren met potloden blog. Deze keer heb ik een one-layerkaartje gemaakt met de stempelset Hold on van Alpaca pals. Op een wit kaartje heb ik met behulp van maskerpapier de afbeeldingen gestempeld met Versafine clair nocturne inkt. Ik heb de afbeeldingen daarna ingekleurd met mijn Polychromos potloden. De wolken heb ik ook nog gekleurd met de Clear Spectrum noir sparkle glitter pen. Daarna heb ik een tekst van de stempelset Hold on van Alpaca pals in de rechter bovenhoek van het kaartje gestempeld. Ik heb de kaart daarna versierd met een aantal Sparkling clear sequins. 


Goodmorning, today I am posting a new card on the Kleuren met potloden blog. This time I have made a one-layer card with the stampset Hold on from Alpaca pals. On a white card I stamped with Versafine clair nocturne ink a couple of the images with the help of masking paper. I have coloured the images with my Polychromos pencils. The clouds are also coloured with the Clear Spectrum noir sparkle glitter pen. Then I stamped the sentiment from the stampset Hold on from Alpaca pals in the right upper corner of the card. Then I decorated the card with Sparkling clear sequins.


Ik heb de volgende potloden gebruikt:
I have used the following pencils:

Lucht:
9201-145 Light phthalo blue, 9201-152 Middle phthalo blue, 9201-110 Phthalo blue.

Wolken:
9201-145 Light phthalo blue, 9201-124 Rose carmine, 9201-127 Pink carmine.

Regenboog:
9201-124 Rose carmine, 9201-127 Pink carmine, 9201-107 Cadmium yellow, 9201-108 Dark cadmium yellow, 9201-111 Cadmium orange, 9201-170 May green, 9201-168 Earth green yellowish, 9201-167 Permanent green olive, 9201-152 Middle phthalo blue, 9201-110 Phthalo blue.

Luiaard:
9201-180 Raw umber, 9201-176 Van Dijck brown.

I want to enter this card in the following challenges:
*********************************************************************************
STAMP: Hold on from Alpaca pals
COLORING MEDIUM: Polychromos pencils
PAPER: White cs
INK: Versafine clair nocturne
ACCESSORIES: Clear Spectrum noir glitter sparkle pen, Sparkling clear sequins, masking paper


Saturday, 19 September 2020

Gerda Steiner designs - Strawberry mouse


Goedemorgen, vandaag heb ik weer een nieuw project gemaakt dat ook op het blog van Gerda Steiner designs wordt gepost. Deze keer heb ik een tasje gemaakt met een label er aan. Op het label heb ik de digitale stempel Strawberry mouse van Gerda Steiner designs gebruikt. Ik heb de afbeelding ingekleurd met mijn Polychromos potloden en de zwarte glaze pen en daarna heb ik de afbeelding uitgeknipt.
Met de Silhouette cameo heb ik uit wit karton de 3d Strawberry favor box (76158) van Lori Whitlock. Ik heb daarna het doosje gekleurd met Candied appleBlack sootShabby shutters en Peeled paint Distress inkt. Met een groene fineliner heb ik op de blaadjes van de bloemen nerfjes getekend en daarna heb ik het bloemetje met een brad aan het doosje bevestigd.


Goodmorning, today I am posting a new project on the blog from Gerda Steiner designs. This time I have made a little bag with a tag. On the tag I used the digital stamp Strawberry mouse from Gerda Steiner designs. I have coloured the image with my Polychromos pencils and the black glaze pen and then I have fussy cut the image. 
With the Silhouette cameo I have cut the 3d Strawberry favor box (76158) from Lori Whitlock from white cardstock. Then I coloured all the parts of the bag with Candied appleBlack sootShabby shutters and Peeled paint Distress ink and then I glued the bag together. With a green fineliner I doodled a bit on the leaves from the flower and then I attached the flower with a black brad onto the bag.


Met de Multiframes MFD 076-Tag 5 van Nellie Snellen heb ik een tag uit wit karton gestanst. Met een zwarte fineliner heb ik een lijntje langs de randen van de tag gedoodled. Daarna heb ik de Strawberry mouse van Gerda Steiner designs met foamtape op het label geplakt. Naast het muisje heb ik een tekst van de stempelset Bulletjournal - Tekst diversen van Craft emotions gestempeld. Ik heb het label met zwart jute draad aan het tasje gehangen.


With the Multiframes MFD 076-Tag 5 from Nellie Snellen I have die-cut the tag from white cardstock. I doodled a line on the tag with a black fineliner. Then I glued the Strawberry mouse from Gerda Steiner designs with foamtape on the label. I have stamped a sentiment (greetings) from the set Bulletjournal - Tekst diversen from Craft emotions on the tag. I attached the tag onto the bag with black jute thread.


Ik heb het tasje gevuld met lekkere snoepjes.

I have filled the bag with some nice candy.


I want to enter this card in the following challenges:
*********************************************************************************
STAMP: Strawberry mouse from Gerda Steiner designs,
SILHOUETTE CUTTING FILE: 3d Strawberry favor box (76158) from Lori Whitlock
COLORING MEDIUM: Polychromos pencils
PAPER: White cardstock
INK: Candied appleBlack sootShabby shutters and Peeled paint Distress inkt
DIES: Multiframes MFD 076-Tag 5 from Nellie Snellen
ACCESSORIES: Black glaze pen, white gelpen, Black and green fineliner, Black brad

I am a participant in the Gerda Steiner designs Affiliate Programme. This means that if you click on one of my links and subsequently make a purchase, I will receive a small commission of store credit, at no extra cost to you.

Tuesday, 15 September 2020

Purple onion designs - Veel geluk


Goedemorgen, vandaag show ik een kaartje dat ik heb gemaakt voor een collega die pas geleden is verhuisd. Ik heb een kaartje gemaakt met de stempelset SA sweet home (retired) van Purple onion designs. Ik heb alle stempels op wit papier gestempeld en daarna heb ik ze ingekleurd met mijn Polychromos potloden. Het dak van het huis en het hart heb ik gestempeld op rood stipjespapier van het Dots & stripes sorbet paper pack (retired) van My favorite things en daarna heb ik het dak na het uitknippen op het huis geplakt. Ik heb op het onderste deel van het huis het Build it stencil van Clearly besotted stamps gebruikt met Versafine clair Fallen leaves inkt en daarna heb ik het hart opgeplakt. Op een witte kaart heb ik met het Mini cloud edges stencil van My favorite things en Tumbled glass distress inkt een achtergrond gemaakt voor de afbeelding. De boom en het gras zijn gemaakt met groen stipjespapier van het Spooky cute paper pack van Your next stamp. Met de Punch die daisies (CR1501) van Marianne design heb ik uit het rode stipjespapier bloemetjes gestanst en die heb ik op de kaart geplakt. Ik heb de bloemetjes daarna versierd met zwarte hotfix steentjes. Ik heb de tekst uit zwart papier gestanst met het Alphabet 2 lowercase (1075-retired) van Elizabeth craft designs en daarna heb ik de tekst op de kaart geplakt.


Goodmorning, today I am showing a card that I have made for a colleague who recently moved house. I have made a card with the stampset SA sweet home (retired) from Purple onion designs. I have stamped everything on white cardstock and then I coloured everything with my Polychromos pencils. I have fussy cut everything. I have stamped the roof of the house and the heart on red dotted patterned paper from the Dots & stripes sorbet paper pack (retired) from My favorite things. I glued the roof on the house. On the bottom part of the house I used the Build it stencil from Clearly besotted stamps and Versafine clair Fallen leaves ink and then I glued the heart on the house.
On a white card I made a background with the Mini cloud edges stencil from My favorite things and Tumbled glass distress ink. The tree and grass are made from dotted patterned paper from the Spooky cute paper pack from Your next stamp. With the Punch die daisies (CR1501) from Marianne design I have die-cut a couple of flowers from the red patterned paper and I glued those on the card. I have decorated the card with black hotfix gems. The sentiment (much happiness) is cut from black cardstock with the Alphabet 2 lowercase (1075-retired) from Elizabeth craft designs and then I glued it on the card. 


Ik heb de binnenkant van de kaart ook nog versierd. Ik heb nog een keer het hart van de stempelset SA sweet home (retired) van Purple onion designs gestempeld en dat heb ik in de kaart geplakt. Daarna heb ik met het Alphabet 2 lowercase (1075-retired) van Elizabeth craft designs de rest van de tekst gestanst en die heb ik in de kaart geplakt.

I also decorated the inside of the card. I stamped the heart from the set SA sweet home (retired) from Purple onion designs again and glued it inside the card. I cut the other part of the sentiment (in your new home) from black cardstock with the Alphabet 2 lowercase (1075-retired) from Elizabeth craft designs and glued it in the card.


I want to enter this card in the following challenges:
*********************************************************************************
STAMP: SA sweet home (retired) from Purple onion designs
COLORING MEDIUM: Polychromos pencils, Distress inks
PAPER: White and black cs, Dots & stripes sorbet paper pack (retired) from My favorite things, Spooky cute paper pack from Your next stamp
INK: Versafine clair nocturne and Fallen leaves, Tumbled glass Distress ink
DIES: Alphabet 2 lowercase (1075-retired) from Elizabeth craft designs,  Punch die daisies (CR1501) from Marianne design
ACCESSORIES: Mini cloud edges stencil from My favorite things, Build it stencil from Clearly besotted stamps, Black hotfix gems

Saturday, 12 September 2020

Di's digi designs challenge - Winged or tailed things


Goedemorgen, vandaag begint er weer een nieuwe challenge op het Di's digi designs challenge blog en deze keer willen we graag iets op je kaart zien dat een staart of vleugels heeft. Ik heb voor deze challenge een kerstkaartje gemaakt en daarvoor heb ik de digitale stempel The magic of christmas van Di's digi stamps gebruikt. Ik heb de afbeelding geprint op aquarelpapier en daarna heb ik de afbeelding ingekleurd met Distress inkt en de zwarte glaze pen. Na het inkleuren heb ik de afbeelding uitgeknipt. Op een stukje wit karton heb ik een achtergrond voor mijn afbeelding gemaakt met Broken chinaBlueprint sketch en Chipped saphire Distress inkt. Op de achtergrond heb ik met witte acrylverf kleine verfspatjes gemaakt. Uit wit karton heb ik sterretjes gestanst met de Star confetti die van Alexandra Renke en die heb ik op de achtergrond geplakt. Daarna heb ik de afbeelding met foamtape op de achtergrond geplakt.
Op een witte kaart heb ik daarna een rood design papier van de set Snowflurry - Christmas van Pinksydoodles geplakt en daarna heb ik het witte karton met de afbeelding op de kaart geplakt. Met de corner chomper heb ik daarna de onderste hoeken van de kaart afgerond. Ik heb een tekst van de stempelset Reindeer games van My favorite things op de kaart gestempeld. Glitter mag natuurlijk niet ontbreken op een kerstkaart en dus heb ik hiervoor Pure sheen glitter: Glitter ice white van Nuvo gebruikt.


Goodmorning, today a new challenge starts on the Di's digi designs challenge blog and this time we want to see something on your cards with wings or a tail. I have made a christmas card for this challenge and used the digital stamp The magic of christmas from Di's digi stamps on it. I have printed the image on watercolour paper and then I coloured the image with Distress inks and the black glaze pen. After I coloured the image,  have fussy cut the image. I have made a background on white cardstock with Broken chinaBlueprint sketch and Chipped saphire Distress ink. On the background I have added paint splatters with white acrylic paint. I have die-cut stars from white cardstock with the Star confetti die from Alexandra Renke and I glued those on the background. Then I glued the image with foamtape on the background. 
On a white card I glued a strip of red patterned paper from the set Snowflurry - Christmas from Pinksydoodles. Then I glued the background with the image on the card. I have stamped a sentiment from the stampset Reindeer games from My favorite things on the card. Glitter needs to be added on a christmas card, so I added Pure sheen glitter: Glitter ice white from Nuvo on the card. 


STAMP: The magic of christmas from Di's digi stamps, Reindeer games from My favorite things
COLORING MEDIUM: Distress inks
PAPER: White cs, Snowflurry - Christmas from Pinksydoodles
INK: Versafine clair nocturne, Broken china, Blueprint sketch and Chipped saphire Distress ink
DIES: Star confetti die from Alexandra Renke
ACCESSORIES: Black glaze pen, White acrylic paint, Pure sheen glitter: Glitter ice white from Nuvo, Corner chomper

LinkWithin

Related Posts with Thumbnails