Wednesday, 30 April 2014

Happy birthday Irma


Hallo, vandaag is mijn tante Irma jarig en daar moest ik natuurlijk een kaartje voor maken. Ik vond deze Frog fashionista van Pink cat studio echt perfect voor haar. Ik heb de kikker ingekleurd met mijn potloden en de zwarte glaze pen. Ik heb daarna nog gekleurd op de afbeelding met de clear wink of stella brush pen. Op de lippen heb ik glossy accents aangebracht. De ketting heb ik gemaakt met de zwarte hotfix steentjes. Ik heb de afbeelding uitgesneden met de cirkel nestabilities. Op mijn kaart heb ik een stuk roze karton geplakt met daarop een strip zwart-wit stipjes papier. Ik heb er een wit lint omheen gebonden met een grote strik. De tekst is gestempeld met de set Sentiment sampler van Paper smooches.


Hello. today it is my aunt Irma's birthday and I had to make her a card offcourse. I thought that this Frog fashionista from Pink cat studio was perfect for her. I colored the frog with my pencils and the black glaze pen. I colored on some parts of the image with the clear wink of stella brush pen. I added glossy accents on her lips. I used black hotfix gems to make the necklace. I have cut the image out with the circle nestabilities. On my card I adhered a piece of pink cardstock and on top of that a strip of black adn white dotted paper. I wrapped a white ribbon around it. The sentiment is stampped with the set Sentiment sampler from Paper smooches.


I want to enter my card in the following challenges:
*********************************************************************************
IMAGE: Frog fashionista from Pink cat studio, Sentiment sampler from Paper smooches
PAPER: White, pink and white cs
INK:Versafine onyx black
ACCESSORIES: Pencils, black glaze pen, white gelpen, glossy accents, clear wink of stella brush pen, circle nestabilities, white ribbon, black pen, hotfix black gems and pearl.


Tuesday, 29 April 2014

Tiddly inks challenge - Handmade flowers


Goedemorgen, vandaag begint de nieuwe Tiddly Inks challenge weer en deze week is de challenge om zelfgemaakte bloemen op je kaartje of project te showen. Ik heb ervoor gekozen om een gehaakt bloemetje op mijn kaart te gebruiken.
Op mijn kaartje heb ik de afbeelding Ellie says hi van Tiddly Inks gebruikt. Ellie is ingekleurd met mijn potloden en de zwarte glaze pen en daarna heb ik de afbeelding uitgeknipt. Op een stukje wit papier heb een steel van een bloem getekend en daarna heb ik gaatjes op de steel geprikt. Daarna heb ik het steeltje met groen draad gestikt. Met hetzelfde groene draad heb ik 2 kleine blaadjes gehaakt. Daarna heb ik met donkerblauw garen een bloemetje gehaakt volgens het patroon van Attic 24's Teeny tiny flowers. Midden op de bloem heb ik een rood-wit gestipte bloem geplakt. De tekst heb ik op het witte karton geprint. Daarna heb ik het geheel op een rode kaart geplakt.


Goodmorning, today a new challenge starts on the Tiddly Inks challenge blog and this week is the challenge to use handmade flowers on your card or project. I have made a crochet flower for my card.
On my card I used the image Ellie says hi from Tiddly Inks. Ellie is colored with my pencils and the black glaze pen and then I cut the image out. On a piece of white cardstock I have drawn a flower stem and made some holes on that line. Then I used green thread to stitch the stem. I used the same green thread to crochet 2 little leaves. Then I used navy thread to crochet a flower following the pattern of the Teeny tiny flower from Attic 24. I added a red and white dotted button to the centre of the flower. Then I adhered the whole panel on a red card.

I want to enter my card in the following challenge:
*********************************************************************************
IMAGE: Ellie says hi from Tiddly Inks
PATTERN: Teeny tiny flower from Attic 24
PAPER: Red and white cs
ACCESSORIES: Pencils, black glaze pen, red and white dotted button, green and blue thread.

Friday, 25 April 2014

Fairytale challenge - Cute only


Goedemorgen vandaag is het weer tijd voor een nieuwe Fairytale challenge en deze week willen we graag Cute kaartjes of projecten zien. Ik heb dit kaartje gemaakt voor Melissa die samen met mij in het design team van Tiddly Inks zit. Ze had gewoon even een flinke knuffel verdiend en die heb ik door middel van dit kaartje gegeven. De afbeelding die ik heb gebruikt is Pachela studios Little sweetie's bouquet van Cuddly buddly. Ik heb deze afbeelding rechtstreeks op een kaart geprint samen met de tekst en een kader. Ik heb de afbeelding daarna ingekleurd met mijn potloden en de zwarte glaze pen.

Goodmorning, today a new challenge starts on the Fairytale challenge blog and this week we want see cute cards or projects. I made this card for Melissa, she is also a member from the Tiddly Inks design team. She needed a big hug and I gave her one with this card. The image I used is Pachela studios Little sweetie's bouquet from Cuddly buddly. I printed the image together with a frame and a sentiment on my card. I colored the image with my pencils and a black glaze pen.

I want to enter my card in the following challenges:
*********************************************************************************
IMAGE: Pachela studio Little sweetie's bouquet from Cuddly Buddly
PAPER: White cs
ACCESSORIES: Pencils, black glaze pen.

Thursday, 24 April 2014

Tiddly Inks thursday throwback met Whatever blooms


Goedemorgen, vandaag laat ik een kaartje zien dat ik heb gemaakt voor de Tiddly Inks thursday throwback. Op deze dag laat één van de design team leden altijd een kaart of project zien met wat oudere Tiddly Inks afbeeldingen. Deze keer heb ik een kaart gemaakt met de afbeelding Whatever blooms van Tiddly Inks. Ik heb de afbeelding ingekleurd met mijn potloden en de zwarte glaze pen. Daarna heb ik de afbeelding uitgeknipt. Op mijn kaart heb ik een stuk jeans papier geplakt en daarop heb ik een stikrandje getekend met een witte gelpen. Op het jeans papier heb ik daarna een stukje roze stippenpapier uit de Dots & strips collectie van Echo park geplakt. Uit wit papier heb ik een tag gesneden met de Rounded tag die van Clearly besotted. Ik heb uit het jeanspapier ook nog een cirkel geponst en deze heb ik bovenaan de tag geplakt en daarna heb ik een wit lintje gestrikt aan de tag. De tekst komt uit de All occasion messages set van Hero arts en deze heb ik gestempeld met versamark inkt en daarna geëmbost met witte embossingpoeder. De tekst is daarna geponst met de Word window punch van Stampin up. Met de retro flower punces heb ik daarna nog 2 bloemetjes gemaakt waar ik stiklijntjes op heb getekend met een witte gelpen. Daarna heb ik een wit knoopje midden op de bloem geplakt. 

Goodmorning, today I showing you a card that I made for the Tiddly Inks thursday throwback. On this day one of the designteam members makes a card or project with an "older" Tiddly Inks stamp. This time I made a card with the image Whatever blooms from Tiddly Inks. I have colored the image with my pencils and the black glaze pen. Then I cut the image out. On my card I adhered a piece of jeans paper and I added faux stitching on it with a white gelpen. On the jeans paper I adhered pink dotted paper from the Dots& stripes collection from Echo park. Out of white paper I cut a tag with the Rounded tag die from Clearly besotted. I cut a little circle out of the jeans paper and adhered it on the top of the tag and then I threaded a white ribbon through it. The sentiment is from the All occassion messages set from Hero arts. I stamped it with versamark ink and then I embossed it with white embossingpowder. I punched it with the word window punch from Stampin up. I punched 2 flowers with the retro flower punches and added faux stitching on them with a white gelpen and then I put a little white button in the centre of the flower.


I want to enter my card in the following challenges:


*********************************************************************************
IMAGE: Whatever blooms from Tiddly Inks, All occassion messages from Hero arts.
PAPER: Dots & stripes from Echo park, jeans paper, white cardstock.
INK: Versamark
ACCESSORIES: Pencils, black glaze pen, white gelpen, retro flower punches, white button, stampin up word window punch, white embossingpowder, Rounded tag die from Clearly besotted stamps, white ribbon.

Wednesday, 23 April 2014

Stampfairy - You make me smile


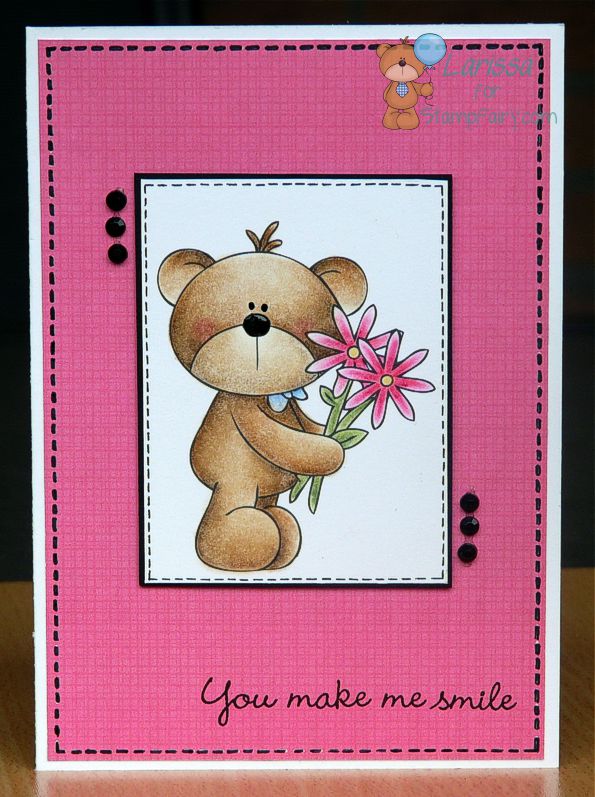
Goedemorgen, vandaag was het weer mijn beurt om een Stampfairy kaartje te maken. Deze keer heb ik een kaartje gemaakt met een afbeelding uit de Lenny flowers collectie van Stampfairy. Ik heb Lenny ingekleurd met mijn potloden en de zwarte glaze pen. Op de neus heb ik glossy accents aangebracht. Ik heb de afbeelding uitgesneden met de rechthoekige nestabilities. Ik heb met een zwarte gelpen stiklijntjes langs de rand van de afbeelding getekend. Op de kaart heb ik een stukje roze design paper uit het Country drive paperpad van Echo Park geplakt. Hierop heb ik een stiklijntje getekend met een zwarte fineliner. De tekst is gestempeld met een tekst uit de All occasion messages set van Hero arts. Als laatste heb ik nog een aantal zwarte pareltjes naast de afbeelding geplakt. (Ik heb een sketch van een oude Bugaboo stamps challenge gevolgd). 

Goodmorning, today it is my turn to make a card for the Stampfairy blog. This time I made a card with an image from the Lenny flowers collection from Stampfairy. I colored Lenny with my pencils and the black glaze pen. I added glossy accents on the nose. I have cut the image out with the rectangle nestabilities. I added faux stitching with a black pen. On my card I adhered a  layer of pink designer paper from the Country drive paperpad from Echo park on my card and I have drawn faux stitching on it with a black pen. The sentiment is made with a sentiment from the All occasion messages set from Hero arts. I added a couple of black pearls next to the image (for this card I followed a sketch from an old Bugaboo challenge).

I want to enter my card in the following challenges:
*********************************************************************************
IMAGE: Lenny flowers from Stampfairy, All occasion messages from Hero arts
PAPER: White and black cs, Country drive paperpad from Echo Park
INK: Versafine onyx black
ACCESSORIES: Pencils, black glaze pen, glossy accents, black pen, black pearls, rectangle nestabilities.

Tuesday, 22 April 2014

Tiddly Inks - Pixies release

Goedemorgen, vandaag is er weer een nieuwe release by Tiddly Inks en deze staat helemaal in het teken van de Pixies. Christy heeft weer een aantal superleuke afbeeldingen getekend en het was dan ook weer een feestje om hiermee een aantal kaarten te maken. Ik was nog begonnen aan een derde afbeelding, maar het is me helaas nog niet gelukt om daar een kaartje mee te maken dus die volgt nog. :)

Goodmorning, today we have a new release from Tiddly Inks and this one is all about the Pixies. Christy has drawn a couple of very cute images and I had so much fun while I was working on my cards. I started on a thirth card, but I didn't have time to finish that one, so you will that later on my blog. :) 


Het eerste kaartje is gemaakt met de afbeelding Poppy pixie van Tiddly Inks. Ik heb de afbeelding ingekleurd met mijn potloden en de zwarte glaze pen. Rondom de afbeelding heb ik gekleurd met blauw krijt en daarna heb ik stipjes gezet met de diamond stickles. Ik heb de afbeelding uitgesneden met de rechthoekige nestabilities en daarna heb ik de afbeelding op roze karton geplakt. De rechterkant heb ik daarna gestanst met de kleine scallop rand van de Scalloped edges dies van Clearly besotted. Ik heb ook nog een wit lintje om het roze karton heen gebonden. Op mijn kaart heb ik 2 strips roze karton geplakt die ik heb geëmbost met de swiss dots embossing folder.

The first card was made with the image Poppy pixie from Tiddly Inks. I have colored the image with my pencils and the black glaze pen. I colored around the image with blue chalk and then I added some dots with diamond stickles. I cut the image out with the rectangle nestabilities. I adhered the image on pink cardstock. I cut the right side of the pink cardstock with the tiny scallop border from the Scalloped edges dies from Clearly besotted. I wrapped a white ribbon around the pink cardstock. On my card I adhered 2 strips of pink cardstock and I embossed those with the swiss dots embossing folder. 


Het tweede kaartje is gemaakt met de afbeelding Peachy pixie van Tiddly Inks. Ik heb de afbeelding rechtstreeks op de voorkant van mijn kaart geprint samen met de tekst. Ik heb de afbeelding ingekleurd met mijn potloden en de zwarte glaze pen. Ik heb de afbeelding daarna ook nog geprint op een stukje maskerpapier en deze uitgeknipt. Dat was een flink karwei met el die kleine blaadjes, maar het is gelukt. Daarna heb ik nog een aantal wolkjes uit het maskerpapier gestanst en daarna heb ik het masker op de afbeelding geplaatst en de wolkjes heb ik ook opgeplakt. Daarna heb ik de lucht gekleurd met een ink blending tool en de soap powder inkt van Jenni Bowlin.

The second card is made with the image Peachy pixie from Tiddly Inks. I have printed the image together with a sentiment on the front of a card. I colored the image with my pencils and the black glaze pen. I printed the image also on masking paper and cut it out. That was a real hard job because of all those little leaves, but I made it. Then I also cut a couple of clouds out of the masking paper. I adhered the mask on the image and then I added the clouds on the front of the card. I colored the sky with a ink blending tool and soap powder ink from Jenni Bowlin.  


I want to enter these cards in the following challenges:

*********************************************************************************
Hugs & kisses
IMAGE: Poppy pixie from Tiddly Inks
PAPER: White and pink cs
ACCESSORIES: Pencils, black glaze pen, rectangle nestabilties, white ribbon, scalloped edges dies from Clearly besotted stamps, swiss dots embossing folder, diamond stickles.

Missing you so much
IMAGE: Peachty pixie from Tiddly Inks
PAPER: White cs
INK: Soap powder from Jenni Bowlin
ACCESSORIES: Pencils, black glaze pen, masking paper, clouds die.


Monday, 21 April 2014

Paascadeautjes voor Menno en Niek


Hallo! Hier ben ik dan met de paastractaties die ik voor mijn neefjes heb gemaakt. Dit ei heb ik 2 jaar geleden al gekocht bij de Ikea en toen heb ik er een paascadeautje voor Menno mee gemaakt. Ik had toen meteen ook dit lichtblauwe ei gekocht en dat kwam perfect uit want zo kon ik meteen een leuke verassing voor neefje Niek maken. Ik heb het ei versierd met een afbeelding uit de Easter buffy set van de Digistamp boutique. Het konijntje is ingekleurd met mijn potloden en daarna heb ik de afbeelding uitgeknipt. Ik heb de afbeelding met foamtape op het ei geplakt. De letters zijn gesneden met het Katie alfabet van quickutz en deze heb ik onder en boven de afbeelding geplakt. 

Hello! Here is am with the easter treats that I made for my little nephews. I bought this egg 2 years ago at the Ikea and then I made an easter treat for my nephew Menno with the green egg. I had also boought this blue egg and that was perfect to make a little something for nephew Niek. I decorated the egg with an image from the Easter buffy set from the Digistamp boutique. I colored the rabbit with my pencils and then I cut the image out. I adhered the image with foamtape on the egg. The letters are cut with the Katie alphabet from quickutz and I adhered those under and above the image.


Niek is nog maar 3,5 maand oud en hij mag natuurlijk nog geen chocolade-eitjes, dus ik heb zijn ei maar gevuld met een konijnenknuffeltje. 

Niek is only 3,5 months old now and doesn't eat chcocolate eggs ...yet, so I filled his egg with a little bunnie plushie.


Voor Menno heb ik dit kleine tasje gemaakt waar hij zijn chocolade eitjes in kon verzamelen. Onderin het tasje had ik ook nog een speelgoedautootjes gedaan. Het tasje is uitgesneden met de silhouette uit geel en rood papier. De afbeelding die ik heb gebruikt is van de Cute chicklets easter collection van de Digistamp boutique. Ik heb deze afbeelding ingekleurd met mijn potloden en de zwarte glaze pen en daarna heb ik de afbeelding uitgesneden met de cirkel nestabilities. De letters zijn gestanst met het Lollipop alfabet van Lifestyle crafts. 

I made this little bag for Menno so he could collect all the chocolate eggs that I had hide for him. I also put a little toycar in the bag. I cut the bag with the silhouette out of yellow and red paper. The image I used is from the Cute chicklets easter collection from the Digistamp boutique. I colored this image with my pencils and a black glaze pen and then I cut the image out with the circle nestabilities. The letters are made with the Lollipop alphabet from Lifestyle crafts.


I want to enter these projects in the following challenges:

Sunday, 20 April 2014

Vrolijk pasen - Happy easter


Hallo allemaal! Ik wil beginnen met iedereen een fijne pasen toe te wensen! We hebben vandaag heerlijk weer, dus het was echt genieten. Ik heb van het mooie weer gebruik gemaakt door snel nog evenmijn laatste paasprojecten en andere dingetjes waar ik aan werk af te maken en  foto's te maken van mijn paasprojectjes van dit jaar. Vandaag laat ik 2 kaarten zien en morgen volgen er nog 2 dingetjes die ik heb gemaakt voor mijn neefjes. :)


Hi everyone! I want to start with wishing everyone a happy easter! Today we had lovely weather here in the Netherlands, so it was a really lovely day. I used the good weather to finish off some last easter projects and other projects that I am working on and I had the chance to take some pictures. Today I am showing you 2 cards and tomorrow on our second easterday I will show you the little things that I made for my cousins. :)


De 2 kaartjes die ik heb gemaakt zijn gemaakt met paasstempels van Hanglar. Zo jammer dat deze stempels niet meer worden gemaakt, ik blijf ze erg lief vinden. Ik heb de afbeeldingen ingekleurd met mijn potloden en de zwarte glaze pen en daarna heb ik ze uitgeknipt. Ik heb mijn kaarten heel simpel gehouden. Voor het meisje heb ik een stukje paars karton gepakt en dat heb ik geëmbost met de swiss dots embossingfolder. Ik heb er een wit lintje omheen gebonden met een strikje. De tekst is met de computer gemaakt en daarna geponst met de word window punch van Stampin up.

The 2 cards are made with easterstamps from Hanglar. Such a shame that these stamp aren't made any longer, I keep loving them. I have colored the images with my pencils and the black glaze pen and then I cut them out. I kept the cards very simple. I used a piece of purple cardstock on the girl's card and I embossed it with the swiss dots embossing folder. I wrapped a white ribbon around it and tied it into a bow. The sentiment (happy easter) is made on the computer and I punched ith with the word window punch from Stampin up.


De binnenkant van de kaart heb ik ook nog versierd met de mini-versie van de stempels en nog een klein stripje van het karton.

The inside of the card is decorated with the mini-version of the stamps and a strip of the cardstock. 


De jongenskaart is gemaakt met groen karton. In plaats van een strikje heb ik nu een knoopje in het lint gemaakt. 

The boy's card is made with green cardstock. Instead of a bow I made a knot in the ribbon.


I want to enter my card in the following challenges:

*********************************************************************************
IMAGE: Easter stamps from Hanglar
PAPER: White, green and purple cardstock
INK: Versafine onyx black
ACCESSORIES: Pencils, black glaze pen, swiss dots embossing folder, white ribbon, stampin up word window punch

Wednesday, 16 April 2014

Tiddly Inks - Minnie's egg


Hallo, hier ben ik met een nog een Tiddly Inks kaartje. Ik kwam dit afdrukje Minnie's egg van Tiddly Inks tegen in mijn doosje met al geprinte afbeeldingen en die moest ik natuurlijk meteen op een kaartje verwerken. Ik heb eerst met een zwarte fineliner lijntjes getekend op de eieren, zodat ik ze lekker met allerlei kleurtjes kon inkleuren. Ik heb de afbeelding zoals altijd ingekleurd met mijn potloden en de zwarte glaze pen. Daarna heb ik glossy accents op de bril aangebracht en daarna heb ik de afbeelding uitgeknipt. Op een stuk wit papier heb ik de tekst geprint en daarna heb ik met Tumbled glass distress inkt en een zelfgemaakt sjabloon een wolkenachtergrond gemaakt. Met de silhouette heb ik 2 grasrandjes uit groen karton gesneden. Uit paars karton heb ik 2 scallop randjes gestanst met Scalloped edges die van Clearly besotted stamps en deze heb ik onder de afbeelding geplakt en daarna heb ik het geheel op een witte kaart geplakt. 

Hello, here I am with another Tiddly Inks card. I found this image Minnie's egg from Tiddly Inks in my box with already printed images and I had to make a card with it. I started with drawing some lines on the egg with a black pen, so I could color them in a couple of bright colors. I colored the image with my pencils and the black glaze pen. I used glossy accents on the glasses and then I cut the image out. I printed the sentiment (happy easter) on white paper and then I used Tumbled glass distress ink and a selfmade cloudpattern to create the cloudy background. I have cut 2 grass borders with the silhouette. Out of purple cardstock I cut 2 scalloped edges with the Scalloped edges die from Clearly besotted stamps and I adhered those under the image. Then I adhered the image on a white card.


I want to enter my card in the following challenges:
*********************************************************************************
IMAGE: Minnie's egg from Tiddly Inks
SILHOUETTE CUTTING FILE: 12 x 12 grassy page bottom
PAPER: White green and purple carstock
INK: Tumbled glass distress ink
ACCESSORIES: Pencils, black glaze pen, glossy accents, black pen, silhouette, scalloped edges die from Clearly besotted stamps


Tuesday, 15 April 2014

Tiddly Inks challenge - Celebrate!


Goedemorgen, vandaag begint er weer een nieuwe Tiddly Inks challenge en deze keer is de challenge Celebrate. Je moet dus een kaartje of project maken voor iets dat je viert, zoals een verjaardag, huwelijk, geboorte etc. Ik heb gekozen om een verjaardagskaartje te maken met één van de allernieuwste Tiddly Inks afbeeldingen Poppylicious. Ik heb allereerst het eerste deel van mijn tekst boven de afbeelding gezet en daarna heb ik de afbeelding en tekst samen geprint.De afbeelding heb ik daarna ingekleurd met mijn potloden en de zwarte glaze pen. Met een zwarte fineliner heb ik een stiklijntje getekend. De afbeelding heb ik gemat op zwart karton. Op mijn kaart heb ik ook weer stiklijntjes getekend. Uit zwart-wit streepjes papier heb ik een banner gesneden en deze heb ik onder de afbeelding geplakt. Als laatste heb ik nog een aantal zwarte hotfix steentjes op de kaart geplakt.


Goodmorning, today a new challenge starts on the Tiddly Inks challenge blog and this time our challenge is Celebrate. So you have to make a card for any celebration that you can think of. It could be for a birthday, a wedding, a birth or something else. I decided to make a birthdaycard with one of the newest Tiddly Inks images: Poppylicious. I started with adding the first part of my sentiment above the image and then I printed them together. I colored the image with my pencils and the black glaze pen. I added faux stitching with a black pen. The image is matted on black cardstock. On my card I also added faux stitching. I have cut a banner out of black and white striped paper and adhered it under the image. Then I added some black hotfix gems to decorate the card.


De binnenkant van de kaart is ook nog versierd. Ik heb naast het tweede deel van de tekst ook nog een kleine versie van de afbeelding geprint en dit geheel heb ik binnenin de kaart geplakt. Ik vind het altijd erg leuk om zo de afbeelding nog eens terug te laten komen binnen in de kaart.

The inside of the card is also decorated. I added the second part of the sentiment and I also added a smaller version of the image and after I printed those I adhered it inside the card. I love it to use the image again on the inside, it gives such a nice look.

I want to enter my card in the following challenges:
*********************************************************************************
IMAGE: Poppylicious from Tiddly Inks
PAPER:m Pink, black and white cs, striped paper
ACCESSORIES: Pencils, black glaze pen, silhouette, black pen. black hotfix gems

Monday, 14 April 2014

Easter chicks/ Paaskuikens


Goedemorgen, vandaag heb ik een paar paastractaties om te laten zien. Ik zag dit grappige kuikendoosje laatst staan in de silhouette shop en ik vond ze meteen perfect voor pasen. Ik heb er 2 gemaakt, ééntje van geel stipjes papier en de andere van geel gestreept papier. De beide kleurtjes geel zijn hetzelfde maar de gestreepte komt veel lichter over op de foto's. De doosjes zijn dus uitgesneden met de silhouette en ze zijn erg makkelijk om in elkaar te zetten. Ik heb de gaatjes voor de ogen niet uitgesneden en in plaats daarvan heb ik zwarte hotfix steentjes gebruikt. Ik heb één van de kuikens een wit strikje gegeven, zodat het een echt meisje wordt en op het lijf van het jongetje heb ik 2 zwarte knopen geplakt.


Goodmorning, today I am showing you a couple of easter treats. I saw these cute chick boxes in the silhouette online shop and I thought they were perfect for easter. I made 2 of them, one from yellow dotted paper and one from yellow striped paper. Both yellows are the same, but the striped one looks a bit light on my photo's. I used the silhouette to cut the boxes and they are so easy to make. I didn't cut the holes for the eyes and instead of that I used black hotfix gems for the eyes. I gave one of the chicks a white bow and now it looks like a girl. I added 2 black buttons on the body of the other chick to make it a boy.


I want to enter these boxes in the following challenges:


*********************************************************************************
SILHOUETTE CUTTING FILE: Chick treat bag
PAPER: Yellow dotted and striped paper
ACCESSORIES: Black hotfix gems, white ribbon, black buttons

Sunday, 13 April 2014

Stampfairy - Mimi easter


Goedemorgen, vandaag was ik weer aan de beurt om iets voor Stampfairy te maken en deze keer heb ik een kleine paastractatie gemaakt. Ik met behulp van de silhouette de 3d easter basket box van Lori Whitlock uitgesneden uit wit papier en deze daarna in elkaar gezet. Het mandje heb ik versierd met een afbeelding uit de Mimi easter 1 collectie van Stampfairy. Ik heb Mimi ingekleurd met mijn potloden en de zwarte glaze pen. Ik heb voor echte pastelkleurtjes gekozen. Het paasei heb ik gekleurd met de clear wink of stella brush pen en daarna heb ik de afbeelding uitgeknipt. Ik heb Mimi daarna met foamtape op het mandje geplakt. 

Goodmorning, today it is my turn to show you a Stampfairy project and this time I decide to make a little easter treat. I used my silhouette to cut the 3d easter basket box from Lori Whitlock out of white cardstock. I decorated my basket with an image from the Mimi easter 1 collection from Stampfairy. I colored Mimi with my pencils and the black glaze pen. I decided to go for some really soft colors this time. I colored on the egg with the clear wink of stella brush pen and then I cut the image out. I adhered Mimi with foamtape on the basket. 


Aan de zijkanten waar het hengsel aan het mandje zit heb ik het mandje versierd met roze bloemetjes en groene blaadjes. Ik heb de hengels met een zilveren brad aan het mandje vastgezet. Daarna heb ik het mandje gevuld met roze en witte eitjes.

I added 2 flowers on the side of the basket where the handle is attached to the basket. I punched those out of pink and green paper and I adhered them with a silver brad. Then I filled the basket with pink and white egg candy.


I want to enter this basket in the following challenges:

*********************************************************************************
IMAGE: Mimi easter 1 from Stampfairy
SILHOUETTE CUTTING FILE: 3d easter basket box from Lori Whitlock
PAPER: White, pink and green cardstock
ACCESSORIES: Pencils, black glaze pen, clear wink of stella brush pen, silver brad, flower and leaves punch.

Friday, 11 April 2014

Fairytale challenge - Butterflies


Goedemorgen, vandaag is er weer een nieuwe challenge op het Fairytale challenge blog en deze keer is de challenge Vlinders. We willen graag een vlinder zien op je kaartje of je project. Ik heb een serie verjaardags en beterschapskaarten gemaakt. Het zijn 2 verschillende modelletjes geworden in 3 verschillende kleuren. Op een scallop kaart heb ik de tekst Hartelijk gefeliciteerd geprint. Op de andere kaart heb ik de tekst Van harte beterschap geprint. Daarna heb ik groen, oranje en paars geruit papier genomen en met behulp van de silhouette heb ik uit dit papier een grote vlinder gesneden. Het stuk waar de vlinder uit gesneden is heb ik op de verjaardagskaart geplakt. Op de plek waar het lijfje van de vlinder hoort heb ik glitter hotfix steentjes geplakt. De vlinder die ik uit het ruitjespapier heb gesneden heb ik op de beterschapskaart geplakt. Het lijfje heb ik rechtstreeks op de kaart geplakt en de vleugels heb ik met foamtape vastgeplakt. Ook hier heb ik glitter hotfix steentjes op het lijfje van de vlinder geplakt. 


Goodmorning, today a new challenge starts on the Fairytale challenge blog en this time our challenge is Butterflies. We want to see a butterfly somewhere on your card or project. I made a collection of birthday and get well cards. I made 2 different cards in 3 different colors. I printed the birthday sentiment on a scalloped card and on another card I printed the get well sentiment. Then I took green, orange and purple design paper and I cut a large butterfly out of it with the silhouette. I adhered the piece where the butterfly was cut out on the birthday card. On the place where the body of the butterfly is, I adhered a couple of hotfix gems. The butterfly that I cut out of the design paper was adhered on the get well card. I adhered the body straight on the card and the wings are adhered with foamtape. I also added a couple of hotfix gems on the body of the butterfly. 


I want to enter my card in the following challenges:


Thursday, 10 April 2014

Stampfairy - Toby easter


Goedemorgen, vandaag is het weer mijn beurt om een kaartje te maken voor Stampfairy. Deze keer heb ik een kaartje gemaakt met een afbeelding uit de Toby easter collectie van Stampfairy. Ik heb Toby ingekleurd met mijn potloden en de zwarte glaze pen. De paarse delen heb ik ook nog gekleurd met een clear wink of stella brush pen en daarna heb ik de afbeelding uitgeknipt. Op mijn kaart heb ik design papier uit het Kraft in color paperpad van Doodlebug. Voor de afbeelding heb ik 2 cirkels uitgesneden met mijn nesatbilities uit wit en paars karton. Op de witte cirkel heb ik een stiklijntje getekend met een zwarte fineliner. De tekst heb ik op een strip papier geprint en daarna heb ik deze in bannervorm uitgesneden. Op deze banners heb ik ook een stiklijntje getekend met een zwarte fineliner en daarna heb ik een aantal zwarte pareltjes opgeplakt.

Goodmorning, today it is my turn to make a card for Stampfairy. This time I made a card with an image from the Toby easter collection from Stampfairy. I have colored Toby with my pencils and the black glaze pen. I colored on the purple parts with the clear wink of stella brush pen and after that I cut the image out. On my card I adhered design paper from the Kraft in color paperpad from Doodlebug. I have cut 2 circles with the circle nestabilities out of white and purple paper. On the white circle I have added faux stitching with a black pen. I printed the sentiment (Happy easter) on a strip of whote cardstock and I cut those into a bannershape. I then added some more faux stitching. The last thing I did was decorating the card with black pearls.

I want to enter my card in the following challenges:
************************************************************************
IMAGE: Toby easter from Stampfairy
PAPER: Kraft in color paperpad from Doodlebug
ACCESSORIES: Pencils, black glaze pen, clear wink of stella brush, black pen, circle nesatbilities, black pearls.


Tuesday, 8 April 2014

Tiddly Inks - Nieuwe release!

Goedemorgen, vandaag is er weer een nieuwe Tiddly Inks release en deze keer worden er een aantal hele leuke lente afbeeldingen uitgebracht. Ik heb met 2 van de afbeeldingen al een kaart gemaakt en de derde ligt al ingekleurd klaar om op een kaartje verwerkt te worden, dus die zien jullie later nog wel verschijnen. Het design team heeft echt geweldige kaarten gemaakt met de afbeeldingen dus kijk vooral ook op hun blogs.

Goodmorning, today we have a new release at Tiddly Inks and this time Christy is releasing a couple of very cute spring images. I used 2 images on cards and the thirth one is already colored and is waiting to be used on a card. The design team really made fabulous cards with all these images, so please visit their blogs.


Mijn eerste kaartje is gemaakt met de afbeelding Zoe so cute van Tiddly Inks. Ik heb de afbeelding samen met de tekst en het kader op mijn kaart geprint. De afbeelding heb ik gekleurd met mijn potloden en de zwarte glaze pen. Ik vind de roze en witte tulpen altijd erg mooi en dus heb ik mijn tulpen zo gekleurd. Rondom de afbeelding heb ik gekleurd met lichtblauw krijt.

My first card is made with the image Zoe so cute from Tiddly Inks. I printed the image together with the sentiment and the frame on my card. I have colored the image with my pencils and the black glaze pen. I really love white and pink tulips, so I used those as inspiration for the tulips on my card. I have used light blue chalk to color arond the image. 


Het tweede kaartje is gemaakt met de afbeelding Berry sweet van Tiddly Inks. Ik heb de afbeelding ingekleurd met mijn potloden en de zwarte glaze pen. Onder de afbeelding heb ik ook nog de tekst geprint. Ik heb de afbeelding uitgesneden met de rechthoekige nestabilities en daarna heb ik de afbeelding op groen karton geplakt. Met de scalloped edges die van Clearly besotted heb ik een randje gestanst uit wit papier en deze heb ik onder de afbeelding geplakt. Op mijn kaartje heb ik rood-wit stipjes papier geplakt waar ik een wit lintje omheen gebonden heb. Uit wit en groen papier heb ik een aantal bloemen en takjes geponst. In de hartjes van de bloemen op de afbeelding heb ik daarna nog een aantal rode pareltjes geplakt. 

The second card is made with the image Berry sweet from Tiddly Inks. I have colored the image with my pencils and a black glaze pen. I printed a sentiment under the image. I have cut the image out with the rectangle nestabilities. After that I adhered the image on green rectangle. With the scalloped edges die from Clearly besotted I cut a scalloped edge out of white cardstock and I adhered it under the image. On my card I used red and white dotted paper and I wrapped a white ribbon around it. Out of green and white cardstock I punched a couple of flowers and leaves an adhered those on the card. In the centres of the flowers and on the image I added a couple of red pearls.


Wednesday, 2 April 2014

Stampfairy - Toby easter


Goedemorgen, vandaag heb ik een Stampfairy kaartje om te laten zien. Dit kaartje heb ik alvast voor mijn kleine neefje gemaakt voor pasen. Ik heb gekozen voor vrolijke kleurtjes, dat zal hij vast leuk vinden. ;)
Op mijn kaartje heb ik gewerkt met een afbeelding uit de Toby easter collectie van Stampfairy. Ik heb de afbeelding ingekleurd met mijn potloden en de zwarte glaze pen en daarna heb ik de afbeelding uitgeknipt. Op mijn kaartje heb ik een tekst geprint. Daarna heb ik met een zwarte fineliner een kader op de kaart getekend. Uit verschillende kleuren papier heb ik cirkels geponst met allerlei ponsjes. Daarna heb ik deze cirkels geëmbost met de swiss dots embossingfolder om ze vervolgens op de kaart te plakken.

Goodmorning, today I am showing you a Stampfairy card. This card is my eastercard for my little nephew. I decided to use some bright colors, because I think he will like that. ) 
On my card I used an image from the Toby easter collection from Stampfairy. I have colored the image with my pencils and the black glaze pen and after I was done with that I cut the image out. I printed a sentiment on my card and then I added a faux stitched frame on the front of the card. I have cut a lot of circles in different sizes out of different shades of bright paper. I embossed those with the swiss dots embossing folder and adhered them on the card. 

*********************************************************************************
IMAGE: Toby easter from Stampfairy
PAPER: White, red , green, purple, yellow and blue cardstock
ACCESSORIES: Pencils, black glaze pen, circle punches, swiss dots embossing folder.

LinkWithin

Related Posts with Thumbnails