Showing posts with label Papertrey ink. Show all posts

Saturday, 31 December 2016

Di's digi designs challenge - Celebrations


Goedemorgen, vandaag begint er weer een nieuwe challenge op het Di's digi designs challenge blog. De challenge deze keer is celebrations. Op deze laatste dag van het jaar vond ik het dan ook wel gepast om een nieuwjaarskaartje te maken. Ik had namelijk de ontzettend leuke afbeelding Champagne mice van Di's digi stamps in de shop gezien en deze is echt perfect voor zo'n kaartje. Ik heb de afbeelding ingekleurd met mijn Polychromos potloden en de zwarte glaze pen en daarna heb ik de muisjes uitgeknipt. Het leek me leuk om de muizen voor een grote klok te plaatsen, dus heb ik er één gemaakt met de cirkelstansen uit de set Crea-nest-lies XXL 49 van Crealies. Ik heb de wijzerplaat uit zwart papier gestanst en de rand uit rood papier. De rand zit met foamtape op de wijzerplaat geplakt. Met witte stickers heb ik de cijfers op de klok gemaakt. In het midden van de klok heb ik een gaatje gestanst en daarna heb ik uit wit papier een paar wijzers gesneden met de silhouette. Ik heb hiervoor het bestand Echo park clock van Echo Park gebruikt. Ik heb de wijzers met een witte brad op de klok vastgemaakt. Ik heb een vierkant uit wit papier gesneden met de Crea-nest-lies XXL 50 van Crealies. Hierop heb ik met zwarte inkt stipjes van de set Botanical silhouettes van Papertrey ink (retired) gestempeld. Ik heb nog een tekst op rood papier gestempeld. Deze komt uit een hele oude stempelset namelijk Tags-christmas van Elzybells (retired). Ik heb een kadertje rondom de woorden getekend met een zwarte pen en daarna heb ik de woorden op de kaart geplakt. Ik heb nog wat witt hotfix steentjes opgeplakt en wat gedoodled met een witte gelpen om de champagne bubbels na te doen.


Goodmorning, today a new challenge starts on the Di's digi designs challenge blog. Our challenge this time is celebrations. I decided to make a happy new year card. I had seen the very cute image Champagne mice from Di's digi stamps and it is perfect for a new year card. I have coloured the card with my Polychromos pencils and the black glaze pen and then I fussy cut the image. I thought it would be fun to place the mice for a giant clock, so I decided to make one with the circle dies from the set Crea-nest-lies XXL 49 from Crealies. I have cut the background from black cardstock and the edge from red cardstock. I adhered the edge with foamtape on the clock. I used white stickers to make the numbers on the clock. I punched a little hole in the middle of the clock. I have made a couple of pinters with the silhouette. I have used the file Echo park clock from Echo Park. From white cardstock I cut a square with the Crea-nest-lies XXL 50 from Crealies. I stamped dots on it with black ink with a stamp from the set Botanical silhouettes from Papertrey ink (retired). I stamped a sentiment from the old stampset Tags-christmas from Elzybells (retired) on red cardstock. I added a frame around the words with a black pen and cut the words out. I doodled a bit with my white gelpen and adhered a couple of white hotfix gems to imitate the champagne bubbles.


I want to enter this card in the following challenges:
*********************************************************************************
STAMP: Champagne mice from Di's digi stamps, Tags-christmas from Elzybells (retired), Botanical silhouettes from Papertrey ink (retired)
SILHOUETTE CUTTING FILE: Echo park clock from Echo Park
COLORING MEDIUM: Polychromos pencils
PAPER: Red, white and black cs
INK: Versafine onyx black
DIES: Crea-nest-lies XXL 49 and 50 from Crealies
ACCESSORIES: Black glaze pen, white brad, white number stickers, white gelpen, white hotfix, black pen 

Monday, 3 August 2015

Create a smile stamps - Happy birthday


Goedemorgen, vandaag laat ik een kaartje zien dat bij toeval is ontstaan. Ik had in een papierwinkeltje een goedkoop blokje aquarelpapier gevonden en wilde dat testen, Dus ik heb deze bloem van de set Magic flowers van Create a smile stamps op het papier gestempeld en daarna geëmbost met clear embossingpoeder. Daarna ben ik eens met allerlei verschillende aqaurel producten gaan testen hoe deze op het papier werken. Ik heb de Zig clean color real brush markers, spectrum noir aquamarkers, Derwent inktense potloden en peerless paint gebruikt. Ik heb de bloemblaadjes gewoon in allerlei vrolijke kleurtjes gekleurd. Na het inkleuren zag ik de bloem liggen en toen vond ik hem zo leuk geworden dat ik er een kaartje mee heb gemaakt. Ik heb de bloem uitgeknipt. Uit zwart papier heb ik een rechthoek gesneden met de Die-namics stitched rounded rectangle stax van My favorite things. Hierop heb ik met zwarte versafine inkt de stippen van de set  Polka dots basics van Papertrey ink gestempeld en deze heb ik daarna geëmbost met clear embossingpoeder. De tekst komt van de set Tree amigos van Mama elephant en deze heb ik op een stripje geel papier gestempeld. De bloem was dus eigenlijk niet voor een kaartje bedoeld, maar uiteindelijk er toch wel op terecht gekomen. ;)


Goodmorning, today I am showed you a card that I made by coincedence. I found some cheap watercolor paper in a store and wanted to try all my watercolor mediums on it to test it. So I stamped this flower from the set  Magic flowers from Create a smile stamps and then I embossed it with clear embossingpowder. Then I started coloring the flower with all my watercolor products. I have used the Zig clean color real brush markers, Spectrum noir aquamarkers, Derwent inktense pencils and peerless paint. I used random colors on the flower petals. After I was done, I realy liked the flower, so I wanted to use it on a card. I have cut the flower out. I have cut a rectangle out of black paper with the Die-namics stitched rounded rectangle stax from My favorite things. I stamped large dots with the set Polka dots basics from Papertrey ink on top of it with onyx black versafine ink and then I embossed those with clear embossingpowder. The sentiment is from the set Tree amigos from Mama elephant and I stamped on a strip of yellow paper. So although the image was not mend for a card, it still ended up on a card. ;)


I want to enter this card in the following challenges:
*********************************************************************************
IMAGE: Magic flowers from Create a smile stamps, Polka dots basics from Papertrey ink, Tree amigos from Mama elephant.
PAPER: Black, yellow and white cs
INK: Versafine onyx black
ACCESSORIES: Zig clean color real brush markers, Spectrum noir aquamarkers, Derwent inktense pencils, Peerless paint, clear embossing powder, Die-namics stitched rounded rectangle stax from My favorite things.

Thursday, 24 July 2014

Tiddly Inks challenge - Make it mini


Goedemorgen, hier is eindelijk mijn post voor de Tiddly Inks challenge die afgelopen dinsdag is begonnen. Het is me niet gelukt om op tijd mijn project at te hebben, dus het is iets later geworden. De challenge deze keer is Make it mini en ik heb ervoor gekozen om kleine kaartje te maken voor aan een cadeautje of bloemetje. De kaartjes hebben het formaat van een atc, dus 8,9 x 6,4 cm, maar dan dubbel zodat er binnenin nog iets geschreven kan worden. 

Goodmorning, I am finally posting my project that I made for the Tiddly Inks challenge that started on Tuesday. I wasn't able to finish my project in time, so I am posting it a little bit later. The challenge this time is Make it mini and I decided to make a couple of tiny cards that you can attach on a present or on some flowers. The cards have the size of an ATC, but they are double, so you are able to write a message inside. 


Op het eerste kaartje heb ik de afbeelding Whatever floats by van Tiddly Inks gebruikt. Ik heb de afbeelding net zoals de andere afbeeldingen ingekleurd met mijn potloden en de zwarte glaze pen en daarna heb ik de afbeeldingen uitgeknipt en met foamtape op de kaartjes geplakt. Op dit kaartje heb ik eerst een strip masker papier geplakt en daarna heb ik de BG Linen background van My favorite things met purple inkt van vivid op het kaartje gestempeld. De tekst komt uit de stempelset Tiny tags van Papertrey ink. Ik heb met een tangetje een klein gaatje in de hoek van het kaartje gestanst en er een lintje doorheen gebonden.

On the first card I have used the image Whatever floats by from Tiddly Inks. I have colored all the images with my pencils and the black glaze pen and then I cut them out. I used foamtape to adhere the images on the front of the cards. On this card I started with placing a strip of masking paper and then I stamped the card with the BG Linen background stamp from My favorite things with purple ink from Vivid. The sentiment is from the set Tiny tags from Papertrey ink. I cut a little hole with a punch and threaded white ribbon through it.   


Op het tweede kaartje heb ik de afbeelding Whatever blooms van Tiddly Inks gebruikt. Op dit kaartje heb ik grote stippen gestempeld met de polka dos basics set van Papertrey ink. Ik heb hiervoor de kleur Lilac posies van Memento gebruikt. De tekst komt weer uit de stempelset Tiny tags van Papertrey ink.

On the second card I have used the image Whatever blooms from Tiddly Inks. On this card I stamped large polkadots wit a stamp from the Polkadots basics set from Papertrey ink. I used the Lilac posies ink from Memento. The sentiment is again from the set Tiny tags from Papertrey ink.


En het laatste kaartje van vandaag is gemaakt met de afbeelding Celebrate joyfully van Tiddly Inks. Op dit kaartje heb ik hartjes aangebracht met het Falling hearts stencil van Simon says stamp. Ik heb hiervoor de kleur Spiced marmelade gebruikt van Ranger. 

And the last card from today is made with the image Celebrate joyfully from Tiddly Inks. On this card I added hearts with the stencil Falling hearts from Simon says stamp. I used spiced marmelade ink from Ranger to do this.

I want to enter these cards in the following challenges:

*********************************************************************************
IMAGE: Whatever blooms, Celebrate joyfully and Whatever floats by from Tiddly Inks, Linen background from My favorite things, Polka dot basics and Tiny tags from Papertrey Ink
PAPER: White cs
INK: Versafine onyx black, spiced marmelade distress ink, Vivid purple, Memento lilac posies.
ACCESSORIES: Pencils, black glaze pen, Falling hearts stencil from Simon says stamp.

Friday, 13 June 2014

Purple onion designs - Best wishes


Goedemorgen, vandaag heb ik een verjaardagskaartje om te laten zien. Ik heb het gemaakt met stempels van Purple onion designs. Het konijntje is Willa (walking bunny) van Purple onion designs en de ballonnen zijn Balloon trio and streamer van Purple onions designs. Ik heb ze gekleurd met mijn potloden en de zwarte glaze pen. Rondom de afbeelding heb ik gekleurd met blauw krijt. Ik heb de afbeelding uitgesneden met de ovalen nestabilities. Ik heb met een zwarte fineliner een stiklijntje getekend. Het gele design papier komt uit het Hello summer paperpad van Echo Park. Ik heb er een zwart lintje omheen gebonden. De tekst is van de Tiny tags set van Papertrey ink. Ik heb de pons geponst met een cirkelpons. In de rechter bovenhoek heb ik zwarte hotfix steentjes geplakt.


Goodmorning, today I have a birthday card to show you. I made with stamps from Purple onion designs. The little bunny is Willa (walking bunny) from Purple onion designs and the balloons are from the Balloon trio and streamer from Purple onion designs. I colored them with my pencils and the black glaze pen. I colored around the image with blue chalk. The yellow design paper is from the Hello summer paperpad from Echo Park. I wrapped a black ribbon around it. The sentiment is from the Tiny tags set from Papertrey ink. I punched it with a circle punch. I added a couple of black hotfix gems in the right upper corner.


I want to enter my card in the following challenges:


*********************************************************************************
IMAGE:  Willa (Walking bunny) and Balloon trion and streamer from Purple onion designs, Tiny tags from Papertrey ink.
PAPER: White and black cs, Hello summer paperpad from Echo Park
INK: Versafine onyx black
ACCESSORIES: Pencils, black glaze pen, blue chalk, oval nestabilities, clear wink of stella brush pen, circle punch, black ribbon, black pen, black hotfix.

Sunday, 1 June 2014

Purple onions designs - Wishing


Hallo! Vandaag was een lekkere knutseldag en ik heb onder andere deze 2 kaartjes gemaakt met dit lieve stempeltje van Purple onion designs. Dit is Wishing (mouse with dandelion) uit de A beautiful day collectie van Stacey Yacula. Ik heb de stempel op verschillende manieren ingekleurd. Op het eerste oranje kaart heb ik de afbeelding ingekleurd met Derwent inktense potloden. Ik kwam op internet een leuke aanbieding tegen voor een doos Derwent inktense potloden en ik kon mezelf niet beheersen. ;) Ik ben nog niet echt goed in het kleuren met aquarelpotloden, maar ik vind het wel erg leuk om te doen. Dat wordt dus flink oefenen de komende tijd. Voor een eerste poging was ik tevreden met hoe de afbeelding eruit kwam te zien. Het neusje van het muisje is gekleurd met de black glaze penen de stipjes op de wangen zijn gemaakt met een witte gelpen. Daarnaast heb ik nog kleine stipjes op de afbeelding gezet met de crystal stickles. Ik heb met de naaimachine een randje langs de afbeelding gestikt. Op mijn witte kaart heb ik oranjes stipjespapier uit het Kraft in color- color paperpad van Doodlebug geplakt. Ook hier heb ik langs de randen van de kaart gestikt. De tekst is ook van Purple onion designs


Hello! Today was a real crafty day and I made a couple of cards. Today I am showing you 2 cards that I made with this cute stamp from Purple onion designs. This is Wishing (mouse with dandelion) from the A beautiful day collection from Stacey Yacula. I used 2 different ways to color the image. On the orange card I colored the image with Derwent inktense pencils. I found a real good sale on these pencils and I had to buy them. ;) I am not really good with watercolor pencils, but I do love to do it. So I guess that means that I need to practise a lot. I was pretty satisfied with this first attempt. I used the black glaze pen to color the nose from the mouse and I added dots with a white gelpen. Then I added a lots of dots with the crystal stickles. I used the sewing machine to add some stitching on the image. On my white card I adhered orange dotted paper from the Kraft in color - color paperpad from Doodlebug. Again I used the sewing machine. The sentiment is also from Purple onion designs.


I want to enter this card in the following challenges:


Het tweede kaartje is weer gemaakt met de Wishing stempel van Purple onion designs. Deze keer heb ik de afbeelding zoals altijd gekleurd met mijn potloden, doezelaars en reukloze terpentine. Rondom de afbeelding heb ik gekleurd met blauw krijt. De neus van de muis is gekleurd met de zwarte glaze pen. Ook hier heb ik crystal stickles op de kaart aangebracht. Ik heb de afbeelding uitgesneden met de cirkel nestabilities. Ik heb nog een keer de naaimachine gebruikt om een randje te stikken. Op de kaart heb ik paars karton geplakt. Ook hier heb ik een randje op gestikt. Daarna heb ik cirkeltjes gestempeld met een stempel uit de polka dots basics collectie van Papertrey ink. Ik heb de tekst gestempeld en daarna in een bannervorm uitgesneden.


The second card is again made with the Wishing stamp from Purple onion designs. This time I colored the image as always with my pencils, gamsol and paper stumps. I colored around the image with blue chalk. I colored the nose from the mouse with the black glaze pen. Again I used the crystal stickles to add some dots on the card. I cut the image out with the circle nestabilities and again I used the sewing machine to add stitching. I adhered purple cardstock on my card. I stamped circles on it with a stamp from the Polkadots basics set from Papertrey ink. I stamped the sentiment and cut it into a bannershape.


I want to enter my card in the following challenges:
*********************************************************************************
Orange card:
IMAGE: Wishing (mouse with dandelion) from Purple onion designs, 
PAPER: White and black cs, kraft in color - color paperpad from Doodlebug
INK: Versafine onyx black
ACCESSORIES: Derwent inktense pencils, black glaze pen, white gelpen, square nestabilities, white ribbon, crystal stickles.

Purple card:
IMAGE: Wishing (mouse with dandelion) from Purple onion designs, Polkadots basics from Papertrey ink
PAPER: White and purple cs
INK: Versafine onyx black, Unicorn pigment ink.
ACCESSORIES: Pencils, black glaze pen, crystal stickles, circle nestabilities

Friday, 28 February 2014

Tiddly Inks - Rollerskate Ellie


Goedemorgen, vandaag laat ik een kaartje zien dat ik heb gemaakt voor de Fabulous friday van Tiddly Inks. Deze week heb ik een kaart gemaakt met één van de nieuwe Tiddly Inks afbeeldingen. Dit is Ellie says Why rock when we can roll van Tiddly Inks. Ik heb deze keer mijn kaartje ingekleurd met spectrum noir markers en daarna heb ik daarover heen gekleurd met mijn potloden. Ik vond de afbeelding met alleen potlood te licht worden bij het design papier, dus ik heb voor de stiften gekozen. Ik kan er echt niet goed mee omgaan, maar gelukkig kon ik met de potloden accenten aanbrengen in de afbeelding. ;) Ik heb de afbeelding uitgeknipt. Onder de afbeelding zit een rechthoek die ik heb uitgesneden met de rechthoekige nestabilities en deze heb ik ook nog geëmbost met de polkadots embossing folder van Quickutz. Het design papier is gemaakt met de Ribbon stripes van Pink petticoat. Ik heb het zelf op de computer bewerkt om er het regenboogpapier van te maken. Ik heb het papier eerst op zwart karton geplakt en daarna heb ik alles op een rode kaart geplakt. Om het papier heb ik ook nog een wit lint gebonden. De bloem is gemaakt met de Layered rose van My favorite things. Op wit papier heb ik de tekst gestempeld met een stempel van de Tiny tags set van Papertrey ink. Daarna heb ik deze geponst met een cirkelpons en ik heb een stiklijntje langs de rand getekend. Daarna heb ik uit zwart karton een groter rondje geponst en deze 2 rondjes heb ik samen op de bloem geplakt. Onder de bloem heb ik nog takjes geplakt die ik uit groen papier heb geponst. 


Goodmorning, today I am showing you a card that I made for the Tiddly Inks Fabulous friday. This week I made a card with one of the new Tiddly Inks images. This is Ellie says Why rock when we can roll.  This time I colored the image first with spectrum noir markers and then I went over the image with my pencils to add some depth to the image. I didn't like the look of just pencils together with the design paper I used, so I decided to add markers this time. I am not an expert with my markers, but I was happy that I could use my pencils to add some details. ;) I have cut the image out. I adhered it on a rectangle that I cut with my nestabilities. I embossed the rectangle with the polkadots embossingfolder from quickutz. The design paper is Ribbon stripes from Pink petticoat. I edited the paper on the computer to give it a rainbow effect. I adhered the paper first in black paper and then I adhered it on a red card. I wrapped a white ribbon around the design paper. The flower is made with the Layered rose from My favorite things. On white paper I stamped a sentiment from the Tiny tags stampset from Papertrey ink. I punched it with a circle punch and I added faux stitching. Out of black paper I punched a bigger black circle. I added both circles to the centre of the flower. I also punched 2 branches out of green paper and I adhered those under the flower.

I want to enter my card in the following challenges:
*********************************************************************************
IMAGE: Ellie says Why rock when we can roll from Tiddly Inks, Tiny tags from Papertrey Ink
PAPER: Red cs, Ribbon stripes from Pink petticoat
INK: Versafine onyx black
ACCESSORIES: Spectrum noir markers, pencils, black glaze pen, black pen, rectangle nestabilities, polkadots embossingfolders from quickutz, white ribbon, layered rose from My favorite things, circle and leaves punch.

Thursday, 27 February 2014

Stampfairy - Clementine spring


Goedemorgen, vandaag heb ik weer een stampfairy kaartje om te laten zien. Ik heb deze week een kaartje gemaakt met een afbeelding van de Clementine spring collectie van Stampfairy. Ik heb mijn afbeelding ingekleurd met mijn potloden en de zwarte glaze pen. Rondom Clementine heb ik gekleurd met blauw krijt. De afbeelding is uitgesneden met de rechthoekige nestabilities en daarna op groen karton geplakt. De tekst komt uit de set Tiny tags van Papertrey Ink. Op mijn kaart heb ik stippen gestempeld met versamark inkt en daarna heb ik ze geëmbost met witte embossingspoeder. Als laatste heb ik een wit lintje om de voorkant van de kaart gebonden.

Goodmorning, today I am posting another Stampfairy card. This week I made a card with an image from the Clementine spring collection from Stampfairy. I have coloured the image with my pencils and the black glaze pen. I coloured around Clementinte with blue chalk. The image is cut out with the rectangle nestabilities and then I adhered it on green cardstock. The sentiment is from the set Tiny tags from Papertrey Ink. On my card I stamped a couple of dots with versamark ink and then I embossed them with white embossingpowder. I wrapped a white ribbon around the front of the card. 


I want to enter my card in the following challenges:
*********************************************************************************
IMAGE: Clementine spring from Stampfairy, Tiny tags and polka dots basics from Papertrey ink
PAPER: Pink, white and green cs
INK: Versamark, versafin onyx black
ACCESSORIES: Pencils, black glaze pen, blue chalk, clear wink of stella brush pen, white embossingpowder, white ribbon, glossy accents.


Wednesday, 21 November 2012

Condoleancekaartjes


Goedemorgen, vandaag laat ik een aantal condoleance kaartjes zien die ik de afgelopen tijd heb gemaakt. Het eerste kaartje is gemaakt met een bloem die ik met de silhouette heb uitgesneden. Ik heb de bloem uit wit karton gesneden en daarna heb ik de randen beinkt met bruine inkt. Op de kaart heb ik eerst een laag kraft papier geplakt, en daar bovenop heb ik wit papier geplakt dat is geëmbost met de guide lines grid impression plate van Papertrey ink. Ik heb hier weer een strip kraft papier overheen geplakt met de daarop de tekst. Het kruisje in de bloem is gestempeld met bruine inkt.

Goodmorning, today I am showing you a couple of sympathy cards that I made. The first card is made with a flower that was cut with the silhouette. I cut it from white paper and I inked the edges of the flower with brown ink. I adhered a layer of kraft paper on the white card and then I added a layer of white paper that was embossed with the Guide lines grid impression plate from Papertrey ink. I qadded a strip of kraft paper with the sentiment (with sympathy). The little cross on the flower is stamped with brown ink.


Het tweede kaartje is gemaakt met een stempel van een wilg. Ik geloof dat hij van Heindesign is. Ik heb op een ecrukaart eerst de tekst geprint en daarna heb ik het ovaal geëmbost met de ovalen nestabilities. De wilg is gestempeld met 3 verschillende kleuren inkt van Memento, namelijk in de kleuren Bamboo leaves, pistachio and cottage ivy. Ik heb de stam eerst beinkt met de cottage ivy, de dnokerste kleur en daarna heb ik beide anderen kleuren aangebracht.

The second card is made with a stamp of a willow. I think it is from Heindesign. On a cream card I started with printing the sentiment and then I embossed it with the oval nestabilities. The willow is stamped with 3 different shades of green ink from Memento. I used the colours Bamboo leaves, pistachio and cottage ivy. I stamped the tree trunk with the darkest ink the cottage ivy and I then I applied the other 2 colours. 

Friday, 21 September 2012

Stampfairy - Toby busy winter


Goedemorgen, het is weer tijd voor mijn wekelijkse Stampfairy post op mijn blog, want er is weer een hele leuke nieuwe collectie digitale stempels te krijgen bij Stampfairy. Deze week is het de collectie Toby busy winter. Ik heb ervoor gekozen om klein doosje te maken met daarin wat mini marsjes. Het is altijd handig om zo'n leuk klein cadeautje te hebben voor als het straks kerst is. ;) Het doosje is uitgesneden met de silhouette uit rood wit gestreept papier. Ik heb rondom het raampje een wit kader geplakt en ik heb een stukje mica gebruikt om het raampje te sluiten zodat niet alles eruit valt. Toby is ingekleurd met potloden. Zijn neus heb ik eerst gekleurd met de zwarte glaze pen en daarna heb ik ook nog glossy accents aangebracht. Ik heb de afbeelding uitgeknipt en met foamtape op het doosje geplakt. Het tagje is gestanst met de Tiny tags die van Papertrey ink. De tekst komt uit de mini sentiments set van Purple onion designs. Ik heb het doosje gesloten met een strikje van wit lint. De tag heb ik met een zwart lintje aan de witte strik bevestigd. Als laatste heb ik nog een paar witte sterretjes geponst en deze heb ik op het doosje geplakt.


Goodmorning, it is time again for my weekly Stampfairy post and this week you can find another new fun collection of digital stamps in the Stampfairy shop. This week the collection is Toby busy winter. I have chosen to make a little box with some delicious choccies in it. I love having little presents on hand. :) The box is cut with the silhouette from red and white striped paper. I added a white frame around the aperture and I used a little piece of plastic to close the box. Toby is colored with pencils and his nose was first colored with a black glaze pen and then I added glossy accents on it.  I have cut the image out and adhered it on the box with foamtape. I used the Tiny tags die from Papertrey ink for the little tag. The sentiment on it is from the Mini sentiments set from Purple onion designs.The box is closed with a bow from white ribbon. I attached the tag to it with a black ribbon.


I want to enter this box in the following challenges:


*********************************************************************************
IMAGE: Toby busy winter from Stampfairy, Mini sentiments from Papertrey ink
PAPER: White cs.
INK: Versafine onyx black
ACCESSORIES: Pencils, black glaze pen, glossy accents, star punch, silhouette, white and black ribbon, Tiny tags die from Papertrey Ink.


Friday, 9 March 2012

Stampfairy - Barry easter 1 collection


Hallo, het is weer tijd voor een nieuwe release van Stampfairy en deze week heeft Gerda  weer een hele leuke collectie getekend voor pasen, de Barry easter 1 collectie. Ik heb Barry ingekleurd met mijn potloden en zijn ogen en neus heb ik gekleurd met een zwarte glaze pen. Ik heb de afbeelding uitgesneden met de ovalen nestabilities. Op mijn kaart heb ik eerst het onderste deel van de kaart geëmbost met de swiss dots embossingfolder. Op de bovenste helft heb ik stippen van de Polka dots basics set van Papertrey Ink gestempeld met versamark inkt en daarn heb ik de stippen geëmbost met witte embossingspoeder. Ik heb een wit lintje rondom de kaart gebonden. De tekst komt van een stempelset van Forever friends, de Spring time set. Uit wit papier heb ik 3 kleine bloemetjes geponst en deze heb ik onderop de kaart geplakt. In het midden van de bloemen heb ik een zwart stickertje geplakt. 

Hello, it is time for a new Stampfairy release and this week Gerda has drawn a very sweet easter collection, the Barry easter 1 collection. I have coloured Barry with my pencils and his eyes and nose are coloured with a black glaze pen. I have cut the image out with the oval nestabilities. I embossed the bottom half of the card with the swiss dots embossingfolder. The other half was stamped with versamark ink and dots from the polka dots basics set from Papertrey Ink and then I embossed the dots with white embossingpowder. I wrapped a white ribbon around my card. The sentiment is from a forever friends set, Spring time. I punched 3 little flowers from white paper and added them to the bottom of the card, I added a little black peel off to their centres.


********************************************************************************
IMAGE: Barry easter 1 collection from Stampfairy, Sprint time from Forever friends, polka dots basics from Papertrey ink.
PAPER: Blue and white cs.
INK: Versafine onyx black
ACCESSORIES: Pencils, black glaze pen, oval nestabilities, white embossingpowder, white ribbon , flower punch

Tuesday, 24 January 2012

Tiddly Tuesday - Little something


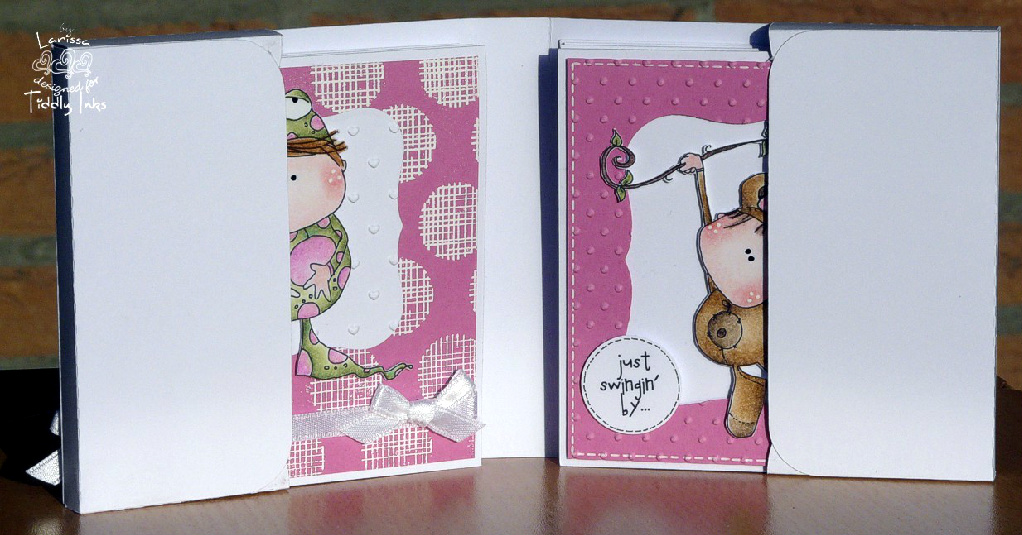
Hallo, vandaag heb ik een Tiddly Inks projectje om te laten zien. Ik heb namelijk met 4 van de diertjes uit de Little something collectie van Tiddly Inks een kaartensetje gemaakt met een bijpassend mapje voor de kaarten en enveloppen. De kaartjes zijn niet zo groot, maar 10 bij 10 cm en gelukkig had ik daarvoor bijpassende enveloppen in de goede maat. :) Op de afbeelding hierboven staat de voorkant van mijn mapje voor de kaartjes. Het lieve kikkertje is Little hopper - Toadily amazing van Tiddly Inks. Ik heb de kikker ingekleurd met mijn potloden. De ogen van het kindje en de kikker zijn gekleurd met een zwarte glaze pen en daarna heb ik de afbeelding uitgeknipt. Met de labels one nestabilities heb ik een achtergrond gestanst en deze heb ik geëmbost met de heartjes embossingfolder uit de Love language set van Provocraft. Op een stuk roze papier heb ik met versamark inkt gestempeld met de Line dots stempel van Hero arts. Daarna heb ik witte embossingspoeder op de afbeelding gebruikt. Ik heb een wit lintje rondom het roze papier gebonden en daarna heb ik de afbeelding met foamtape op het mapje geplakt.

Hello, today I am posting a Tiddly Inks project that I made. I have used 4 animals from the Little something collection to make a little card set and a matching wallet for the cards and envelopes. The cards aren't very large only 10 bij 10 cm and I was very happy that I found the perfect size envelopes for them. :) This cute little frog is Little hopper - Toadily amazing from Tiddly InksI have coloured the frog with my pencils and I used a black glaze pen for the eyes of both the frog and child. Then I cut the image out by hand. I made a label with the nestabilities labels one and embossed it with the hearts embossing folder from the Love language set from Provocraft. I stamped the Line dots from Hero arts on pink paper with versamark ink and then I embossed it with white embossing powder. I wrapped a white ribbon around the pink paper and adhered the image with foamtape.


Dit is de  binnenkant van het kaartenmapje. Aan beide kanten zitten 2 kaarten en 2 enveloppen. 

This is the inside of the wallet. On both 2 sides I made pockets for 2 cards and envelopes.


Het eerste kaartje is bijna hetzelfde als de voorkant van het kaartenmapje. De afbeelding is Little hopper - Toadily amazing van Tiddly Inks.  Ik heb alleen een kleinere label gemaakt met de nestabilities labels one. Bovendien heb ik op het kaartje wel een tekstje geplakt. Het tekstje heb ik eerst geprint en daarna is deze geponst met een cirkelpons. Ik heb de tekst met foamtape op de kaart bevestigd.

The first card is almost the same as the front of my card wallet. The image is Little hopper - Toadily amazing from Tiddly Inks. On the card I have used a smaller label that I cut with the nestabilities labels one. I also added a sentiment. The sentiment is printed and then I punched it with a circle punch. I have adhered it on the card with foamtape. 


Op het tweede kaartje heb ik de afbeelding Little squeaker van Tiddly Inks gebruikt. Ik heb met versamark inkt allemaal stippen in verschillende maten op een stkje roze papier gestempeld  met de polka dots basics set van Papertrey ink en deze heb ik daarna geëmbost met witte embossingspoeder. Met een cirkelpons heb ik daarna geponst aan de zijkanten van het roze papier zodat er kleine inhammetjes onstaan. Ik heb een wit koordje een paar keer rondom het roze papier gebonden en daarna heb ik er een strikje in gemaakt. De muis is gekleurd met mijn potloden en voor de ogen heb ik een zwarte glaze pen gebruikt. Met een witte gelpen heb ik stipjes getekend op de strikken van de muis. De tekst is gemaakt met zwarte stickerlletertjes.

On the second card I have used the image Little squeaker from Tiddly Inks. I have stamped some dots  from the Polka dots basics stamp set from Papertrey ink with versamark ink and then I embossed them with white embossingpowder. I used a circle punch to make the notches on the side of the card and wrapped white cord around my card and then I made a little bow. The mouse is coloured with my pencils and I used a black glaze pen for her eyes. I used a white gelpen to draw the dots on her bow. The sentiment is made with black peel off letters.


Op het derde kaartje heb ik de afbeelding Little lovely monkey gebruikt. Net als alle andere afbeelding heb ik ook hier gekleurd met mijn potloden en de zwarte glaze pen. Ik heb de afbeelding uitgeknipt en dat was nogal aan gedoe met dat hele dunne takje. Ik heb een gat in mijn roze papier  met de nestabilities labels one gestanst en daarna heb ik het roze papier geëmbost met de swiss dots embossing folder van Provocraft. Het roze papier is met foamtape op de kaart geplakt en ik heb er een wit lintje omheen gebonden. De tekst is geprint en daarna geponst met een cirkelpons. Met een zwarte fineliner heb ik een stiklijntje langs de rand van de tekst gezet. 

On the third card I have used the image Little lovely monkey from Tiddly Inks. I have coloured the image with my pencils and a black glaze pen. I have cut the image out and that was quite a job with the thin branch. I have made an aperture in the pink paper with the nestabilities labels one and then I embossed the pink paper with the swiss dots embossing folder from Provocraft. I used foamtape to adhere the pink paper  on my card and wrapped white ribbon around it.  The sentiment is printed and punched with a circle punch. I used a black fineliner to add faux stitching to the circle. 


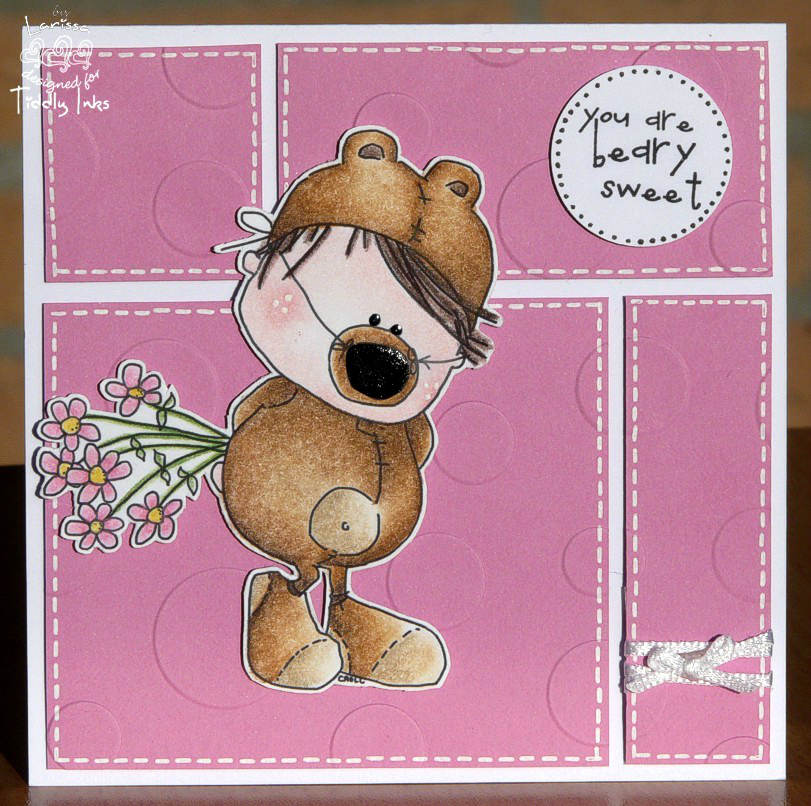
Op het laatste kaartje heb ik de afbeelding Little bear gebruikt. De beer is ingekleurd met potloden en de zwarte glaze pen. Ik heb de afbeelding uitgeknipt. Ik heb het roze papier in 4 vlakken gesneden en ik heb stiklijntjes langs de randen getekend. Daarna heb ik alle vlakken geëmbost met de polka dots embossing folder van quickutz. Ik heb een wit lintje rondom één van de vlakken gebonden. De tekst is geprint en daarna geponst met een cirkel pons. 

On the last car I have used the image Little bear from Tiddly Inks. The bear is coloured with pencils and a black glaze pen. I have cut the image out. I have cut the pink paper in 4 pieces and have used a white gelpen to add the faux stitching to them. I embossed all the pieces of pink paper with the polka dots embossing folder from quickutz. I wrapped a white ribbon around one of the pieces of pink paper. The sentiment is printed and then punched with a circle punch.

I want to enter my project in the following challenges:

********************************************************************************
IMAGE: Littel hopper - Toadily amazing, Little squeaker, Little lovely monkey and Little bear from Tiddly Inks, Line dots from Hero Arts, Polka dots basics from Papertrey Ink.
PAPER: White and pink cs
INK: Versamark ink
ACCESSORIES: Pencils, black glaze pen, white gelpen, black fineliner, white embossing powder, swiss dts embossing folder and Love language set from Provocraft, Polka dots embossing folder from Quickutz, white ribbon and cord, nestabilities labels one, letter peel offs, circle punch. 

Sunday, 25 September 2011

Doosjes met kinderchocolade


Hallo, zoals jullie vast wel weten, vind ik her erg leuk om allerlei doosjes te maken en normaal maak ik die meestal voor volwassenen. Afgelopen week heb ik eens een serie voor kinderen gemaakt. Ik heb voor allemaal een zelfde soort doosje gemaakt. Alle doosjes zijn uitgesneden met de silhouette.

Hello. you might know it already but I love to make little giftboxes and most of the times I make those for adults. Last week I decided to make a couple of boxes for children. I have made the same box for all the different images. All the boxes are cut out with the silhouette.


Op het eerste doosje heb ik een afbeelding van Tiddly Inks gebruikt, namelijk Soccer king. Soccer King is te vinden in the Tiddly Inks basement. Ik heb de afbeelding samen met de tekst geprint. Het jongetje heb ik daarna ingekleurd met potloden en zijn ogen zijn gekleurd met een zwarte glaze pen. Ik heb langs de randen van het witte papier een stiklijntje gezet met een zwarte fineliner. Daarna heb ik een zwart lintje rondom het papier gebonden. 

I used a http://www.tiddlyinks.com/Tiddly Inks image on my first box. It is called Soccer king and you can find it here in the Tiddly Inks basement. I have printed the little boy together with the sentiment (especially for you). I coloured the boy with my pencils and I used a black glaze pen for his eyes. I added faux stitching with a black fineliner. I also wrapped a black ribbon around the cardstock.


Het doosje is uit groen linnenpapier gesneden met de silhouette. Alle doosjes sluiten met een stukje zelfklevend klitteband. Ik heb de doosjes gevuld met reepjes kinderchocolade.

I have cut the box from green paper with linen structure. All the boxes close with a piece of velcro. I have filled the boxes with kinder chocolate bars.


Op het tweede doosje heb ik een afbeelding van de Digistamp boutique gebruikt, namelijk Spaceship Henry. Ik heb de afbeelding eerst gekleurd met mijn potloden. Daarna ben ik met een transparante glaze pen over de grijze delen van de raket gegaan, zodat ze mooi gaan glimmen. Dat is helaas niet te zien op de foto. Daarna heb ik op het ruitje van de raket glossy accents gedaan. Het doosje heb ik uitgesneden uit blauw sterretjes papier gesneden dat natuurlijk perfect past bij deze afbeelding. Voor de maan heb ik eerst een cirkel uitgesneden met mijn nestabilities en daarna heb ik deze geëmbost met de polka dots embossingfolder van quickutz. Daarna heb ik de randen van de maan gewerkt met spiced marmelade inkt. De tekst is gemaakt met het moxie alfabet van quickutz. Ik heb de randen van de letters ook bewerkt met de spiced marmelade inkt.

On the second box I have used an image from the Digistamp boutique: Spaceship Henry. I have coloured the image with my pencils. Then I went over the grey parts with a transparent glaze pen, so they will get a nice shine. Unfortunately you can't see it very well on the picture. Then I added glossy accents on the window of the rocket. I used blue starry paper for my box, because that matched perfect with the image. I have cut a circle from yellow paper for the moon with the circle nestabilities and then I embossed it with the polka dots embossing folder from quickutz. I distressed the edges of the moon with spiced marmelade ink. The sentiment (for you ) is made with the moxie alphabet from quickutz. I also inked the edges of the letters with the spiced marmelade ink. 


Ook op het derde doosje heb ik een afbeelding van de Digistamp boutique gebruikt, namelijk het prinsessen meisje van de Lucy collectie. Ik heb Lucy samen met de tekst op een stukje wit karton geprint. Langs de randen heb ik een stiklijntje gezet met een zwarte fineliner. Ik heb Lucy ingekleurd met mijn potloden en haar ogen heb ik eerst gekleurd met een zwarte glaze pen en daarna een witte gelpen. Op haar kleren heb ik stipjes gemaakt met een zwarte fineliner. Op het kroontje van Lucy en rondom haar stafje heb ik glitter aangebracht. Ik heb een zwart lintje rondom het het witte papier gebonden en er daarna een strikje in gemaakt. De afbeelding is op een doosje van roze linnenpapier geplakt. 

On the thirth box I used another image from the Digistamp boutique, it is the little princess girl from the Lucy collection. I printed Lucy together with the sentiment on a piece of white cardstock. I added the faux sttching with a black fineliner. I coloured Lucy with my pencils and I used a black glaze pen and a white gelpen for her eyes. I used the white gelpen to add the dots on her clothes. On her crown and around her wand I have added some glitter. I wrapped a black ribbon around the white paper and made a little bow. The image is adhered on a box that was made from pink paper with a linen structure. 


Het laatste doosje is gemaakt met stempels van My favorite things en Papertrey ink. Het is een beetje nagemaakt van dit kaartje dat ik laatst voor het Hobbyjournaal heb gemaakt. Ik ben begonnen met het printen van de tekst op een stukje wit karton. Daarna heb ik de Pure innocence: Ladybug van My favorite things op het witte papier gestempeld. Ik heb het meisje ingekleurd met mijn potloden en haar ogen heb ik gekleurd met een zwarte glaze pen. Ik heb haar stippen eerst gekleurd met een black spica glitter pen en daarna heb ik ze ook nog gekleurd met een transparante glaze pen, zodat ze mooi gaan glanzen. Op de uiteindes van haar voelsprieten heb ik zwarte hotfix steentjes geplakt. Ik heb met groene inkt een soort heuveltje gemaakt en daarna heb ik met een groen potlood nog wat grassprietjes getekend. Daarna heb ik blauwe inkt een wolkenachtergrond bij de afbeelding gemaakt. De vlindertjes komen uit de Round & round  stempelset van Papertrey ink. Ik heb de vlindertjes alleen met hun lijfje vastgeplakt. Op de lijfjes heb ik een paar kristallen hotfix steentjes geplakt. 

The last box is made with stamps from My favorite things and Papertrey Ink. It looks a lot like this card that  I made earlier. I started with printing the sentiment (especially for you) on a piece of white cardstock. Then I stamped the Pure innocence: Ladubug from My favorite things on the white paper. I have coloured the girl with pencils and I coloured her eyes with a black glaze pen. I have coloured her dots first with a black spica glitter pen and then I went over them with a transparent glaze pen, so they have a nice sparkle. On the ends of the antennas I adhered 2 black hotfix cabochons. I have made a sort of hill with green ink and I used green pencils to add some grass. Then I added the clouds with blue ink. The butterflies are from the Round & round stamp set from Papertrey Ink. I adhered them  with their bodies on the paper. I added some chrystal hotfix gems.


De buitenkant van het doosje is gestempeld met de Polka dots basics 2 set van Papertrey Ink.

I have stamped the outside of the box with the Polka dots basics 2 stampset from Papertrey Ink.

LinkWithin

Related Posts with Thumbnails