Showing posts with label Mannen. Show all posts

Friday, 12 June 2020

A birthday card for my brother


Goedemorgen, vandaag post ik het verjaardagskaartje dat ik heb gemaakt voor de verjaardag van mijn broer. 

Goodmorning, today I am posting the birthday card that I have made for my brother. 


Ik heb van rood karton een kaart gesneden en daarop het zwart-wit papier van het Dessinpapier pak van de Hema geplakt. Met een zwarte fineliner heb ik een lijntje langs de randen van het design papier getekend. Met de Crea-nest-lies XXL 21 van Crealies heb ik een cirkel uit wit karton gestanst. Uit zwart karton heb ik een grotere cirkel gestanst met de Crea-nest-lies XXL 33 van Crealies. De grootste cirkel is met de Crea-nest-lies XXL 92 van Crealies uit rood karton gestanst en daarna heb ik alle cirkels op elkaar geplakt en daarna heb ik de cirkels op de kaart geplakt. Op een stuk wit karton heb ik 2 teksten van de stempelset 't is je verjaardag van Els Brigé design gestempeld met Versafine clair nocturne inkt. Daarna heb ik deze teksten uitgestanst met de 't is je verjaardag coördinerende stansset van Els Brigé design en daarna heb ik deze teksten met foamtape op de kaart geplakt. Uit rood karton heb ik met het Planner essential 27 Retro number trio (1745) van Elizabeth craft designs het getal 40 gestanst. Ik heb de getallen 3 keer uitgestanst en die heb ik op elkaar geplakt en daarna heb ik deze getallen op de kaart geplakt. De sterretjes heb ik uit rood karton gestanst met dies uit dezelfde die set en die heb ik op mijn kaart geplakt.


Goodmorning, today I am posting the birthday card that I have made for my brother. I have cut a card from red cardstock and glued black and white patterned paper from the Dessinpapier pack from Hema on it. With a black fineliner I have doodles lines on the patterned paper. With the Crea-nest-lies XXL 21 from Crealies I have cut a circle from white cardstock. From black cardstock I have cut a bigger circle with the Crea-nest-lies XXL 33 from Crealies. The largest circle is cut from red cardstock with the Crea-nest-lies XXL 92 from Crealies. I glued all circles on top of each other and then I glued them on the card. I have stamped 2 sentiments (hooray and congratulations) from the set 't is je verjaardag from Els Brigé design on white cardstock with Versafine clair nocturne ink. I have used the 't is je verjaardag coördinerende stansset from Els Brigé design to die-cut the sentiments and then I glued them on the card with foamtape. I have die-cut the number 40 from red cardstock with the Planner essential 27 Retro number trio (1745) from Elizabeth craft designs. I have cut each number 3 times and glued them on top of each other and then I placed them on the card. The little red stars are made with dies from the same die-set. 


Bij het kaartje heb ik ook een doosje gemaakt met daarin het cadeautje. Ik heb het doosje uit rood karton gesneden met de Silhouette cameo. Ik heb hiervoor het bestand Money roll box with mats (122261) van Lori Whitlock gebruikt. Ik het het doosje versierd met design papier van het Dessinpapier pak van de Hema. Ik heb de tekst gefeliciteerd van de stempelset 't is je verjaardag van Els Brigé design op rood karton gestempeld en daarna heb ik deze uitgestanst met de 't is je verjaardag coördinerende stansset van Els Brigé design. Ik heb de tekst met foamtape op het doosje geplakt. Ik heb het geld met washitape aan elkaar geplakt en ik heb er nog een extra kaartje aan geplakt. Daarna heb ik uit rood karton met een stans van de Craft emotions die - Planner essentials 1 van Craft emotions een tabje gestanst en dat heb ik aan het briefje geplakt. Op het tabje heb ik een tekst van de stempelset Stempels interacties van Carlijn design gestempeld.


Together with the card I have made a box with the present. I have cut the from red cardstock with the Silhouette cameo.I have used the file Money roll box with mats (122261) from Lori Whitlock. The box is decorated with patterned paper from the Dessinpapier pack from Hema. I have stamped the sentiment (congratulations) from the set 't is je verjaardag from Els Brigé design on red cardstock. I have die-cut the word with the 't is je verjaardag coördinerende stansset from Els Brigé design and glued it on the box with foamtape. I have glued the money together with washitape and added a little card. From red cardstock I have die-cut a tab for on the card with the Craft emotions die - Planner essentials 1 from Craft emotions and glued it on the card. On the tab I stamped a sentiment (pull here) from the set Stempels interacties from Carlijn design.


STAMP: 't is je verjaardag from Els Brigé design, Stempels interacties from Carlijn design
SILHOUETTE CUTTING FILE: Money roll box with mats (122261) from Lori Whitlock
PAPER: Red, white and black cs, Dessinpapier from Hema
INK: Versafine clair nocturne inkt  
DIES: 't is je verjaardag coördinerende stansset from Els Brigé design, Crea-nest-lies XXL 21, 33 and 92 from Crealies, Planner essential 27 Retro number trio (1745) from Elizabeth craft designs, Craft emotions die - Planner essentials 1 from Craft emotions
ACCESSORIES: Black fineliner

Tuesday, 12 September 2017

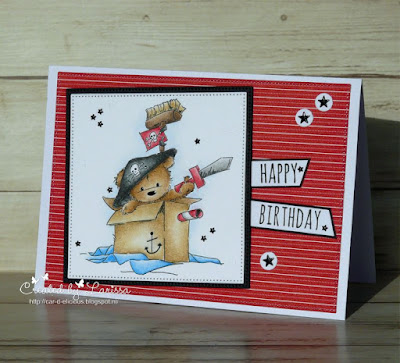
Fairytale challenge 176 - Only men


Vandaag begint er weer een nieuwe challenge op het Fairytale challenge blog. Deze keer is de challenge Only men, we willen dus graag een project voor een man of jongen zien. Ik heb een verjaardagskaartje gemaakt voor een kleine jongen. Ik heb hiervoor de digitale stempel James pirate van Lili of the valley gebruikt. Ik heb de afbeelding ingekleurd met mijn Polychromos potloden en de zwarte glaze pen en daarna heb ik de afbeelding uitgestanst met de Crea-nest-lies XXL 42 van Crealies. Ik heb uit zwart karton een grotere vierkant uitgestanst met de Crea-nest-lies XXL 50 van Crealies en daarna heb ik de afbeelding op het zwarte vierkant geplakt. Op een strip wit karton heb ik een tekst van de stempelset Crazy talk van Stampers anonymous gestempeld. Ik heb de strip vervolgens op zwart karton geplakt en daarna heb ik de strips schuin afgeknipt. Uit streepjespapier van het Red devil paperpack van Bazzil basics heb ik een rechthoek gestanst met de Crea-nest-lies XXL 52 van Crealies en die heb ik op een witte kaart geplakt. Uit wit karton heb ik 3 kleine cirkels geponst en deze heb ik op de kaart geplakt. Op de cirkels heb ik 3 grotere zwarte hotfix sterretjes geplakt. Daarna heb ik de kaart nog verder versierd met kleine zwarte hotfix sterretjes.


Today a new challenge starts on the Fairytale challenge blog. This time our challenge is only men, so we want to see cards or other projects for a men or a boy. I made a birthday card for a little boy. I have used the digital stamp James pirate from Lili of the valley. I have coloured the image with my Polychromos pencils and the black glaze pen. I have die-cut the image with the Crea-nest-lies XXL 42 from Crealies. I have die-cut a larger square from black cardstock with the Crea-nest-lies XXL 50 from Crealies. I have adhered the image on the black square. On a strip of white cardstock I stamped a sentiment from the stampset Crazy talk from Stampers anonymous. I have adhered the strips on black cardstock. From striped design paper from the Red devil paperpack from Bazzil basics I have cut a rectangle with the Crea-nest-lies XXL 52 from Crealies and ahdered it on a white card. I also punched 3 little circles from white cardstock and adhered it on the card. I have adhered larger blck hotfix stars on the circles. Then I decorated the card with tiny black hotfix stars.


STAMP: James pirate from Lili of the valley, Crazy talk from Stampers anonymous
COLORING MEDIUM: Polychromos pencils
PAPER: White and black cs, Red devil paperpack from Bazzil basics
INK: Versafine onyx black
DIES: Crea-nest-lies XXL 42, 50 and 52 from Crealies
ACCESSORIES: Black glaze pen, Circle punch, Black hotfix stars

Friday, 31 July 2015

Fairytale challenge 123 - Boys and/or men


Goedemorgen, vandaag begint er weer een nieuwe challenge op het Fairy tale challenge blog. De challenge is deze keer Boys/Men. Voor de 30-day coloring challenge heb ik deze Hanglar stempel ingekleurd met mijn Derwent inktense potloden. Zijn ogen heb ik gekleurd met de zwarte glaze pen. Ik heb de afbeelding uitgeknipt. Op een witte kaart heb ik donkerblauw papier geplakt. Het vierkant van donkerblauw glitter papier is uitgesneden met de silhouette. Ik heb met een witte gelpen stiklijntjes langs de rand van het donkerblauwe papier gezet. Daarna heb ik 2 stripjes rood-wit gestreept papier opgeplakt. Boven de strips heb ik de tekst gestempeld met versamark inkt en deze daarna geëmbost met witte embossingspoeder. De tekst komt uit de set Sentimental type van Clearly besotted stamps. Ik heb nog een aantal sterretjes uit het streepjespapier gestanst met de Holiday hearts stars craft die van Simons says stamp en deze heb ik daarna op de kaart geplakt.


Goodmorning, today a new challenge starts on the Fairy tale challenge blogand this time our challenge is Boys/men. For the 30-day coloring challenge I colored this Hanglar stamp with my Derwent inktense pencils. His eyes are colored with a black glaze pen. I have cut the image out. On a white card I adhered a piece of navy cardstock. The square of navy blue glitter paper is cut out with the silhoutte. On top of the navy paper I adhered 2 strips of red and white striped paper. Above the strips I stamped the sentiment with versamark ink and then I embossed it with white embossingpowder. The sentiment is from the set Sentimental type from Clearly besotted stamps. I diec-ut a couple of stars out of the striped paper with the Holiday hearts stars craft die from Simons says stamp and adhered those on the card.


I want to enter this card in the following challenges:
*********************************************************************************
IMAGE: Hanglar boy, Sentimental type from Clearly besotted stamps 
PAPER: Navy blue glitter paper, white cs, red and white striped paper.
INK: Versafine onyx black, versamark
ACCESSORIES: Derwent inktense pencils, black glaze pen, silhouette, white gelpen, Holiday hearts stars craft die from Simon says stamp, white embossingpowder.

Tuesday, 5 August 2014

Tiddly Inks challenge - Let's hear it for the boys


Goedemorgen, vandaag begint er weer een nieuwe challenge op het Tiddly Inks challenge blog. Deze keer is de challenge Let's hear it for the boys. Ik heb ervoor gekozen om een cadeau-envelopje te maken voor de verjaardag van een jongen. In de Tiddly Inks shop is een aantal leuke robot afbeeldingen te vinden en die vond ik perfect voor dit project. De afbeelding die ik vandaag heb gebruikt is Roboto (and extras) van Tiddly Inks. Ik heb de robot ingekleurd met mijn potloden en de zwarte glaze pen en daarna heb ik de afbeelding uitgeknipt. Van turquoise papier heb ik een cadeau-envelopje gemaakt. Op een strip wit papier heb ik de tekst geprint en deze heb ik daarna op het envelopje geplakt. Ik heb de strip versierd met een aantal kleine zwarte sterretjes rub-ons.

Binnenin het envelopje heb ik nog een kaartje gestopt waar een kleinere versie van de afbeelding op staat. Ook hier heb ik de tekst en de afbeelding versierd met de kleine zwarte sterretjes.


Goodmorning, today a new challenge has started on the Tiddly Inks challenge blog. This time our challenge is Let's hear it for the boys. I decided to make a money wallet to celebrate the birthday from a boy. You can find a couple of cool robot images in the Tiddly Inks shop and I think robots are perfect for a project for a boy. The image that I used today is Roboto (and extras) from Tiddly Inks. I have colored the robot with my pencils and the black glaze pen and then I cut him out. I used turquoise cs to make the money wallet. I printed the sentiment (congratulations) on a strip of white paper and then I adhered it on the money wallet. I decorated the strip with little black star rub-ons.

Inside the wallet I added a card with a smaller version of the image on it. Here I also used the little black stars to decorate the image and the sentiment.


I want to enter this card in the following challenges:

*********************************************************************************
IMAGE: Roboto (and extras) from Tiddly Inks
PAPER: Turkoois cs from Papicolor
ACCESSORIES: Pencils, black glaze pen, white ribbon, hole punch, star rub-ons.

Monday, 19 May 2014

Proost op je verjaardag!


Goedemorgen, vandaag heb ik een verjaardagskaartje om te laten zien. Ik heb op dit kaartje de afbeelding Cheers Alf van de Digistamp boutique gebruikt. Echt de perfecte afbeelding voor op een mannenkaartje. Ik heb de afbeelding niet in het zwart geprint maar in het bruin, om het geheel een net iets zachter uiterlijk te geven. Ook de tekst en het kader op de kaart zijn in deze bruintint geprint. Alf is ingekleurd met mijn potloden en de zwarte glaze pen. Ik heb hem een geruite pet en overhemd gegeven, dat leek me leuk staan. Ik heb Alf uitgeknipt en met foamtape op de kaart geplakt.

Goodmorning, today I have another birthday card to show you. On this card I used the image Cheers Alf from the Digistamp boutique. He is really the perfect image to make a masculin card. I decided to change the image into a brown tint instead of the black, to give the image and card a softer look. I also printed the sentiment and frame in the same brown tint. I colored Alf with my pencils and the black glaze pen. I really love how his shirt and cap turned out. I cut the image out and adhered it with foamtape on the card.


I want to enter this card in the following challenges:
*********************************************************************************
IMAGE: Cheers Alf from the Digistamp boutique
PAPER: White cs
ACCESSORIES: Pencils, back glaze pen, white gelpen.

Monday, 12 May 2014

Verjaardagskaartje met Bo text


Goedemorgen, vandaag heb ik weer een verjaardagskaartje voor een man of jongen om te laten zien. Deze keer heb ik een kaart gemaakt met de afbeelding Bo text van Fairy doodler (TeddyBo164). Ik heb de afbeelding ingekleurd met mijn potloden en de zwarte glaze pen en daarna heb ik de afbeelding uitgeknipt. Ik heb de sketch van het Mojo monday blog gevolgd voor mijn kaart. Ik heb op een witte kaart eerst denim paper geplakt en daarop een vierkant van rood papier. Met de Rounded tag die van Clearly besotted stamps heb ik uit donkerblauw papier een tag gesneden. Op alle onderdelen heb ik stiklijntjes getekend met een witte gelpen. De tekst uit de Sentiment sampler set van Paper smooches heb ik gestempeld met versamark inkt en daarna geëmbost met witte embossingpoeder en daarna heb ik de tekst uitgesneden in een bannervorm.

Goodmorning, today I am showing you a birthday card for a man or boy. This time I made a card with the image Bo text from Fairy doodler (TeddyBo164). I colored the image with my pencils and the black glaze pen and then I cut the image out. I followed the Mojo monday sketch. On my white card I first added a layer of denim paper and on top of that a red square. With the Rounded tag die from Clearly besotted stamps I cut a tag out of navy paper. I added faux stitching with a white gelpen on all these parts. The sentiment from the Sentiment sampler set from Paper smooches is stamped with versamark ink and then I embossed it with white embossingpowder. Then I cut the sentiment into a banner shape. 

I want to enter this card in the following challenges:
*********************************************************************************
IMAGE: Bo text from Fairy doodler (TeddyBo164), Sentiment sampler from Paper smooches
PAPER: Denim paper, red and blue cs
INK: Versamark
ACCESSORIES: Pencils, black glaze pen, whie gelpen, white embossing ppowder, white hotfix, Rounded tag die from Clearly besotted stamps.

Monday, 5 May 2014

Hartelijk gefeliciteerd met de Birdbrain brew


Goedemorgen, vandaag laat ik een verjaardagskaartje zien die ik voor een man heb gemaakt. Het blijft altijd moeilijk om kaarten voor mannen te maken, maar toen ik deze afbeelding zag wist ik meteen dat het me geen enkele moeite zou kosten om hier een kaartje mee te maken. De afbeelding die ik heb gebruikt is Birdbrain brew van From the heart stamps. Ik heb de afbeelding samen met de tekst geprint en daarna ingekleurd met mijn potloden en de zwarte glaze pen. Op het schuim van het bier heb ik Frosted lace stickles aangebracht, om het nog wat echter te laten lijken. Ik heb de afbeelding op een laag zwart papier geplakt Op mijn kaart heb ik eerst een laag zwart papier geplakt en daarop heb ik ruitjespapier van Pink petticoat geplakt. Dit papier is uit de collectie gehaald, dus ik heb geen direct linkje meer. 

Goodmorning, today I am showing you a birthday card that I made for a man. I keep finding it difficult to make cards for men, but when I saw this image, I knew it was going to be easy. The image I used is Birdbrain crew from From the heart stamps. I printed the image together with the sentiment (Happy birthday) and colored the image with my pencils and the black glaze pen. I added Frosted lace stickles on the foam of the beer to make it more realistic. I adhered the image on a layer of black paper. On my card I first adhered a layer of black paper and then I added checkered paper from Pink petticoat. This paper is now retired, so I can't give you a link.


I want to enter this card in the following challenges:
*********************************************************************************
IMAGE: Birdbrain brew from From the heart stamps
PAPER: Black and white cs, checkered paper from Pink petticoat (retired)
ACCESSORIES: Pencils, black glaze pen, frosted lace stickles.


Friday, 1 November 2013

Tiddly Inks nieuwe release!!!

Hallo! Hier ben ik dan eindelijk met mijn kaarten voor de nieuwe release van Tiddly Inks. Het was de bedoeling dat ik gisteravond al een blogpost zou schrijven en dat deze dan vanochtend op mijn blog zou verschijnen, maar dat is dus niet helemaal gelukt. Gisteren na het douchen ging ik Expedition Robinson kijken en toen ben ik in slaap gevallen..oeps. Dus het was gister toen ik wakker werd veel te laat om nog een blogpost te schrijven. Nou ja dan doen we het nu maar ;)
Dan maar gauw over naar de release. Christy van Tiddly Inks heeft veel verzoeken gekregen voor jongensafbeeldingen en nu heeft ze dan ook een aantal leuke afbeeldingen getekend.

Hello! Here are finally my cards for the new Tiddly Inks release. I wanted to write my blogpost yeseterday evening and they should have been posted on my blog this morning, but that didn't go like I wanted it to go. After taking my shower yesterday evening, I wanted to watch Expedition Robinson and then I fell asleep....ooops. So when I woke up, it was to late  to write a blogpost. 
So now on to the release. Christy from Tiddly Inks has gotten many requests for boys images and now she is releasing a couple of perfect images for boys!


Dit is Sk8ter boy, een echt stoere vent. Ik heb hem ingekleurd met mijn potloden en de zwarte glaze pen, net zoals alle andere afbeeldingen op mijn kaarten. Ik heb de afbeelding uitgesneden met de cirkel nestabilities. Op mijn kaart heb ik een stukje spijkerstof behang geplakt. De tekst is op de computer gemaakt. Uit rood en wit papier heb ik een aantal sterretjes geponst en deze heb ik op de kaart geplakt. 

This is Sk8ter boy, a real cool dude. I coloured him with pencils and the black glaze pen and did that on all the cards in this post. I cut the image out with the circle nestabilities. On my card I adhered a layer of jeans wall paper. The sentiment was made on the computer. I ounched a couple of stars out of red and white paper and adhered those around the image.

I want to enter this card in the following challenges:


Deze afbeelding is Dino-mite. Ik heb stipjes op de dinosaurussen getekend met een groen en rode fineliner. De tekst heb ik meteen onder de afbeelding geprint. Ik heb met oranje borduurgaren een gestikt randje gemaakt onder en boven de afbeelding. En daarna heb ik afbeelding op groen papier geplakt en daarna heb ik het geheel op een kraft kaart geplakt. 

This image is Dino-mite. I added dots on the dino's with a green and red pen. I printed the sentiment under the image. I added stitching with orange embroidery floss. I adhered the image on green paper and then I adhered everything on a kraft card.


Op mijn laatste jongenskaart  van vandaag heb ik de afbeelding King of the wild ones gebruikt. Ik heb de afbeelding uitgeknipt en daarna met foamtape op de kaart geplakt. De tekst heb ik op het witte papier geprint en daarop heb ik een stripje paars en groen papier geplakt. De groene strip is geëmbost met de polkadots embossing folder van Lifestyle crafts.

On my last boys card for today I used the image King of the wild ones. I have cut the image out and adhered it with foamtape on the card. The sentiment was printed on the white paper and then I adhered a 2 strips of green and purple paper. The pruple paper was embossed with the polkadots embossing folder from Lifestyle crafts.

I want to enter this card in the following challenges:


Op dit vierde kaartje heb ik de afbeelding Spirit of Christmas gebruikt. Ik heb de afbeelding samen met de tekst op wit papier geprint. Met een zwarte pen heb ik lijntjes getekend langs de randen. Op de kaart heb ik rood-wit gestreept papier geplakt en daar bovenop de afbeelding. Ik heb een lusje van een wit lintje gemaakt en deze heb ik achter de afbeelding geplakt. Daarna heb ik een rood-wit gestipte knoop opgeplakt.

On this fourth card I used the image Spirit of christmas. I printed the image together with the sentiment on a piece of white paper. I doodled on the edges of the paper with a black pen. On the card I adhered red-white striped paper and on top of that I adhered the image. I added some white ribbon behind the image and then I adhered a red-white dotted button.


Mijn laatste kaartje van vandaag is gemaakt met afbeeldingen uit de clear stempel set Holly jolly christmas. Ik heb de afbeeldingen na het kleuren uitgesneden met de cirkel nestabilities. Met een rode pen heb ik daarna een stiklijntje toegevoegd en met een groene fineliner heb ik stipjes getekend. Uit rood papier heb ik een kaartje gesneden met de cirkel nestabilities en daarna heb ik eerst een groene cirkel opgeplakt en daar bovenop de afbeelding. 

My last card is made with images from the clear stamps set Holly jolly christmas. I have cut the images with the circle nestabilitiesI added faux stitching with a red pen and I coloured some dots with a green pen. I have cut a card out of red paper with the circle nestabilities. I added green circle on the card and then the circle with the images. 


I want to enter this cards in the following challenges:


Saturday, 13 July 2013

Have a MONSTER of a birthday.


Hallo, ik had snel een verjaardagskaartje nodig en dus ben ik gauw aan de knutsel gegaan. Het is een klein kaartje geworden met klein bijpassend envelopje. Als basis heb ik kraft papier genomen. Hierop heb ik met witte stempelinkt de chevron achtergrond gestempeld met een stempel uit de set Little tangles van Neat and Tangled. Het grappige monstertje is een stempel van Annabelle stamps. Het is Lil monster's balloon. Ik heb de afbeelding ingekleurd met een soort aquarel krijtpotloden. Aangezien ik geen ster ben ik kleuren met aquarelpotloden, heb ik het kleuren heel simpel gehouden. Ik heb daarna het monstertje uitgeknipt. Op de kaart heb ik eerst een stukje washi tape van de wibra geplakt en daar heb ik het monstertje op geplaatst. De tekst komt ook uit de stempelset van Annabelle stamps.

Hello, I needed a birthday card for a boy, so I made one this weekend. It is a little card with a matching envelope. I used kraft cardstock for the card and envelope. On the envelope I stamped the background with white ink with the stampset Little tangles from Neat and tangled. The funny monster is a stamp from Annabelle stamps. It is Lil monster's balloon. I have coloured the monster with some watercolour pencils. I kept the colouring very simple, because I am not a star in watercolouring. I cut the monster out. On the card I adhered a piece of washi tape and on top of it I adhered the monster. The sentiment is also from the Annabelle stampset.


Het envelopje sluit met een stukje washi tape.

The envelope closes with a piece of washi tape.


Op het kaartje heb ik het monstertje nog een keer gestempeld. Ik heb nu alleen de ballon ingekleurd en de rest niet. 

On the card I stamped the monster again, but this time I didn't colour him. I only decided to colour his balloon. 

*********************************************************************************
IMAGE: Lil monster's balloon from Annabelle stamps, Little tangles from Neat and tangled
PAPER: Kraft paper
INK: Versafine onyx black, white ink.
ACCESSORIES: Pencils, washitape from Wibra, silhouette.

Thursday, 6 June 2013

Tiddly Thursday Throwback - The conductor


Goedemorgen, vandaag heb ik een kaartje gemaakt voor de Tiddly Thursday Throwback. Hierbij laten de verschillende design team leden iedere week een wat oudere Tiddly Inks stempel zien. Deze week was ik aan de beurt en ik heb een kaartje gemaakt met de afbeelding The conductor van Tiddly Inks. Deze afbeelding doet me heel erg aan mijn kleine neefje Menno denken, die heel graag met zijn treintje speelt. Ik heb alvast een kaartje gemaakt voor zijn tweede verjaardag, hoewel die pas in november is. Ben ik in ieder geval niet te laat. ;) Ik heb de afbeelding ingekleurd met mijn potloden en de zwarte glaze pen. Daarna heb ik de afbeelding uitgeknipt. Met de silhouette heb ik een train rails uitgesneden, die natuurlijk perfect bij de afbeelding past. Ik heb hiervoor de train tracks set gebruikt. Het spoor heb ik met lijmspray opgeplakt. De tekst heb ik gemaakt met het Moxie alfabet van quickutz. Op de rode letters heb ik kleine accentjes getekend met een witte gelpen.

Goodmorning, today I made a card for the Tiddly Thursday Throwback. Every week a memeber of the design team shows a card with an "older" Tiddly Inks image and this week it was my turn to make something. I decided to make a card with the image The conductor from Tiddly Inks. This image reminds me of my little cousin Menno, he loves to play with his little train. I made him a birthday card for his second birthday in november. This way I am certainly not too late with a card for him. ;) I have coloured the image with my pencils and the black glaze pen. Then I cut the image out. I have cut the train tracks with the silhouette. I used the Train tracks set for it. I have adhered the track with glue spray. I made the sentiment with the Moxie alphabet from quickutz. I added little accents on the letters with a white gelpen.

I want to enter my card in the following challenges:

*********************************************************************************
SILHOUETTE CUTTING FILE: Train tracks set
PAPER: Kraft paper and black cs
ACCESSORIES: Pencils, black glaze pen, white gelpen, moxie alphabet from quickutz, silhouette.

Sunday, 17 March 2013

Nog een ruimtekaart


Hallo, ik kon het niet laten om nog een kaartje te maken voor de Ruimte challenge van Casology. Deze afbeelding van de Digistamp boutique is er namelijk perfect voor. Dit is Spaceship Henry. Ik heb de afbeelding samen met de tekst op de kaart geprint. Ik heb het ruimteschip gepaperpieced met rood stippenpapier van het Red devil paperpack van Bazzil basics. Het ruimteschip heb ik nog een keer extra geprint en nadat ik de grijze delen had gekleurd en het raampje met Henry, heb ik deze allemaal uitgeknipt en op de afbeelding geplakt. Daarna heb ik op het raampje glossy accents aangebracht. Op de sterretjes heb ik stickles aangebracht. Als laatste heb ik met een zwarte fineliner een kader rondom de kaart getekend.

Hello. I had to make another card for the Extraterrestrial challenge from Casology. This image from the Digistamp boutique is so perfect for it. This is Spaceship Henry. I printed the image together with the sentiment on the card. I paperpieced the spaceship with red dotted paper from the Red devil paperpack from Bazzil basics. I printed the spaceship and after I had coloured all the silver parts with my pencils, I cut those all out and adhered them on the image. Then I applied glossy accents on the window. On the stars I applied stickles. I added a black frame around the card with a black pen.

I want to enter my card in the following challenges:


*********************************************************************************
IMAGE: Sapceship Henry from the Digistamp boutique
PAPER: White cs, Red devil paperpack from Bazzil basics
ACCESSORIES: Pencils, glossy accents, stickles, black pen.

Wednesday, 13 March 2013

Have a MONSTER of a birthday!


Hallo, vandaag heb ik een clean en simpel kaartje om te laten zien. Ik zag namelijk gisteren de nieuwe challenge van Casology and die hebben de challenges om Ruimtekaartjes te maken. Zo'n monster als deze woont volgens mij nergens op de aarde, dus dan moet ie wel uit de ruimte komen toch? ;) Het schattige monstertje is Lil monster's balloon van Annabelle stamps. Ik heb mijn monster volledig gepaperpieced met papiertjes uit het On the bright side paperpad van My mind's eye. UIt hetzelfde design papier heb ik nog 2 banners geknipt. De randen van de banners heb ik bewerkt met vintage photo distress inkt. Ik heb ze op de kaart geplakt. Onder de uiteindes heb ik geen plakband gedaan en deze heb ik een beetje omgekruld. Als laatste heb ik de tekst in de rechter bovenhoek geplakt.

Hello, today I have a clean and simple card to show. Yesterday I saw the new challenge from Casology and they want to see Extraterristrial cards this time. I don't a monster like the one on my card lives somewhere on earth, so he must be from outer space, don't you think so? ;) The cute monster is Lil monster's balloon from Annabelle stamps. I paperpieced the monster with design papers from the On the bright side paperpad from My mind's eye. I also cut two banners from the same design paper. I inked the edges of those banners with vintage photo distress ink and adhered them on the card. I didn't adhere the ends of the banners, because I wanted to curlo those up a bit. The last thing I did was adding the sentiment in the right upper corner.

I want to enter my card in the following challenges:


Friday, 25 January 2013

Stampfairy - Barry diet


Goedemorgen, vandaag is er weer een release van een nieuwe Stampfairy collectie, namelijk de Barry diet collectie. Ik heb Barry ingekleurd met mijn potloden en zijn neus en ogen heb ik gekleurd met een zwarte glaze pen. Daarna heb ik op de neus glossy accents aangebracht. Ik heb Barry uitgeknipt en met foamtape op de kaart geplakt. Op de kaart heb ik een laag blauw papicolor karton geplakt. Dit papier heb ik geëmbost met een embossingsfolder van de Hobbyvoordeel zaak. De tekst heb ik geprint. Naast de tekst heb ik blauwe hotfixsteentjes geplakt.

Goodmorning, today we have a release from a new Stampfairy collection, the Barry diet collection. I have coloured Barry with my pencils and his eyes and nose are coloured with a black glaze pen. Then I applied glossy accents on his nose. I have cut Barry out and adhered with foamtape on the card. I have added a layer of blue cardstock on my card. It is embossed with an embossingfolder from a dutch store. The sentiment is printed. I added a couple of blue hotfix gems next to it.


*********************************************************************************
IMAGE: Barry diet 1 from Stampfairy
PAPER: White, blue and black cs.
ACCESSORIES: Pencils, black glaze pen, white gelpen, glossy accents, embossingfolder, blue hotfix.

Monday, 21 January 2013

Nog een keer Ahoy matey


Goedemorgen, vandaag laat ik nog een kaartje zien dat ik heb gemaakt met het stempelsetje Ahoy matey van Clearly besotted. Ik schreef laatst bij mijn eerste kaartje al dat ik een bepaald idee voor een kaartje in mijn hoofd had, maar dat de uitwerking nog niet precies wilde worden zoals ik in gedachten had. Afgelopen weekend heb ik het nog eens geprobeerd en nu lukte het wel. :)
Voor dit kaartje heb ik het schip gestempeld met Rocket red ink van Brilliance en Midnight blue van Memories. Ik heb het schip daarna uitgeknipt met een randje wit rondom de afbeelding. Ik wilde het schip op golven plaatsen en toen kwam mijn moeder op het briljante idee om met de letter c deze golven te maken. Ze zijn meerdere malen getypt en daarna na wat knip en plakwerk onstonden deze golven. Ik heb ze midden op de voorkant van mijn kaart geprint. Daarna heb ik met de silhouette dit frame uit blauw karton gesneden. Met een witte gelpen heb ik stiklijntjes langs de randen van het frame aangebracht. De tekst is weer gestempeld met de blauwe inkt en die heb ik op een rode banner geplakt. Als laatste heb ik 3 felrode hotfix steentjes opgeplakt.

Goodmorning, today I showing you another card that I made with the stampset Ahoy matey from Clearly besotted. A few days ago when I posted this card I already wrote that I had an idea for a card in my head, but it didn't work out like I wanted it to work out. This weekend I had another try and this time it worked out. :)
For this card I stamped the ship with Rocket red ink from Brilliance and Midnight blue ink from Memories. I have cut the ship out with a little white border. I wanted to add some waves on my card and then my mum got the brilliant idea to make waves with the letter c. They are typed a couple of times and then with some editing these waves were made. I printed them on the front of my card. Then I used the silhouette to cut this frame from blue cardstock. I added faux stitching with a white gelpen. The sentiment is stamped with the blue ink and then I adhered it on a red banner. Then I added 3 red hotfix gems.

I want to enter my card in the following challenges:

*********************************************************************************
IMAGE: Ahoy matey from Clearly besotted
PAPER: White, red and blue cs 
INK: Rocket red from Brilliance and idnight blue from Memories
ACCESSORIES: White gelpen, red hotfix gems, silhouette.

Sunday, 13 January 2013

Clearly Besotted - Ahoy matey


Hallo! Vandaag laat ik een kaartje zien dat ik heb gemaakt met het stempelsetje Ahoy matey van Clearly besotted stamps. Toen ik aan het kaartje begon had ik een hele andere layout voor mijn kaartje in mijn hoofd, maar op de een of andere manier wilde dat maar niet leuk worden. :) Uiteindelijk is het dit kaartje geworden. 
Ik heb de stempel afgedrukt met bruine inkt. De kleur past erg goed bij het chocolate brownie karton van Elzybells (retired). Ik heb de afbeelding uitgesneden met de long deckled rectangles nestabilities. Onderaan heb ik de tekst gestempeld. Het ankertje heb ik met versamark inkt gestempeld en daarna geëmbost met witte embossingpoeder. Daarna heb ik het uitgeponst met een cirkelpons en toen heb ik de cirkel gekleurd met de bruine inkt. Ik heb bruin keukentouw (van Dille en kamille) rondom het rechthoek gebonden en daar bovenop heb ik het cirkeltje met de inkt geplakt.

Hello! Today I am showing you a card that I made with the stampset Ahoy matey from Clearly besotted stamps. When I started making this card, I had a different layout in my head, but that didn't work out like I wanted it to. :) So I ended up with this card. 
I stamped the image with brown ink. The colour really matched the chocolate brownie cardstock from Elzybells (retired). I have cut the image out with the long deckled rectangle nestabilities. I stamped the sentiment on the bottom of the rectangle. I stamped the anchor with versamark ink and then it was embossed with white embossignpowder. I punched it out with a circle punch and then I inked the circle with the brown ink. I wrapped brown bakers twine around the rectangle and adhered the circle on top of the knot.

*********************************************************************************
IMAGE: Ahoy matey from Clearly besotted
PAPER: Chocolate brownie from Elzybells (retired) and white cs
INK: Brown ink (no brand), versamark
ACCESSORIES: Circle punch, brown bakers twine from Dille en kamille (A dutch store), white embossingpowder, long deckled rectangles nestabilities.

Sunday, 4 November 2012

Hoera Menno 1 jaar!!!


Hallo! Vandaag ga ik de eerste verjaardag van mijn neefje Menno vieren. Eigenlijk is hij morgen jarig maar we vieren het vandaag al. En natuurlijk moest ik een kaartje maken voor de kleine man. Ik heb ervoor gekozen om een spinnerkaartje te maken, want ik denk dat hij dat wel heel erg interessant vindt. Nu maar hopen dat hij hem niet in zijn handen krijgt, anders heeft de kaart geen lang leven ben ik bang. ;)
Ik heb de kaart gemaakt met een stempelsetje van The alley way stamps. Het vliegtuigje komt uit het setje Priceless Joy. Ik heb de afbeelding gestempeld met versamark ink en daaroverheen zwarte versafine inkt. Zo kon ik de afbeelding goed embossen met clear embossingpoeder, zodat de randjes mooi gaan glimmen. Ik heb de afbeelding ingekleurd met mijn potloden en daarna heb ik de afbeelding  uitgeknipt. De wolkenachtergrond is een digitale stempel van Hero arts van de stempelset Silly scapes. Ik heb er zelf een stippenlucht van gemaakt. Ik heb de sleuf en het voorpaneel daarna met de silhouette uitgesneden. Op de voorkant van de kaart heb ik daarna een tekst geprint die precies door de sleuf komt. De tekst heb ik uitgesneden met de silhouette.


Hello! Today we are celebrating my cousin Menno's first birthday. His birthday is actually tomorrow, but we are celebrating it today. So I had to make a card for the little man.I decided to make a spinnercard, because I think he will find it very interesting. ;)
I made my card with a stampset from The alley way stamps. The little airplane is from the set Priceless joy. I stamped the image with versamark ink and then I used black versafine ink. That way I could embos the image with clear embossing powder to give it a nice shine. I coloured the image with my pencils and then I cut it out. The cloudy background is a digital stamp from Hero arts from the Silly scapes set. I added dots onto the sky. I cut the frontpanel and the slid with the silhouette. On the front of the card I printed the sentiment (hip hip hooray). The red letters are cut with the silhouette.


En hier is een fotootje van vorige week van de kleine man. 

And here is a picture of the little man.

*********************************************************************************
IMAGE: Priceless joy from The alley way stamps, silly scapes from Hero arts.
PAPER: White cs.
INK: Versafine onyx black, versamark ink.
ACCESSORIES: Pencils, silhouette, clear embossing powder

LinkWithin

Related Posts with Thumbnails